
Seat Leon >> Anti-theft wheel nuts
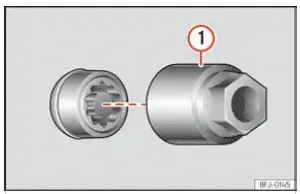
Fig. 251 Anti-theft wheel nut with cap and adapter.
Loosening the anti-theft wheel nut
- Remove the plastic wheel trim, decorative cover, or protective nut cap to access the security bolt head.
- Take the special anti-theft adapter key from the vehicle tool kit ››› Fig. 251 1 and slide it firmly into the patterned splines of the anti-theft wheel nut, pressing it down completely until securely engaged.
- Fit the factory wheel wrench fully onto the hex end of the adapter key.
- Unscrew and remove the anti-theft wheel nut.
Note Write down the unique code number stamped on the anti-theft adapter key and store it safely at home, rather than leaving it inside your Seat Leon. If the adapter key is misplaced or damaged, an exact replacement can be ordered through any SEAT Official Service dealer using this code.
Loosening wheel nuts
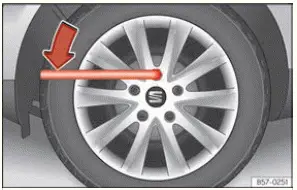
Fig. 252 Tyre change: loosen the wheel nuts.
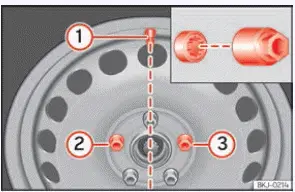
Fig. 253 Tyre change: tyre valve 1 and the correct position for the anti-theft wheel locking bolt 2 or 3.
Always use the factory-supplied wheel wrench included in your tool kit to break loose the wheel nuts.
Loosen each wheel nut by approximately one full turn counterclockwise while the car is still resting firmly on the ground, before placing and raising the jack.
If a wheel nut is stuck or overtightened, carefully apply downward foot pressure onto the outer end of the wrench arm to gain extra leverage.
Maintain your balance by holding onto the body of the vehicle so you do not slip while breaking the nut free.
Loosening wheel nuts
- Slide the box spanner socket completely over the nut head until it sits fully flush ››› Fig. 252.
- Grip the outer end of the wrench handle and turn the nut counterclockwise roughly one full turn.
Important information about wheel nuts
Factory rims and wheel nuts for your Seat Leon are specifically engineered to match as an integrated assembly. If you replace the stock wheels with alternative alloy or steel rims, you must install dedicated wheel nuts featuring the exact matching shank length and seat profile (spherical or conical head).
Using correct fastener hardware ensures that the wheels remain tightly clamped to the wheel hubs while preventing interference with braking components.
Due to subtle structural variations, you must not swap or use wheel nuts taken from other models, or even from different model years of the same vehicle line, without verifying exact specifications.
On wheels equipped with full plastic hubcaps, the anti-theft wheel locking bolt must be installed exclusively in bolt hole positions ››› Fig. 253 2 or 3, using the position of the tyre valve stem 1 as your visual reference point. Mounting the security bolt in any other hole will prevent the hubcap from snapping into place flat against the wheel.
WARNING Improperly torqued or incorrect wheel nuts can back off while the vehicle is in motion, leading to wheel separation, severe accidents, injuries, and sudden loss of steering control.
- Always use wheel nuts engineered specifically for the exact rim specification mounted on your Seat Leon.
- Never mix different types, lengths, or seat designs of wheel nuts on the same wheel.
- Keep all wheel nut threads and hub mating surfaces clean and completely clear of dirt, rust, oil, or grease so bolts turn smoothly by hand.
- To loosen or tighten wheel nuts during a tyre change, rely only on the factory wheel wrench provided with your vehicle.
- Only crack the wheel nuts slightly open (about one turn) while the tyres are still on the ground before lifting the car with a jack to prevent the vehicle from shifting off the jack support.
- Never apply lubricant, grease, or anti-seize compounds to the wheel nuts or hub mounting threads. Fasteners coated with lubricant can work loose while driving, even if initially tightened to the specified torque setting.
- Never attempt to loosen or disassemble the structural bolts holding together multi-piece rims or decorative rim rings.
- Tightening wheel nuts below the recommended torque setting can cause the assembly to loosen during travel. Over-torquing can stretch wheel studs, strip hub threads, or crack the mounting holes on the wheel rim.
 Integral wheel trim
Fig. 249 Remove the wheel cover.
Full plastic wheel covers must be removed from steel wheels to expose the underlying wheel nuts before loosening them.
Removing
Extract the box spanner wren ...
 Raise the vehicle
Fig. 254 Jack position points.
Fig. 255 Crossbar: mounting the jack on the vehicle.
Position the jack from your vehicle tool kit on solid, level ground.
If the surface is soft or unst ...
See also:
Removing and installing sliding sunroof
adjustment control unit - J245-
Removing
Remove lighting elements and front control unit .
Loosen bolts -2-.
Remove the frame -1- in -the direction of arrow- out of the
moulded headliner.
Loosen bolts -2-.
...
