
Seat Leon >> Charging with direct current (DC)
Valid for: hybrid vehicles
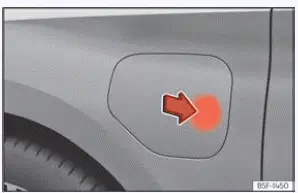
Fig. 59 Opening the charging socket cover.
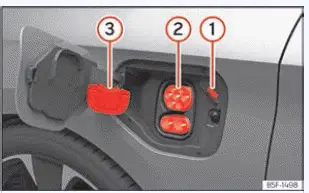
Fig. 60 Behind the battery charging cover on the
rear right-hand side.
- Charging process status display LED
- Direct current (DC) charging socket
- Protective terminal cap
During direct current fast charging, incoming alternating current from the electrical grid is converted into direct current externally by the charging station equipment. This enables a substantially higher charging power delivery compared to standard AC charging methods.
Public fast-charging station: The high-voltage traction battery of your Seat Leon can be replenished rapidly using direct current (DC) at a compatible high-power charging column, significantly reducing total waiting times.
Always ensure that any connected DC charging cable is kept to a total length of less than 30 meters.
Connecting the charging cable
- Unlock the vehicle doors using your key fob.
- Press firmly on the outer edge of the charging socket flap near the arrow indicator to swing the cover open ››› Fig. 59.
- Remove the protective rubber cap from the lower connection and hang it securely on the integrated hook ››› Fig. 60 3.
- Insert the heavy-duty DC charging connector from the charging station firmly into the vehicle charging socket ››› Fig. 60 2.
The heavy-duty plug locks securely into place automatically.
The LED status indicator (charging process display) integrated into the charging socket will begin pulsing or flashing white ››› Fig. 60 1.
Automatic start of charging
Activate the charging station via its user interface or screen terminal.
The high-power DC charging sequence will commence immediately.
The vast majority of public fast-charging stations require user identification and authentication before releasing electrical power. Verify that your payment or RFID authentication completes successfully; failure to authenticate properly can cause communication faults or prevent energy transfer.
During charging
While direct current flows into the traction battery, the charging process indicator LED on socket 1 flashes green in a steady rhythm ››› Fig. 60.
If the charging status indicator illuminates solid red during the session, a system error or connection fault has been detected.
Interrupting the charging process
An active DC fast-charging session can be manually terminated at any time before reaching your target state of charge:
- Tap the "Stop charging" soft-touch function button on the central Infotainment system touchscreen display. The charging status indicator located next to socket 1 will turn solid white ››› Fig. 60, and the DC charging connector will automatically unlock.
After charging
Once the battery has attained the requested state of charge, the charging process indicator light on the vehicle socket will illuminate solid green.
Upon completion of a DC fast-charge session, the heavy-duty charging connector unlocks automatically from the station if the "Release automatic connector" option is enabled within your infotainment charging configuration settings.
- Unplug the DC charging connector straight out of the vehicle socket.
- Reinstall the protective plastic cap back onto the lower connection port of the charging socket housing ››› Fig. 60 3.
- Close the outer battery charging flap firmly until you hear a clear, distinct click confirming mechanical latching.
NOTICE When operating public DC fast-charging stations, always read and strictly follow the operating guidelines, safety notices, and instructions provided by the charging station manufacturer.
 Charging with alternating current
(AC)
Valid for: hybrid vehicles
Fig. 57 Opening the charging socket cover.
Fig. 58 Behind the battery charging cover on the
front left-hand side: Charging socket
Charging process status displ ...
 Charging process display
Valid for: hybrid vehicles
Fig. 61 Behind the battery charging socket
cover: charging process indicator.
Fig. 62 On the inside face of the cover
of the battery charging socket: sticker with
i ...
See also:
Raise the vehicle
Fig. 254 Jack position points.
Fig. 255 Crossbar: mounting the jack on the vehicle.
Position the jack from your vehicle tool kit on solid, level ground.
If the surface is soft or unst ...
