Seat Leon >> Installing gearbox
Note Refer to procedure "Removing gearbox" for required special tools.
- All threaded holes into which self-locking bolts are to be screwed must be carefully cleaned of residual locking fluid using a thread chaser.
- Renew self-locking nuts and bolts after each removal.
- Check whether dowel sleeves for centring engine/gearbox have been fitted in cylinder block, install if necessary.
If dowel sleeves are not fitted, difficulties shifting gears, clutch problems and possible noises from the gearbox (rattling of gears which are not engaged) could occur.
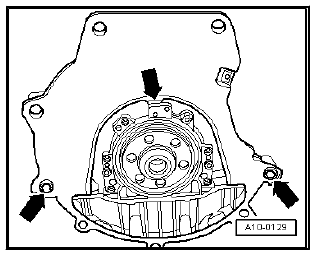
- Make sure that intermediate plate is engaged on sealing flange -top arrow- and fitted onto dowel sleeves -bottom arrows-.
- Clean splines of input shaft and apply a thin coat of grease for clutch plate splines - G 000 100- .
It must be possible to move the clutch plate from side to side on the input shaft.
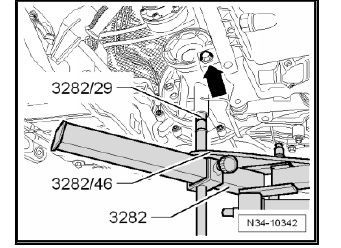
To install gearbox "0AH", set up gearbox support - 3282- with adjustment plate - 3282/46- .
- Insert gearbox support - 3282- in engine and gearbox jack - V.A.G 1383 A- .
- Fit adjustment plate - 3282/46- on gearbox support - 3282- (adjustment plate fits in only one position).
- Align arms of gearbox support according to holes in adjustment plate .
- Screw support elements into adjustment plate as illustrated.
- Place gearbox on engine and gearbox jack - V.A.G 1383 A- .
- Align adjustment plate and gearbox parallel to one another.
- Screw pin - 3282/29- into rear hole on gearbox for securing bolt of pendulum support.
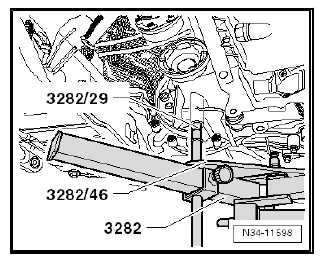
- Secure bolts - 3282/45- -arrow- to gearbox using a M 8 nut.
The bolts - 3282/45- should be flush below with the guide from the gearbox support - 3282- .
- Turn gearbox in the area of the differential upwards and in the area of the 5th gear downwards.
- Position engine and gearbox jack - V.A.G 1383 A- under vehicle.
Arrow on adjustment plate points in direction of vehicle travel.
- Raise gearbox carefully.
- 5th gear cover of gearbox faces front end.

Note Be careful of all lines when installing gearbox.
- Carefully push the engine forwards with the assistance of another mechanic.
- Then carefully guide gearbox and left-hand flange shaft -Bpast subframe and guide right-hand flange shaft -A- past clutch pressure plate.
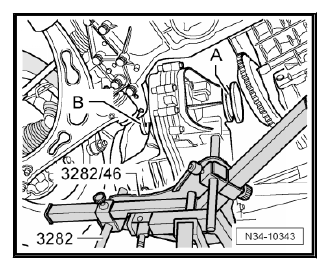
- Carefully guide gearbox with right-hand flange shaft -A- past flywheel, as shown.
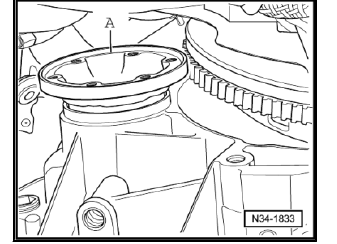
- Align gearbox in installation position to engine.
- Install gearbox, screw and tighten bolts above and below -arrow- of right-hand flange shaft.
- Screw and tighten the remaining bolts connecting gearbox to engine.
- After gearbox has been bolted to engine, remove engine and gearbox jack from gearbox.
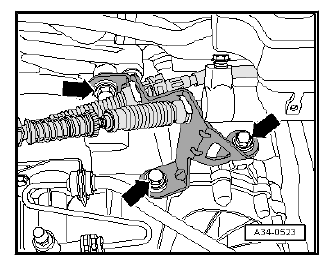
- Install gearbox support with new bolts -arrows 2-
- Align engine/gearbox assembly in installation position; to do so, tighten spindles of support bracket - 10 - 222 A- until gearbox support makes contact with gearbox mounting.
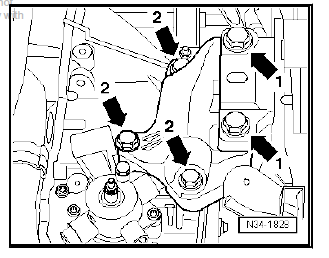
| Caution The threads in the gearbox support can be damaged if the bolts are not inserted straight.
|
- Screw in new bolts and tighten them -arrows 1-
- Install earth wire -arrow-.
| Caution Risk of accident.
|
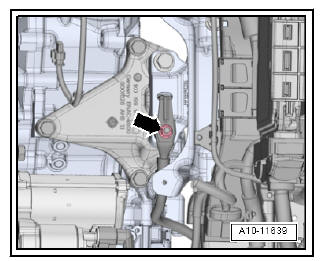
- Install pendulum support with new bolts.
- Check the settings of the mechanical components.
- Assemble exhaust system free of tension.
- Install drive shafts.
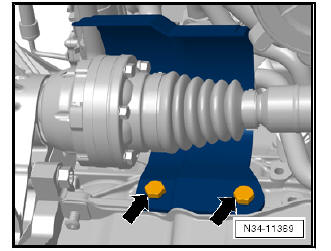
- Install heat shield for drive shaft, if present -arrows-.
- If present screw the indicator for the front vehicle level - G78- to the crossbeam.
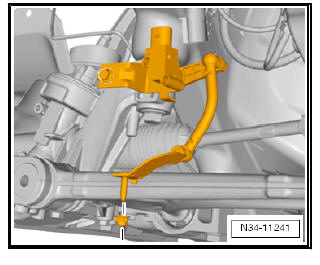
- Install coupling rod -3- to anti-roll bar -2- on both sides.
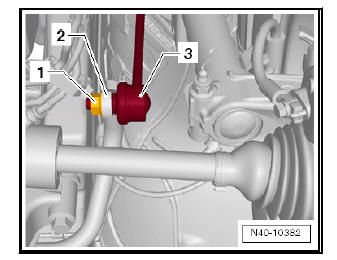
- Attach connector -1- to oil level and oil temperature sender - G266- .
- Ensure the braking system vacuum hose is positioned correctly.
If necessary install vacuum hose.

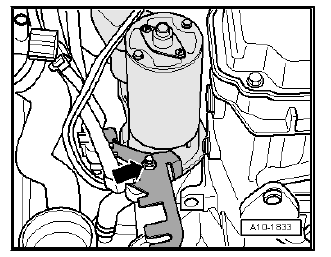
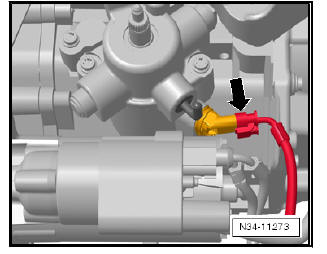
- Install starter and attach bracket for electrical wiring -Arrow-.
- Screw in upper engine/gearbox securing bolts and tighten them .
- Install clutch slave cylinder.
- Gearboxes for vehicles with start-stop system: join connector -arrow- to gearbox neutral position sender - G701- .
- Install cable support bracket on gearbox and tighten bolts -arrows-.
- Install gearbox selector lever -B-.
- Tighten hexagon nut -arrow 2- .
- Install relay lever -A- together with cable end-piece.
- Spread a small amount of grease on pin of gearbox selector lever -B-.

Allocate grease for selector mechanism using - Electronic parts catalogue (ETKA) .
- Attach gear selector cable to gearbox selector lever.
- Renew securing clip -arrow 1- each time after removing.
- Adjust selector mechanism,
- If the wiring for the air conditioning becomes disconnected, connect these carefully. Do not disconnect pipe/hose system.
- Install battery tray, battery and battery cover.
- Install engine cover and air filter.
- Install filler pipe for washer fluid reservoir of windscreen washer system.
- Check gear oil level.
- Remove the lower part of the front left-hand wheel housing shell .
- Install noise insulation.
- If an indicator for the front vehicle level - G78- is installed in the vehicle, the setting of the headlights must be checked .
 Removing gearbox
Special tools and workshop
equipment required
Support. - 10 - 222 A-
Shackle - 10 - 222 A /12-
Adapter for the engine bracket - 10 222A/18-
Square pipe - T40091/1- and connector - T40091/ ...
 Assembly mountings
Exploded view - assembly mountings
- Bolt
- Engine support
- Engine support.
- Bolt
- Bolt
- Bolt
- Support bracket
- Bolt
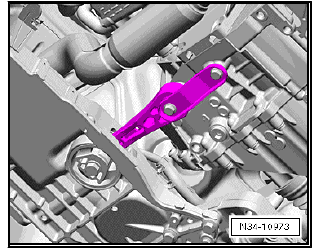
- Pendulum support
- Bolt
- Bolt
- Bolts
- Bolt ...
See also:
Rear seat bench
Fold down the seat back
Fig. 92 Folding the seat
backrests down
– Pull the release button on the backrest (sectioned backrest)
forwards in the direction of the arrow
– Fold down the backres ...
