Seat Leon >> Removing and installing infotainment system display
Infotainment system screen, installation and removal, versions without control unit 1 for information electronics - J794-
Special tools and workshop equipment required
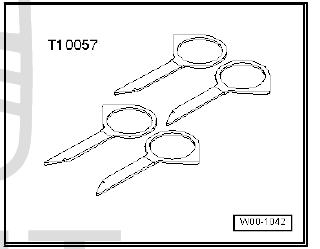
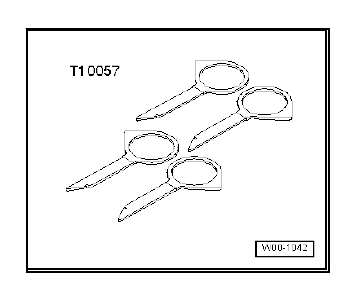
- Puller - T10057-

removing
- Switch off ignition and all electrical equipment.
Vehicles without access and start authorisation system
- Remove ignition key, if fitted.
Vehicles with access and start authorisation system
- Store ignition key outside the vehicle to prevent the ignition from being switched on unintentionally.
Continued for all vehicles
- Take the CD out of the Radio - R- .
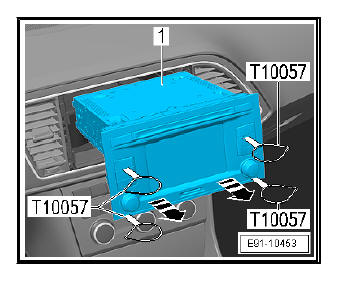
- Insert four pieces of the puller - T10057- into the unlocking slots on the radio - R- -1-, until they engage. The tips of the puller - T10057- point outwards.
- Pull the radio - R- -1- out of the dash panel at the eyelets of the puller - T10057- .
- Release plug connector of the radios - R- -1- and disconnect.
- Pull out the puller - T10057- by pressing on the release tabs of the radio - R- .

fitting
- Installation is carried out in the reverse order, noting the following:
- Attach all connectors.
- Push the radio - R- until it engages in the dash panel.
Infotainment system screen, installation and removal, versions with control unit 1 for information electronics - J794-
Special tools and workshop equipment required
- Puller - T10057-

removing
- Switch off ignition and all electrical equipment.
Vehicles without access and start authorisation system
- Remove ignition key, if fitted.
Vehicles with access and start authorisation system
- Store ignition key outside the vehicle to prevent the ignition from being switched on unintentionally.
Continued for all vehicles
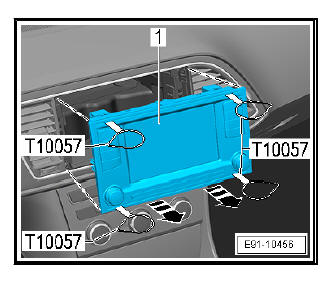
- Insert four clips of the puller - T10057- into the unlocking slots on the display unit for front information display and operating unit control unit - J685- -1- until they engage. The tips of the puller - T10057- point outwards.
- Remove the display unit for front information display and operating unit control unit - J685- -1- from the dash panel by pulling the eyes of the radio puller - T10057- .
- Release the connector of the display unit for front information display and operating unit control unit - J685- -1- and remove it.
- Press release tabs on display unit for front information display - T10057- and operating unit control unit and remove puller - J685- .

fitting
- Installation is carried out in the reverse order, noting the following:
- Attach all connectors.
- Push the display unit for front information display and operating unit control unit - J685- into the dash panel until it engages.
Removing and installing infotainment system display, versions with an 8" screen
removing
- Switch off ignition and all electrical equipment.
Vehicles without access and start authorisation system
- Remove ignition key, if fitted.
Vehicles with access and start authorisation system
- Store ignition key outside the vehicle to prevent the ignition from being switched on unintentionally.
Continued for all vehicles
- Remove the entire vents.
- Release the connector of the display unit for front information display and operating unit control unit - J685- and remove it.
- Using a screwdriver, press the unlocking slots of the display unit for control unit of the display and operating unit, information front - J685- -1-.

fitting
- Installation is carried out in the reverse order, noting the following:
- Attach all connectors.
- Push the display unit for front information display and operating unit control unit - J685- into the dash panel until it engages.
 Layout - infotainment system
Structure - Infotainment system, versions without control unit 1 for
information
electronics - J794-
- Telephone microphone -
R38- in front interior light - W1-
- Window aerial in rear wi ...
 Removing and installing control unit 1
for information electronics - J794-
Removing and installing control unit 1
for information electronics - J794-
Special tools and workshop equipment required
Puller - T10057-
removing
Switch off ignition and all electrical ...
See also:
Check vehicle key operation
Remove the keys from the key ring in order to check each
one's operation.
Place all the vehicle keys one by one in the ignition and start
the engine.
If after approximately 3 seconds the en ...
