Seat Leon >> Removing and installing warning buzzers for back parking assist H15
Removing and installing warning buzzers for back parking assist H15
Removing
- Switch off ignition and all electrical consumers.
Vehicles without access and start authorisation system
- Remove ignition key, if fitted.
Vehicles with access and start authorisation system
- Store the ignition key outside the vehicle to prevent the ignition from being switched on unintentionally.
Continued for all vehicles
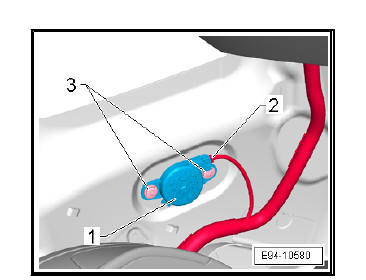
- Remove C-pillar cover .
- Remove the expanding clips -3-.
- Remove the warning buzzer for the rear parking aid -1- together with the expanding clips.
- Unplug the electrical connector -2-.
Installing
Installation takes place in reverse order.
Removing and installing warning buzzers for back parking assist H15, Leon SC
Removing
- Switch off ignition and all electrical consumers.
Vehicles without access and start authorisation system
- Remove ignition key, if fitted.
Vehicles with access and start authorisation system
- Store the ignition key outside the vehicle to prevent the ignition from being switched on unintentionally.
Continued for all vehicles
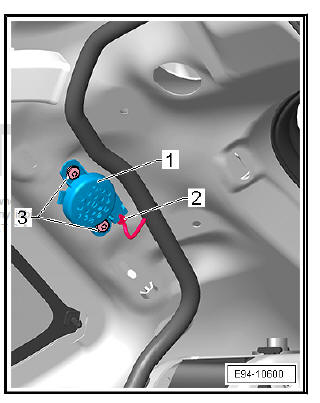
- Remove C-pillar cover .
- Unplug the electrical connector -2-.
- Remove the expanding clips -3-.
- Remove the warning buzzer for the rear parking aid -1- together with the expanding clips.
Installing
Installation takes place in reverse order.
Removing and installing warning buzzers for back parking assist H15, Leon ST
Removing
- Switch off ignition and all electrical consumers.
Vehicles without access and start authorisation system
- Remove ignition key, if fitted.
Vehicles with access and start authorisation system
- Store the ignition key outside the vehicle to prevent the ignition from being switched on unintentionally.
Continued for all vehicles
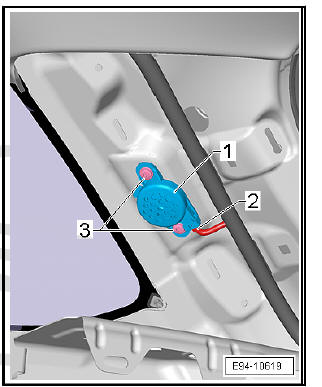
- Remove D-pillar cover .
- Unplug the electrical connector -2-.
- Remove the expanding clips -3-.
- Remove the warning buzzer for the rear parking aid -1- together with the expanding clips.
Installing
Installation takes place in reverse order.
 Removing and installing parking aid
J446
Removing and installing parking aid
J446
Removing and installing parking aid
J446
Removing
Switch off ignition and all electrical consumers.
Vehicles without access and start authorisation system
Remove ignition key, if fitted.
...
 Removing and installing front parking
aid senders
Removing and installing front parking
aid senders
Removing
Switch off ignition and all electrical consumers.
Vehicles without access and start authorisation system
Remove ignition key, if fitted.
Vehicles with access and start authorisa ...
See also:
The structure of this manual
Before reading this manual it must be understood
This manual describes the vehicle equipment at the time of publication.
Some of the equipment described here will not be available until a later da ...
