Seat Leon >> Removing and installing parking aid J446
Removing and installing parking aid J446
Removing
- Switch off ignition and all electrical consumers.
Vehicles without access and start authorisation system
- Remove ignition key, if fitted.
Vehicles with access and start authorisation system
- Store the ignition key outside the vehicle to prevent the ignition from being switched on unintentionally.
Continued for all vehicles
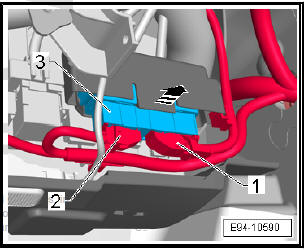
- Depending on the configuration, remove the knee airbag on driver's side.
- Remove footwell vent on driver's side.
- Disconnect the electrical plugs -1 and 2- , press the safety catch, turn the retention bracket and remove the plug.
- Disengage retaining tab -arrow- and remove control unit -3- downwards from retainer.
Installing
Installation takes place in reverse order.
Remove and install the control unit holder for - J446- the parking assist
Special tools and workshop equipment required
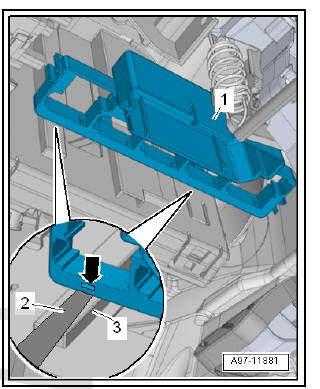
- Gauge
Removing
- With the ignition switched off, disconnect battery earth cable.
- Remove control unit for parking aid - J446- .
- Remove fuse holder C and move to one side.
- Insert a 0.9 mm feeler -2- behind the opening -Arrow- as shown in the illustration.
- Remove bracket -1- downwards from bracket for onboard supply control unit -3-.
Installing
Installation takes place in reverse order.
Removing and installing warning buzzers for front parking assist H22
Removing
- Switch off ignition and all electrical consumers.
Vehicles without access and start authorisation system
- Remove ignition key, if fitted.
Vehicles with access and start authorisation system
- Store the ignition key outside the vehicle to prevent the ignition from being switched on unintentionally.
Continued for all vehicles
- Depending on the configuration, remove the knee airbag on driver's side .
- Remove footwell vent on driver's side .
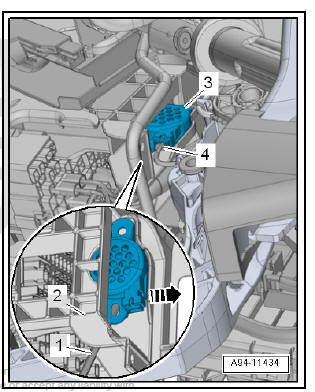
- Release the front parking aid warning buzzer - H22- -3- from its mount -1- using a narrow screwdriver -2- -arrow-.
- Detach the front parking aid warning buzzer - H22- .
- Unplug the electrical connector -4-.
Installing
Installation takes place in reverse order.
 Parking aid
Assembly overview - parking aid
- Front left parking aid sender
- G255-
Removal and installation
- Front centre left parking aid
sender - G254-
Removal and installation
...
 Removing and installing warning buzzers
for back parking assist H15
Removing and installing warning buzzers
for back parking assist H15
Removing and installing warning buzzers
for back parking assist H15
Removing
Switch off ignition and all electrical consumers.
Vehicles without access and start authorisation system
Remov ...
See also:
Reversing camera system
Layout - reversing camera system
The reversing camera supports the driver during reversing by
providing the driver with an image of the traffic situation behind
the vehicle on the radio/navigation ...
