Seat Leon >> Dimensions - lettering and emblems on rear lid
Dimensions: Emblem "Leon" in the tailgate (2 and 4-door models)
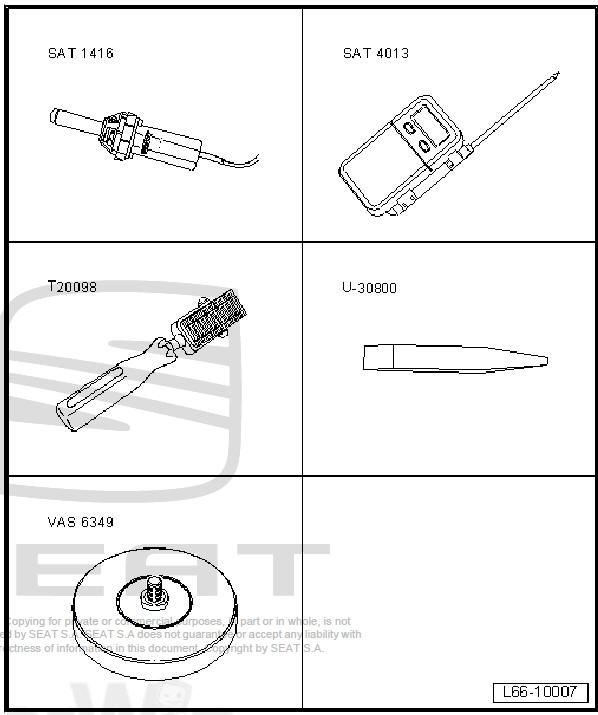
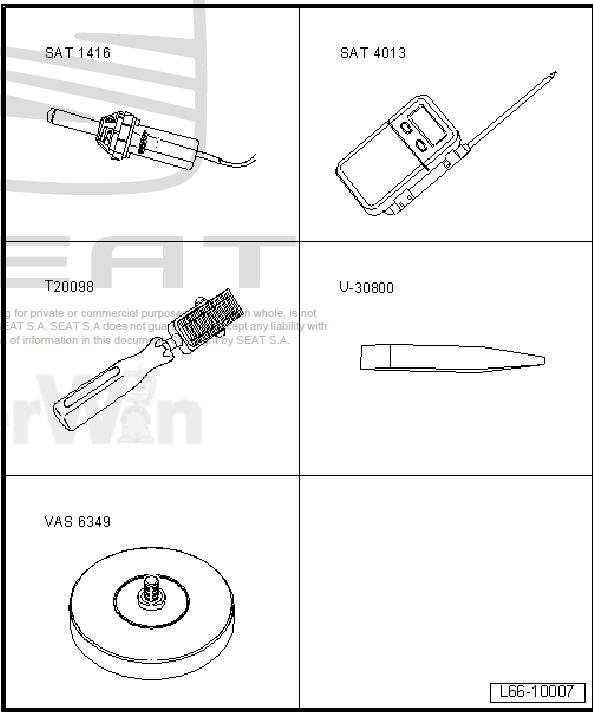
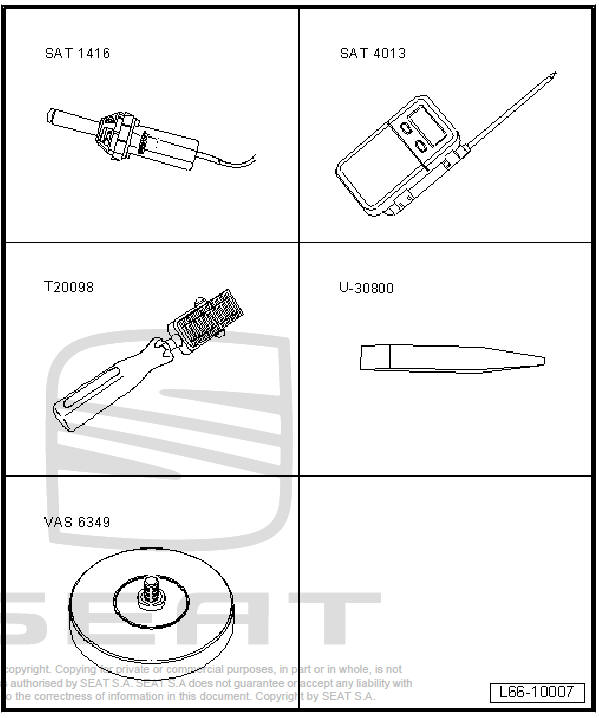
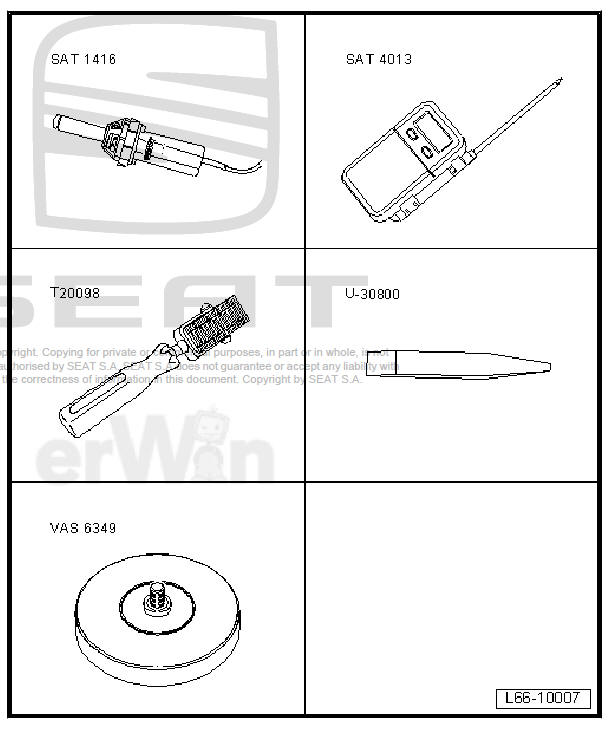
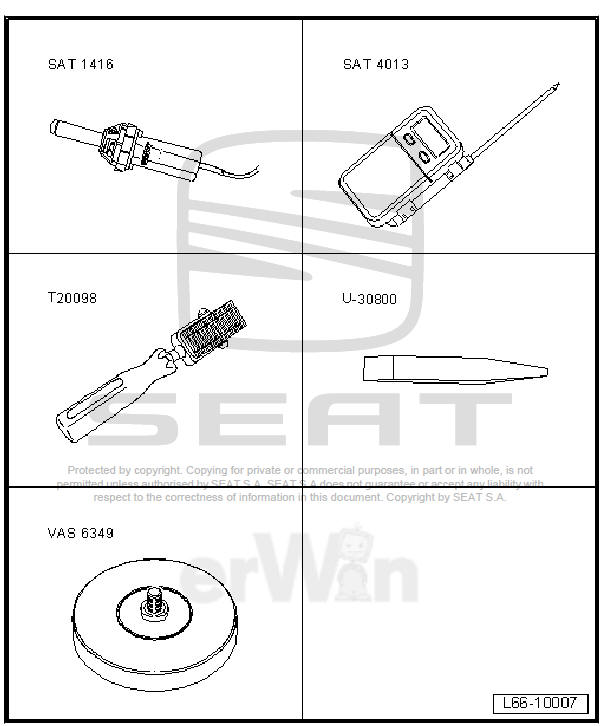
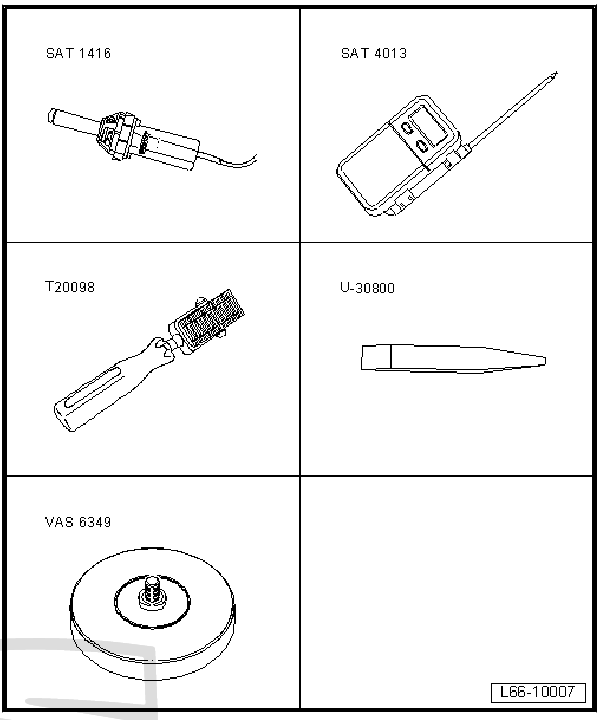
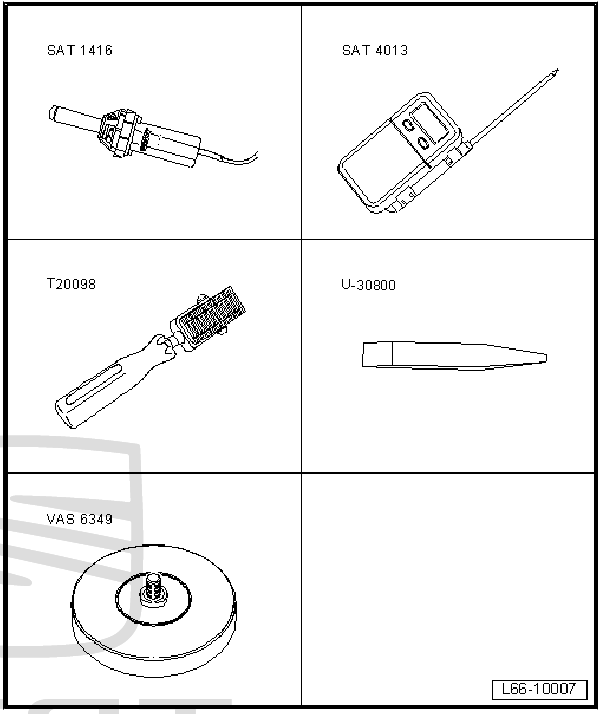
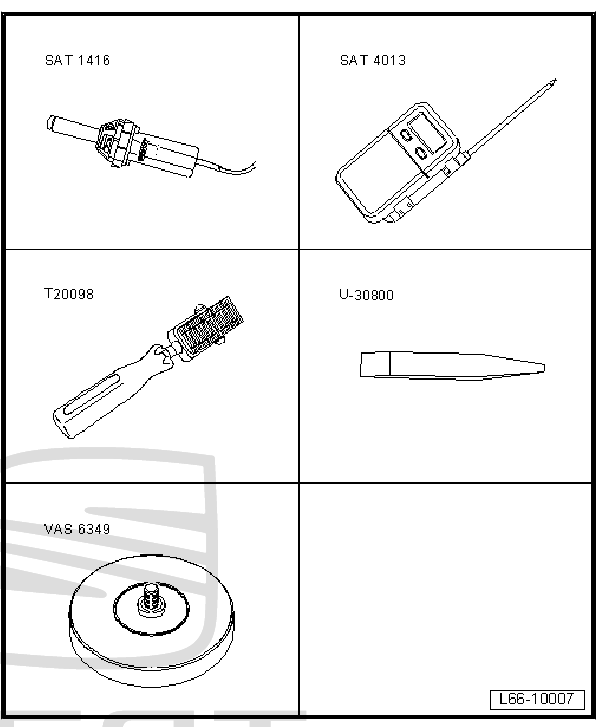
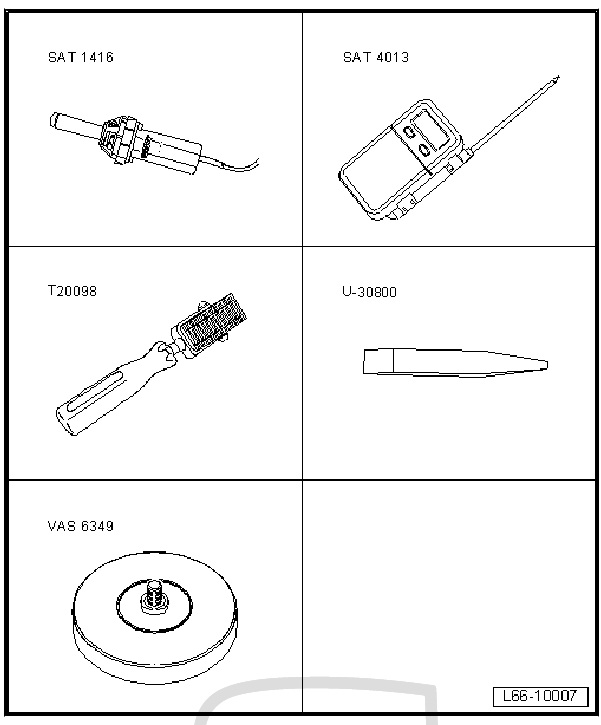
Special tools and workshop equipment required
- Hot-air blower - SAT 1416-
- Digital thermometer - SAT 4013-
- Thrust piece - T20098-
- Release lever - U 30800-
- Adhesive strip remover - VAS 6349-
Removing
- Heat the self-adhesive emblem to approx. 25ºC with the hot air blower - SAT 1416- .
- Unfasten the emblem with the help of the lever - U 30800- .
- Remove possible residual adhesive with the tool - VAS 6349- .
fitting
Note
- Do not remove the protective film of the self-adhesive emblem until the assembly work on the vehicle has been completed.
- If the emblem is installed for the first time on a new vehicle or on newly painted surfaces.
- The lettering must be bonded in place immediately after cleaning.
- Remove protective film just before the installation.
- Clean the area of the tailgate where the new self-adhesive badge is to be applied with isopropyl alcohol or heptanol.
- Then treat the area where the new self-adhesive company badge should be applied using silicone cleaner.
- Allow to dry well.
- Using the hot air blower - SAT 1416- , heat the application area on the bodywork to approx. 35ºC. Check the temperature using the digital thermometer - SAT 4013- .
- Remove the protective film -2- of the self-adhesive company emblem "LEON".
Note This illustration shows dimensions in millimetres.
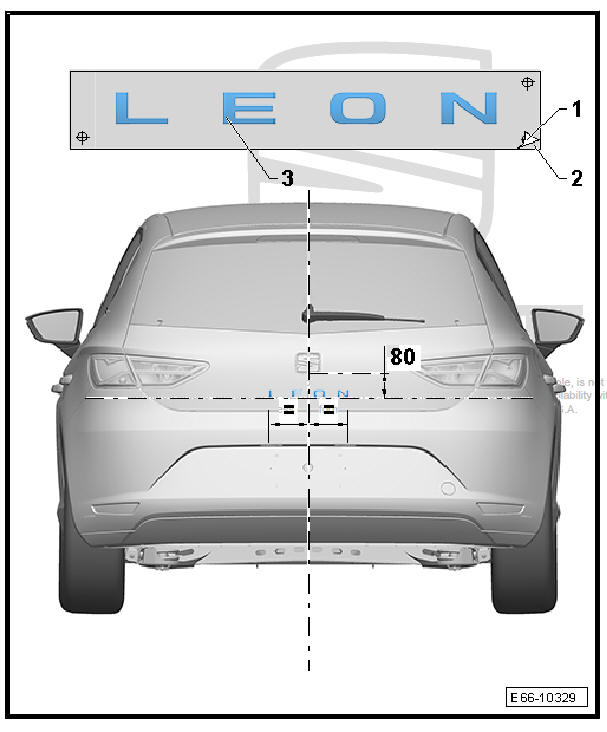
- Apply the new self-adhesive badge "LEON" according to the dimensions shown in the illustration.
- Apply the self-adhesive emblem -3- and press down with pressure tool - T20098- with force of approx 5 kg.
- Remove the protective film -1- of the self-adhesive emblem.
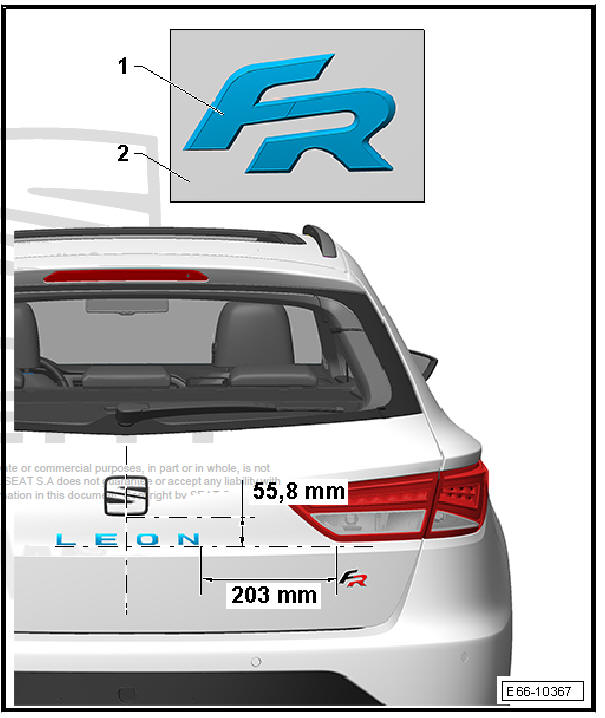
Dimensions: Emblem "FR" in the tailgate (2 and 4-door models)
Special tools and workshop equipment required
- Hot-air blower - SAT 1416-
- Digital thermometer - SAT 4013-
- Thrust piece - T20098-
- Release lever - U 30800-
- Adhesive strip remover - VAS 6349-
Removing
- Heat the self-adhesive emblem to approx. 25ºC with the hot air blower - SAT 1416- .
- Unfasten the emblem with the help of the lever - U 30800- .
- Remove possible residual adhesive with the tool - VAS 6349- .
fitting
Note
- Do not remove the protective film of the self-adhesive emblem until the assembly work on the vehicle has been completed.
- If the emblem is installed for the first time on a new vehicle or on newly painted surfaces.
- The lettering must be bonded in place immediately after cleaning.
- Remove protective film just before the installation.
- Clean the area of the tailgate where the new self-adhesive badge is to be applied with isopropyl alcohol or heptanol.
- Then treat the area where the new self-adhesive company badge should be applied using silicone cleaner.
- Allow to dry well.
- Using the hot air blower - SAT 1416- , heat the application area on the bodywork to approx. 35ºC . Check the temperature using the digital thermometer - SAT 4013- .
- Remove the protective film -2- of the self-adhesive emblem "FR".
Note This illustration shows dimensions in millimetres.
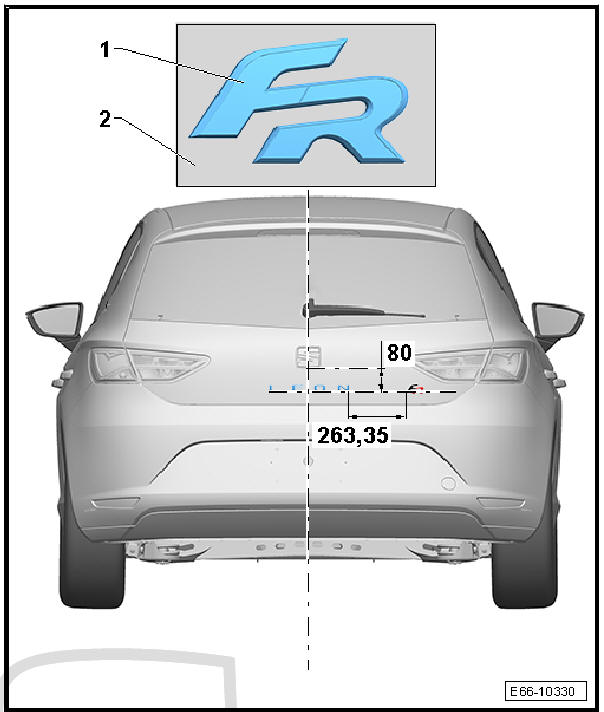
- Apply the new self-adhesive emblem "FR" -1- according to the dimensions shown in the figure.
- Attach the self-adhesive emblem "FR" -1- and press down with pressure tool - T20098- with force of approx 5 kg.
Dimensions: Emblem "CUPRA" in the tailgate (2 and 4-door models)
Special tools and workshop equipment required
- Hot-air blower - SAT 1416-
- Digital thermometer - SAT 4013-
- Thrust piece - T20098-
- Release lever - U 30800-
- Adhesive strip remover - VAS 6349-
Removing
- Heat the self-adhesive emblem to approx. 25ºC with the hot air blower - SAT 1416- .
- Unfasten the emblem with the help of the lever - U 30800- .
- Remove possible residual adhesive with the tool - VAS 6349- .
fitting
Note
- Do not remove the protective film of the self-adhesive emblem until the assembly work on the vehicle has been completed.
- If the emblem is installed for the first time on a new vehicle or on newly painted surfaces.
- The lettering must be bonded in place immediately after cleaning.
- Remove protective film just before the installation.
- Clean the area of the tailgate where the new self-adhesive badge is to be applied with isopropyl alcohol or heptanol.
- Then treat the area where the new self-adhesive company badge should be applied using silicone cleaner.
- Allow to dry well.
- Using the hot air blower - SAT 1416- , heat the application area on the bodywork to approx. 35ºC . Check the temperature using the digital thermometer - SAT 4013- .
Company badge "CUPRA"
- Remove the protective film -2- of the self-adhesive emblem "CUPRA".
Note This illustration shows dimensions in millimetres.
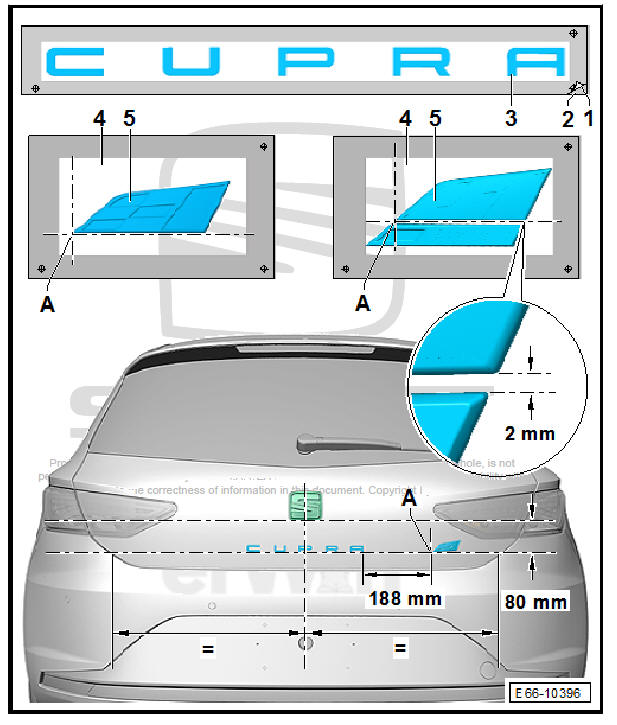
- Apply the new self-adhesive emblem "CUPRA" -3- according to the dimensions specified in the illustration.
- Attach the self-adhesive emblem "CUPRA" -3- and press down with pressure tool - T20098- with force of approx 5 kg.
- Remove the protective film -1- of the self-adhesive emblem.
Badge "CUPRA"
- Remove the protective film -4- of the self-adhesive emblem "CUPRA".
Note This illustration shows dimensions in millimetres.
- Apply the new self-adhesive emblem "CUPRA" -5- according to the dimensions specified in the illustration.
- Attach the self-adhesive emblem "CUPRA" -5- and press down with pressure tool - T20098- with force of approx 5 kg.
Dimensions: Emblem "Ecomotive" in the tailgate (2 and 4-door models)
Special tools and workshop equipment required
- Hot-air blower - SAT 1416-
- Digital thermometer - SAT 4013-
- Thrust piece - T20098-
- Release lever - U 30800-
- Adhesive strip remover - VAS 6349-

Removing
- Heat the self-adhesive emblem to approx. 25ºC with the hot air blower - SAT 1416- .
- Unfasten the emblem with the help of the lever - U 30800- .
- Remove possible residual adhesive with the tool - VAS 6349- .
fitting
Note
- Do not remove the protective film of the self-adhesive emblem until the assembly work on the vehicle has been completed.
- If the emblem is installed for the first time on a new vehicle or on newly painted surfaces.
- The lettering must be bonded in place immediately after cleaning.
- Remove protective film just before the installation.
- Clean the area of the tailgate where the new self-adhesive badge is to be applied with isopropyl alcohol or heptanol.
- Then treat the area where the new self-adhesive company badge should be applied using silicone cleaner.
- Allow to dry well.
- Using the hot air blower - SAT 1416- , heat the application area on the bodywork to approx. 35ºC . Check the temperature using the digital thermometer - SAT 4013- .
- Remove the protective film -2- from the new self-adhesive "Ecomotive" company badge.
Note This illustration shows dimensions in millimetres.
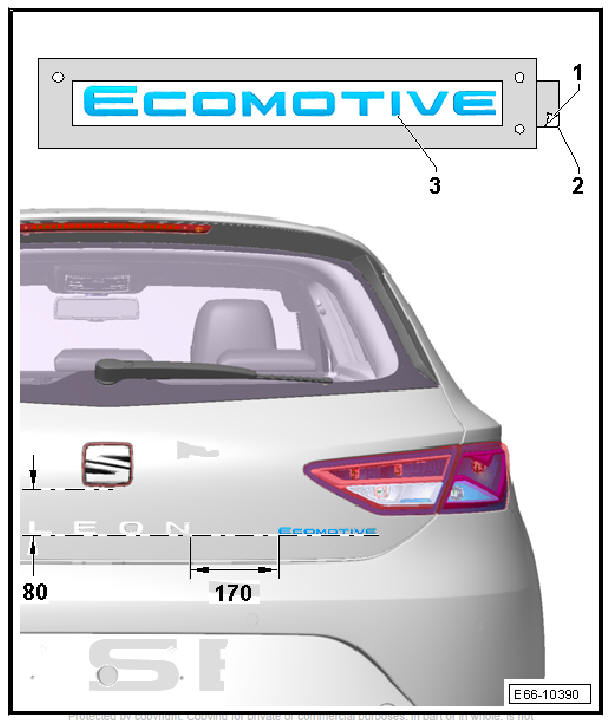
- Apply the new self-adhesive badge "Ecomotive" according to the dimensions shown in the illustration.
- Apply the self-adhesive emblem -3- and press down with pressure tool - T20098- with force of approx 5 kg.
- Remove the protective film -1- of the self-adhesive emblem.
Dimensions: Emblem "TGI" in the tailgate (2 and 4-door models)
Special tools and workshop equipment required
- Hot-air blower - SAT 1416-
- Digital thermometer - SAT 4013-
- Thrust piece - T20098-
- Release lever - U 30800-
- Adhesive strip remover - VAS 6349-
Removing
- Heat the self-adhesive emblem to approx. 25ºC with the hot air blower - SAT 1416- .
- Unfasten the emblem with the help of the lever - U 30800- .
- Remove possible residual adhesive with the tool - VAS 6349- .
fitting
Note
- Do not remove the protective film of the self-adhesive emblem until the assembly work on the vehicle has been completed.
- If the emblem is installed for the first time on a new vehicle or on newly painted surfaces.
- The lettering must be bonded in place immediately after cleaning.
- Remove protective film just before the installation.
- Clean the area of the tailgate where the new self-adhesive badge is to be applied with isopropyl alcohol or heptanol.
- Then treat the area where the new self-adhesive company badge should be applied using silicone cleaner.
- Allow to dry well.
- Using the hot air blower - SAT 1416- , heat the application area on the bodywork to approx. 35ºC . Check the temperature using the digital thermometer - SAT 4013- .
- Remove the protective film -2- of the self-adhesive company badge "TGI".
Note This illustration shows dimensions in millimetres.
- Apply the new self-adhesive badge "TGI" according to the dimensions shown in the illustration.
- Apply the self-adhesive emblem -3- and press down with pressure tool - T20098- with force of approx 5 kg.
- Remove the protective film -1- of the self-adhesive emblem.
Dimensions: Emblem "Leon" in the tailgate (ST model)
Special tools and workshop equipment required
- Hot-air blower - SAT 1416-
- Digital thermometer - SAT 4013-
- Thrust piece - T20098-
- Release lever - U 30800-
- Adhesive strip remover - VAS 6349-
Removing
- Heat the self-adhesive emblem to approx. 25ºC with the hot air blower - SAT 1416- .
- Unfasten the emblem with the help of the lever - U 30800- .
- Remove possible residual adhesive with the tool - VAS 6349- .
fitting
Note
- Do not remove the protective film of the self-adhesive emblem until the assembly work on the vehicle has been completed.
- If the emblem is installed for the first time on a new vehicle or on newly painted surfaces.
- The lettering must be bonded in place immediately after cleaning.
- Remove protective film just before the installation.
- Clean the area of the tailgate where the new self-adhesive badge is to be applied with isopropyl alcohol or heptanol.
- Then treat the area where the new self-adhesive company badge should be applied using silicone cleaner.
- Allow to dry well.
- Using the hot air blower - SAT 1416- , heat the application area on the bodywork to approx. 35ºC . Check the temperature using the digital thermometer - SAT 4013- .
- Remove the protective film -2- of the self-adhesive company emblem "LEON".
- Apply the new self-adhesive badge "LEON" according to the dimensions shown in the illustration.
- Apply the self-adhesive emblem -3- and press down with pressure tool - T20098- with force of approx 5 kg.
- Remove the protective film -1- of the self-adhesive emblem.
Dimensions: Emblem "FR" in the tailgate (ST model)
Special tools and workshop equipment required
- Hot-air blower - SAT 1416-
- Digital thermometer - SAT 4013-
- Thrust piece - T20098-
- Release lever - U 30800-
- Adhesive strip remover - VAS 6349-
Removing
- Heat the self-adhesive emblem to approx. 25ºC with the hot air blower - SAT 1416- .
- Unfasten the emblem with the help of the lever - U 30800- .
- Remove possible residual adhesive with the tool - VAS 6349- .
fitting
Note
- Do not remove the protective film of the self-adhesive emblem until the assembly work on the vehicle has been completed.
- If the emblem is installed for the first time on a new vehicle or on newly painted surfaces.
- The lettering must be bonded in place immediately after cleaning.
- Remove protective film just before the installation.
- Clean the area of the tailgate where the new self-adhesive badge is to be applied with isopropyl alcohol or heptanol.
- Then treat the area where the new self-adhesive company badge should be applied using silicone cleaner.
- Allow to dry well.
- Using the hot air blower - SAT 1416- , heat the application area on the bodywork to approx. 35ºC . Check the temperature using the digital thermometer - SAT 4013- .
- Remove the protective film -2- of the self-adhesive emblem "FR".
- Apply the new self-adhesive emblem "FR" -1- according to the dimensions shown in the figure.
- Attach the self-adhesive emblem "FR" -1- and press down with pressure tool - T20098- with force of approx 5 kg.
Dimensions: Emblem "Ecomotive" in the tailgate (ST model)
Special tools and workshop equipment required
- Hot-air blower - SAT 1416-
- Digital thermometer - SAT 4013-
- Thrust piece - T20098-
- Release lever - U 30800-
- Adhesive strip remover - VAS 6349-
Removing
- Heat the self-adhesive emblem to approx. 25ºC with the hot air blower - SAT 1416- .
- Unfasten the emblem with the help of the lever - U 30800- .
- Remove possible residual adhesive with the tool - VAS 6349- .
fitting
Note
- Do not remove the protective film of the self-adhesive emblem until the assembly work on the vehicle has been completed.
- If the emblem is installed for the first time on a new vehicle or on newly painted surfaces.
- The lettering must be bonded in place immediately after cleaning.
- Remove protective film just before the installation.
- Clean the area of the tailgate where the new self-adhesive badge is to be applied with isopropyl alcohol or heptanol.
- Then treat the area where the new self-adhesive company badge should be applied using silicone cleaner.
- Allow to dry well.
- Using the hot air blower - SAT 1416- , heat the application area on the bodywork to approx. 35ºC . Check the temperature using the digital thermometer - SAT 4013- .
- Remove the protective film -2- from the new self-adhesive "Ecomotive" company badge.

- Apply the new self-adhesive badge "Ecomotive" according to the dimensions shown in the illustration.
- Apply the self-adhesive emblem -3- and press down with pressure tool - T20098- with force of approx 5 kg.
- Remove the protective film -1- of the self-adhesive emblem.
Dimensions: Emblem "4Drive" in the tailgate (ST model)
Special tools and workshop equipment required
- Hot-air blower - SAT 1416-
- Digital thermometer - SAT 4013-
- Thrust piece - T20098-
- Release lever - U 30800-
- Adhesive strip remover - VAS 6349-
Removing
- Heat the self-adhesive emblem to approx. 25ºC with the hot air blower - SAT 1416- .
- Unfasten the emblem with the help of the lever - U 30800- .
- Remove possible residual adhesive with the tool - VAS 6349- .
fitting
Note
- Do not remove the protective film of the self-adhesive emblem until the assembly work on the vehicle has been completed.
- If the emblem is installed for the first time on a new vehicle or on newly painted surfaces.
- The lettering must be bonded in place immediately after cleaning.
- Remove protective film just before the installation.
- Clean the area of the tailgate where the new self-adhesive badge is to be applied with isopropyl alcohol or heptanol.
- Then treat the area where the new self-adhesive company badge should be applied using silicone cleaner.
- Allow to dry well.
- Using the hot air blower - SAT 1416- , heat the application area on the bodywork to approx. 35ºC . Check the temperature using the digital thermometer - SAT 4013- .
- Remove the protective film -2- of the self-adhesive company emblem "4Drive".
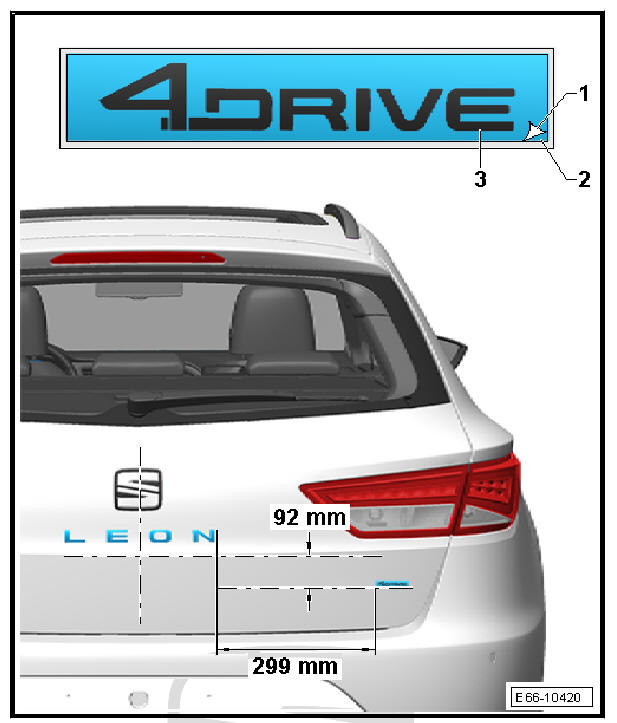
- Apply the new self-adhesive badge "4Drive" according to the dimensions shown in the illustration.
- Apply the self-adhesive emblem -3- and press down with pressure tool - T20098- with force of approx 5 kg.
- Remove the protective film -1- of the self-adhesive emblem.
Measurements: Emblem "X-PERIENCE" in the rear lid (ST model)
Special tools and workshop equipment required
- Hot-air blower - SAT 1416-
- Digital thermometer - SAT 4013-
- Thrust piece - T20098-
- Release lever - U 30800-
- Adhesive strip remover - VAS 6349-
Removing
- Heat the self-adhesive emblem to approx. 25ºC with the hot air blower - SAT 1416- .
- Unfasten the emblem with the help of the lever - U 30800- .
- Remove possible residual adhesive with the tool - VAS 6349- .
fitting
Note
- Do not remove the protective film of the self-adhesive emblem until the assembly work on the vehicle has been completed.
- If the emblem is installed for the first time on a new vehicle or on newly painted surfaces.
- The lettering must be bonded in place immediately after cleaning.
- Remove protective film just before the installation.
- Clean the area of the tailgate where the new self-adhesive badge is to be applied with isopropyl alcohol or heptanol.
- Then treat the area where the new self-adhesive company badge should be applied using silicone cleaner.
- Allow to dry well.
- Using the hot air blower - SAT 1416- , heat the application area on the bodywork to approx. 35ºC . Check the temperature using the digital thermometer - SAT 4013- .
- Remove the protective film -2- from the new self-adhesive company emblem "X-PERIENCE".
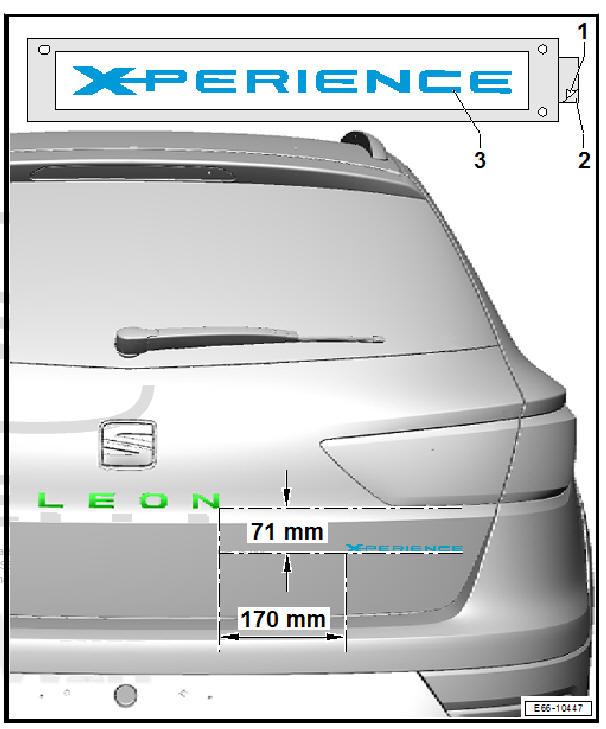
- Apply the new self-adhesive badge "X-PERIENCE" according to the dimensions shown in the illustration.
- Apply the self-adhesive emblem -3- and press down with pressure tool - T20098- with force of approx 5 kg.
- Remove the protective film -1- of the self-adhesive emblem.
Dimensions: Emblem "TGI" in the tailgate (ST model)
Special tools and workshop equipment required
- Hot-air blower - SAT 1416-
- Digital thermometer - SAT 4013-
- Thrust piece - T20098-
- Release lever - U 30800-
- Adhesive strip remover - VAS 6349-
Removing
- Heat the self-adhesive emblem to approx. 25ºC with the hot air blower - SAT 1416- .
- Unfasten the emblem with the help of the lever - U 30800- .
- Remove possible residual adhesive with the tool - VAS 6349- .
fitting
Note
- Do not remove the protective film of the self-adhesive emblem until the assembly work on the vehicle has been completed.
- If the emblem is installed for the first time on a new vehicle or on newly painted surfaces.
- The lettering must be bonded in place immediately after cleaning.
- Remove protective film just before the installation.
- Clean the area of the tailgate where the new self-adhesive badge is to be applied with isopropyl alcohol or heptanol.
- Then treat the area where the new self-adhesive company badge should be applied using silicone cleaner.
- Allow to dry well.
- Using the hot air blower - SAT 1416- , heat the application area on the bodywork to approx. 35ºC . Check the temperature using the digital thermometer - SAT 4013- .
- Remove the protective film -2- of the self-adhesive company badge "TGI".
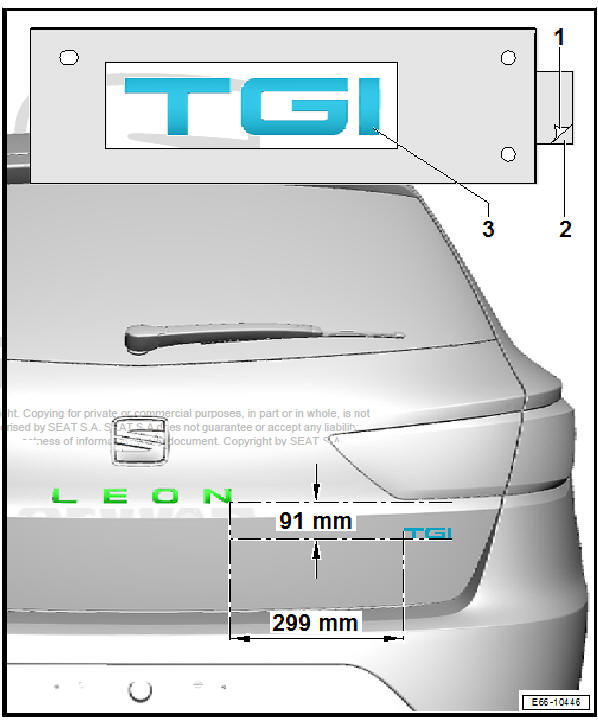
- Apply the new self-adhesive badge "TGI" according to the dimensions shown in the illustration.
- Apply the self-adhesive emblem -3- and press down with pressure tool - T20098- with force of approx 5 kg.
- Remove the protective film -1- of the self-adhesive emblem.
Dimensions: "CUPRA" emblem on the tailgate
Special tools and workshop equipment required
- Hot-air blower - SAT 1416-
- Digital thermometer - SAT 4013-
- Thrust piece - T20098-
- Release lever - U 30800-
- Adhesive strip remover - VAS 6349-
Removing
- Heat the self-adhesive emblem to approx. 25ºC with the hot air blower - SAT 1416- .
- Unfasten the emblem with the help of the lever - U 30800- .
- Remove possible residual adhesive with the tool - VAS 6349- .
fitting
Note
- Do not remove the protective film of the self-adhesive emblem until the assembly work on the vehicle has been completed.
- If the emblem is installed for the first time on a new vehicle or on newly painted surfaces.
- The lettering must be bonded in place immediately after cleaning.
- Remove protective film just before the installation.
- Clean the area of the tailgate where the new self-adhesive badge is to be applied with isopropyl alcohol or heptanol.
- Then treat the area where the new self-adhesive company badge should be applied using silicone cleaner.
- Allow to dry well.
- Using the hot air blower - SAT 1416- , heat the application area on the bodywork to approx. 35ºC . Check the temperature using the digital thermometer - SAT 4013- .
Company badge "CUPRA"
- Remove the protective film -2- of the self-adhesive emblem "CUPRA".
Note This illustration shows dimensions in millimetres.
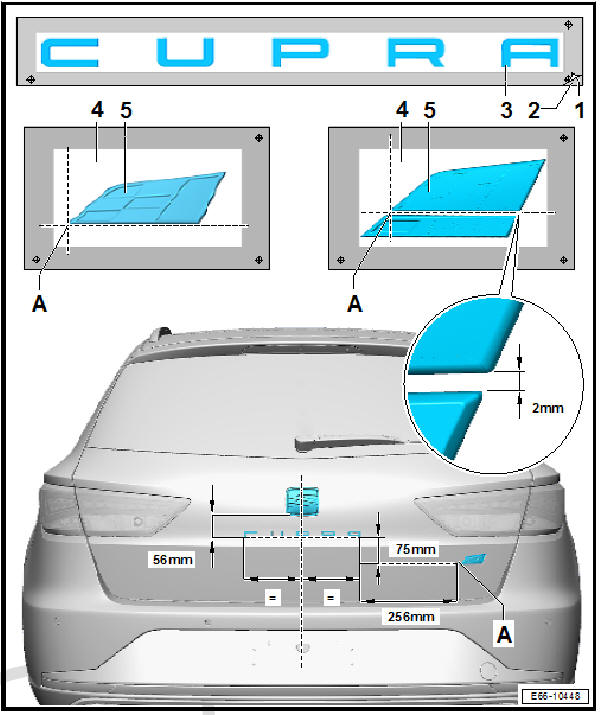
- Apply the new self-adhesive emblem "CUPRA" -3- according to the dimensions specified in the illustration.
- Attach the self-adhesive emblem "CUPRA" -3- and press down with pressure tool - T20098- with force of approx 5 kg.
- Remove the protective film -1- of the self-adhesive emblem.
Badge "CUPRA"
- Remove the protective film -4- of the self-adhesive emblem "CUPRA".
Note
This illustration shows dimensions in millimetres.
- Apply the new self-adhesive emblem "CUPRA" -5- according to the dimensions specified in the illustration.
- Attach the self-adhesive emblem "CUPRA" -5- and press down with pressure tool - T20098- with force of approx 5 kg.
 Model badges and brand emblems
Exploded view - Model badges and brand emblems
- Company emblem at front
Fitted to top grilled on
bumper trim panel
Secured to top grille on
bumper trim panel with
retaining clips ...
 Self-adhesive, side emblems (3 and 5-
door models): replacing
Self-adhesive, side emblems (3 and 5-
door models): replacing
Company badge "ITECH"
Special tools and workshop
equipment required
Hot-air blower - SAT 1416-
Digital thermometer - SAT
4013-
Thrust piece - T20098-
Release lever - U 30800-
Adhesive ...
See also:
Removing and installing upper transverse
link
Removing and installing upper transverse
link, front-wheel drive
Special tools and workshop equipment required
Torque wrenches - V.A.G 1332-
Removing
Remove rear wheel on affected side. ...
