Seat Leon >> Exploded view - underbody trim
SEAT Leon Service and Repair Manual / General body repairs, exterior / Exterior equipment / Underbody trim / Exploded view - underbody trim
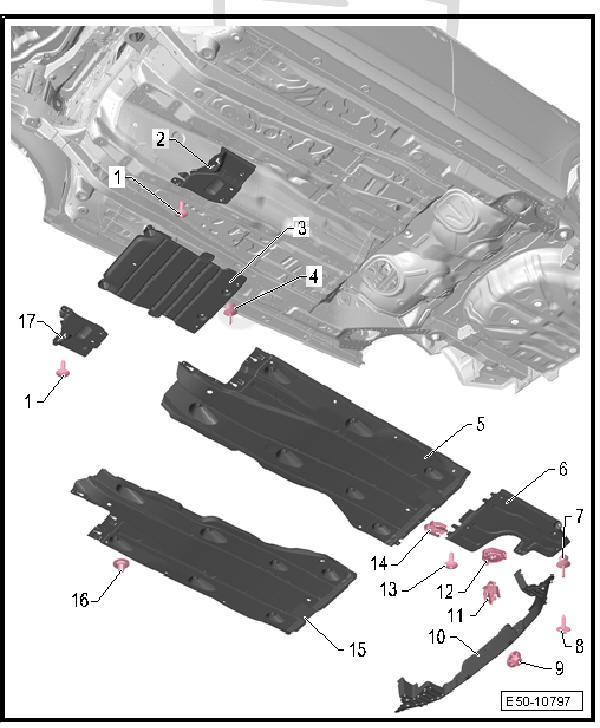
- - Bolt.
- 1 + 1 each
- 2 Nm
- - Guard for the window lifter
bracket
- Left-side
Removing
- Unscrew the screw and release the locking elements of the side at the rear.
- - Centre noise insulation, bottom
- Depending on version
Removing
- Take off the expanding catches
- - Expansion rivet
- 4 off
- - Left underbody protection
Removing
- Remove the guard for the window lifter bracket
- Unscrew hex. nuts
The nuts remain attached to the trim due to the fixing tabs.
- - Underbody trim in the area of the exhaust pipe
- Depending on version
Removing
- Remove the bolt
- Remove the expanding rivet
- Remove the fastening rings
- - Expansion rivet
- 1x
- - Bolt.
- 6 + 6 each
- - Nut
- 3 off
- Plastic material
- - Rear underbody protection
Removing
- Remove rear bumper cover
- Remove screws still inserted
- Unscrew the nuts
- - Quick locking nut
- 6 + 6 each
- - Retaining clip
- 1x
- Open with screwdriver
- Always replace.
- - Bolt.
- 1x
- - Quick locking nut
- 1x
- - Right underbody protection
Removing
- Remove the guard for the window lifter bracket
- Unscrew hexagonal nuts
The nuts remain attached to the trim due to the fixing tabs.
- - Nut
- 7 + 7 each
- Plastic material
- Integrated in the trim.
- - Guard for the window lifter bracket
- Right.
Removing
- Remove the screws
 Underbody trim
...
 Removing and installing underbody trim
Special tools and workshop equipment required
Torque wrench 2-10 Nm - VAG 1783-
Note
During removal and installation, take note of small amounts of differences
depending on the engine.
...
See also:
Removing and installing tailgate seal
Special tools and workshop equipment required
Thrust piece - T20098-
Removing
Open the tailgate.
Pull seal -1- off body flange.
arrow-: vulcanised connection of the seal.
fitting
...
