Seat Leon >> Exploded view of bumper cover
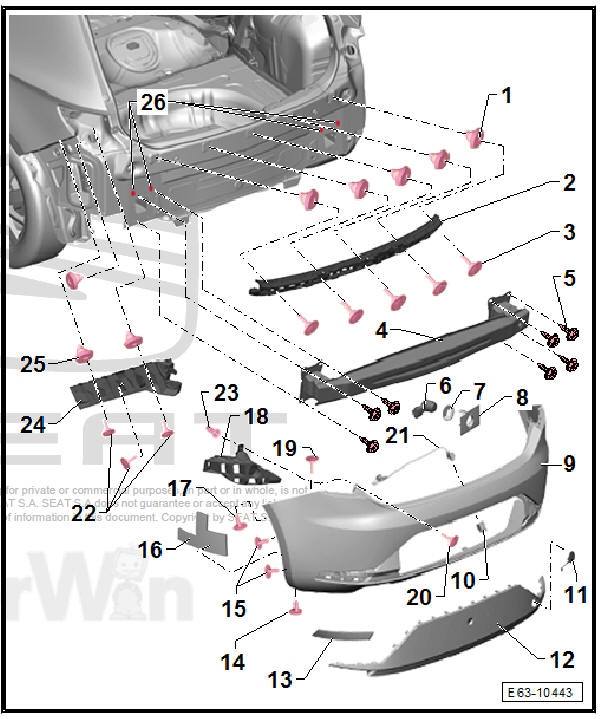
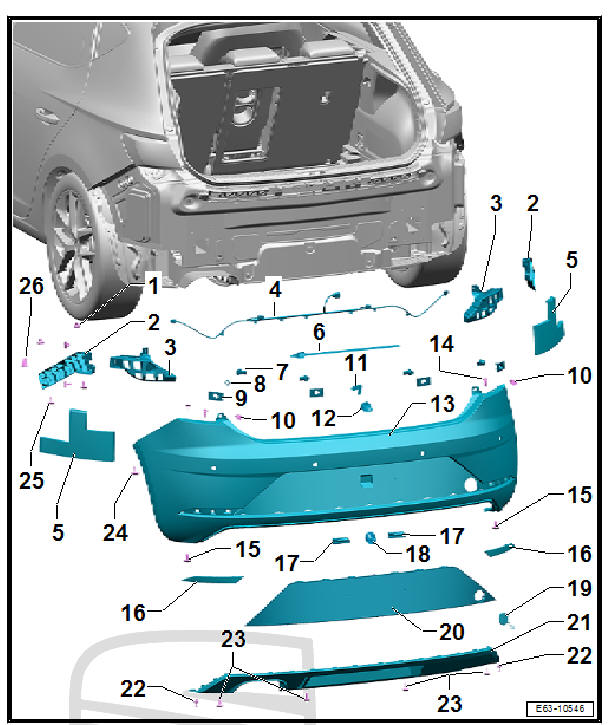
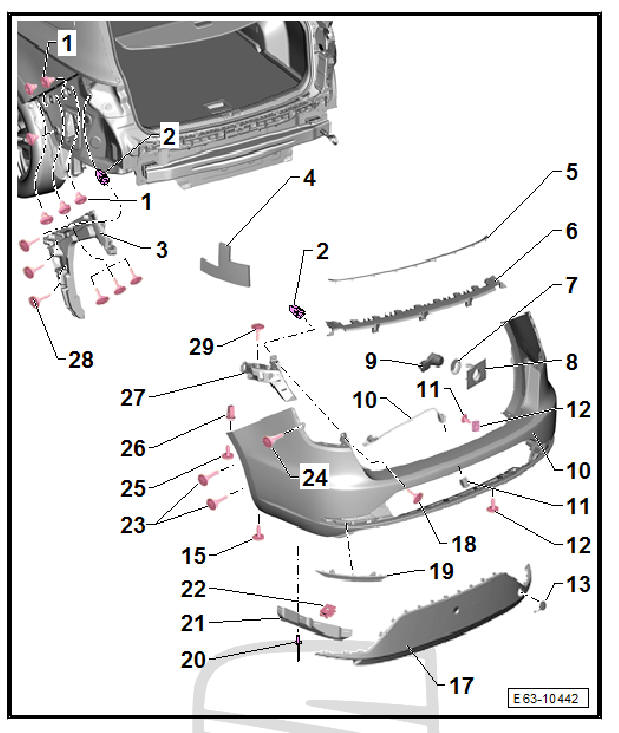
Rear bumper trim, three and five-door models: exploded view

- - Tight spreader block
- 5 off
| DANGER! Risk of ingress of exhaust fumes in the passenger compartment
|
- - Moulding attachment
- - Bolt.
- 5 off
- 2.5 Nm
- - Rear crossbeam
Removing
- Remove the bumper trim
- Remove screws -5-.
- Remove the rear cross member.
fitting
Fit in reverse order from removal, remembering the following:
- Ensure that cavity seal -28- is in place.
- - Bolt.
- 3 + 4 each
- 20 Nm
- - Sensor for rear steering parking aid
- - Sensor seal for the rear steering parking aid
- 4 off
- - Sensor holder for the rear steering parking aid
- 4 off
- - Quick locking nut
- - Rear view camera
- - Trailer hitch cover
- - Holder for rear view camera
- - Bumper trim
- Material: PP/EPDM
- - Lower spoiler (rear bumper):
Removing
- Remove the bumper trim.
- Clip the spoiler out of the bumper trim.
fitting
Installation is done in reverse order of removal operations.
- - Reflector
- Left and right.
- Remove using the lever - U30800-
- - Bolt.
- 3 + 3 each
- 2.5 Nm
- - Bolt.
- 2 + 2 each
- 2 Nm
- - Soundproofing sump
- 1 + 1 each
- - Bolt.
- 1 + 1 each
- 1.7 Nm
- - Support plate
- For bumper
- Fit into the guide profile -5- and into the securing strip -2-.
- - Bolt.
- 1 + 1 each
- 2.5 Nm
- - Clip
- With plastic screws
- Unscrew the screw to remove it
- - Guide profile
- Left-side
Removing
- Remove the bumper trim.
- Remove screws -24-.
- Remove the guide profile.
- Proceed in exactly the same manner to remove the guide profile on the other side.
fitting
Installation is done in reverse order of removal operations.
- - Bolt.
- 3 + 3 each
- 2.5 Nm
- - Bolt.
- 1 + 1
- 2 Nm
- - Tight spreader block
- 3 + 3 each
| DANGER! Risk of ingress of exhaust fumes in the passenger compartment
|
- - Spreader block
- 1 + 1 each
- - Cavity wax - AKR.308.SP5-
Note To prevent water penetration
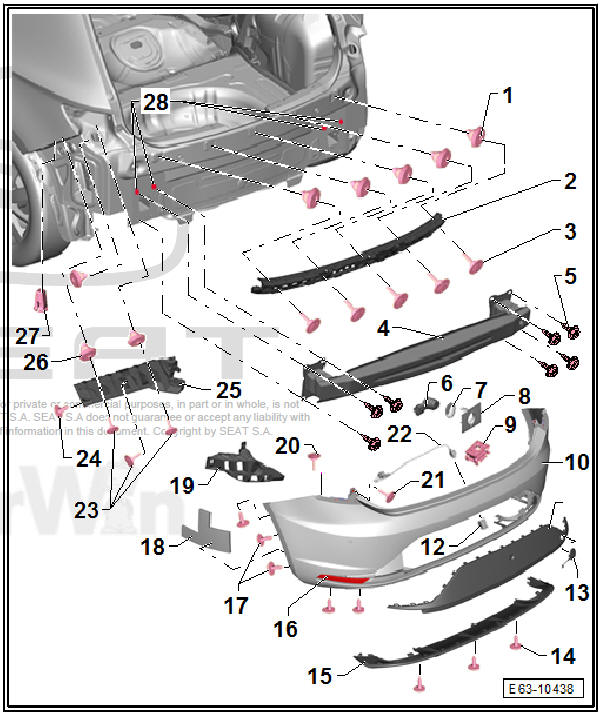
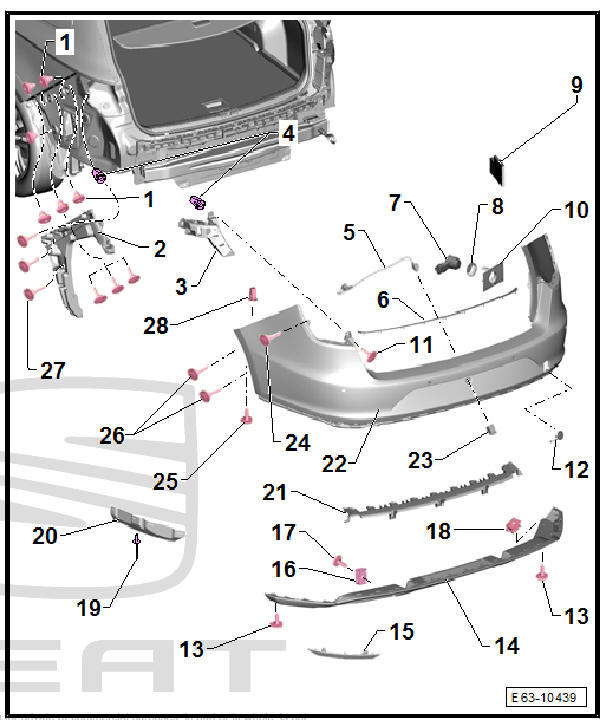
Rear bumper cover, version FR, 3 and 5 door: assembly overview
- - Tight spreader block
- 5 off
| DANGER! Risk of ingress of exhaust fumes in the passenger compartment
|
- - Moulding attachment
- - Bolt.
- 5 off
- 2.5 Nm
- - Rear crossbeam
Removing
- Remove the bumper trim.
- Remove screws -5-.
- Remove the rear cross member.
fitting
Fit in reverse order from removal, remembering the following:
- Ensure that cavity seal -26- is in place.
- - Bolt.
- 3 + 4 each
- 20 Nm
- - Sensor for rear steering parking aid
- - Sensor seal for the rear steering parking aid
- 4 off
- - Sensor holder for the rear steering parking aid
- 4 off
- - Bumper trim
- Material: PP/EPDM
- - Holder for rear view camera
- - Trailer hitch cover
- - Bumper cover
- - Reflector
- Left and right.
- Remove using the lever - U30800-
- - Bolt.
- 7 off
- 2.5 Nm
- - Bolt.
- 2 + 2 each
- 2.5 Nm
- - Soundproofing sump
- 1 + 1 each
- - Bolt.
- 1 + 1 each
- 2.5 Nm
- - Support plate
- For bumper
- Fit into the guide profile -22- and into the securing strip -2-.
- - Bolt.
- 1 + 1 each
- 2.5 Nm
- - Bolt.
- 1 + 1 each
- 2.5 Nm
- - Rear view camera
- - Bolt.
- 3 + 3 each
- 2.5 Nm
- - Spreader block
- 1 + 1 each
- - Guide profile
- Left-side
Removing
- Remove the bumper trim.
- Remove screws -23-.
- Remove the guide profile.
- Proceed in exactly the same manner to remove the guide profile on the other side.
fitting
Installation is done in reverse order of removal operations.
- - Tight spreader block
- 3 + 3 each
| DANGER! Risk of ingress of exhaust fumes in the passenger compartment
|
- - Cavity wax - AKR.308.SP5-
Note To prevent water penetration
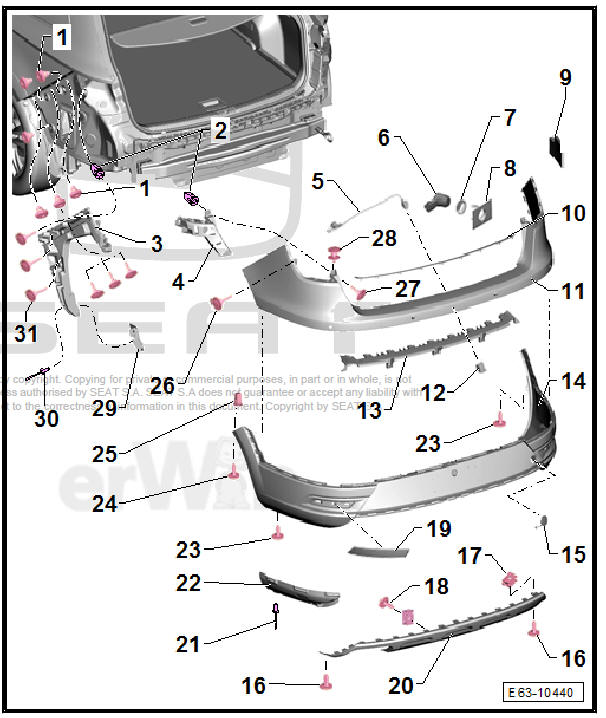
Rear bumper cover, version CUPRA, 3 and 5 door: assembly overview
- - Tight spreader block
- 5 off
| DANGER! Risk of ingress of exhaust fumes in the passenger compartment
|
- - Moulding attachment
- - Bolt.
- 5 off
- 2.5 Nm
- - Rear crossbeam
Removing
- Remove the bumper trim.
- Remove screws -5-.
- Remove the rear cross member.
fitting
Fit in reverse order from removal, remembering the following:
- Ensure that cavity seal -28- is in place.
- - Bolt.
- 3 + 4 each
- 20 Nm
- - Sensor for rear steering parking aid
- Removing and installing
- - Sensor seal for the rear steering parking aid
- 4 off
- - Sensor holder for the rear steering parking aid
- 4 off
- - Quick locking nut
- - Bumper trim
- Material: PP/EPDM
- - Bumper cover
- - Holder for rear view camera
- - Trailer hitch cover
- - Bolt.
- 7 off
- 2.5 Nm
- - Lower spoiler (rear bumper)
- - Reflector
- Left and right.
- Remove using the lever - U30800-
- - Bolt.
- 3 + 3 each
- 2.5 Nm
- - Soundproofing sump
- 1 + 1 each
- - Support plate
- - Bolt.
- 1 + 1 each
- 2.5 Nm
- - Bolt.
- 1 + 1 each
- 2.5 Nm
- - Rear view camera
- - Bolt.
- 3 + 3 each
- 2.5 Nm
- - Spreader block
- 1 + 1 each
- - Guide profile
- Left-side
Removing
- Remove the bumper trim.
- Remove screws -23-.
- Remove the guide profile.
- Proceed in exactly the same manner to remove the guide profile on the other side.
fitting
Installation is done in reverse order of removal operations.
- - Tight spreader block
- 3 + 3 each
| DANGER! Risk of ingress of exhaust fumes in the passenger compartment
|
- - Spreader block
- 1 + 1 each
- - Cavity wax - AKR.308.SP5-
Note To prevent water penetration.
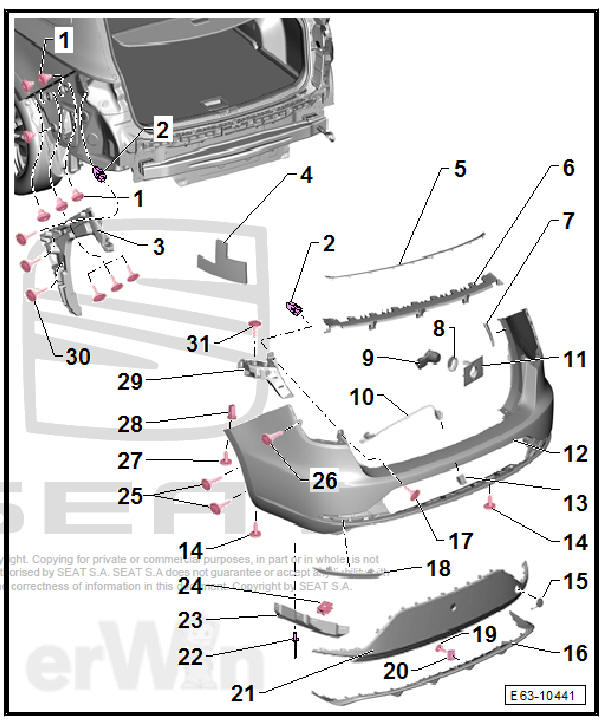
Rear bumper trim, CUPRA 2017 version - Assembly overview
- - Spreader block
- 1 + 1 each
- - Tight spreader block
- 3 + 3 each
| DANGER! Risk of ingress of exhaust fumes in the passenger compartment
|
- - Tight spreader block
- 5 off
| DANGER! Risk of ingress of exhaust fumes in the passenger compartment
|
- - Bolt.
- 4 + 4 each
- 2.5 Nm
- - Rear crossbeam
- - Moulding attachment
- - Bolt.
- 5 off
- 2.5 Nm
- - Wiring harness
- - Sensor holder for the rear steering parking aid
- 4 off
- - Sensor seal for the rear steering parking aid
- 4 off
- - Bumper trim
- Material: PP/EPDM
- - Clip
- 3 off
- - Number plate lights X4 / X5
- - Bumper cover
- - Trailer hitch cover
- - Bolt.
- 6 off
- 2.5 Nm
- - Lower spoiler (rear bumper)
- - Expansion rivet
- 1 + 1 each
- - Quick locking nut
- 6x
- - Reflector
- Left and right.
- Remove using the lever - 3409-
- - Holder for rear view camera
- - Bolt.
- 3 + 3 each
- 2 Nm
- - Rear wheel housing liner trim
- Connected to the inner side of the bumper trim with adhesive
- - Bolt
- 1 + 1 each
- 1.7 Nm
- - Bolt.
- 1 + 1 each
- 2.5 Nm
- - Bolt.
- 1 + 1 each
- 2.5 Nm
- - Rear view camera
- - Sensor for rear steering parking aid
- Removing and installing
- - Clip
- 1 + 1 each
- - Soundproofing sump
- 2 off
- - Bolt.
- 3 + 3 each
- 2.5 Nm
- - Guide profile
- - Support plate
- - Fixing block
- 1 + 1 each
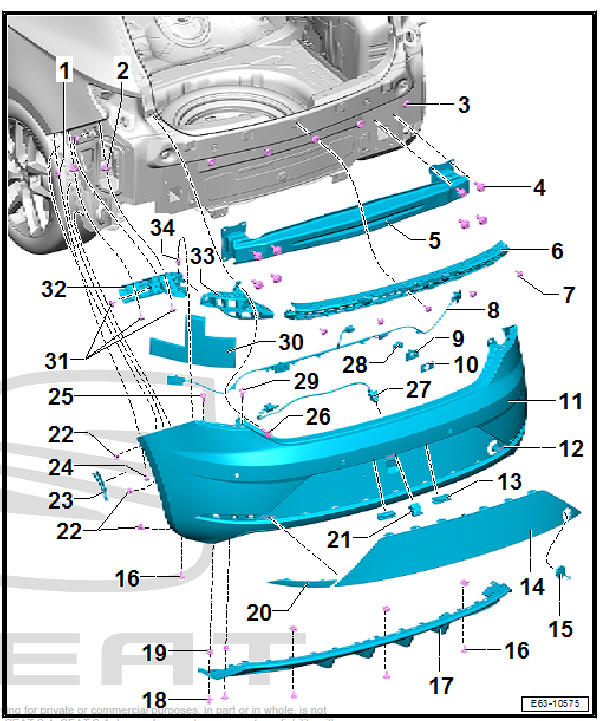
Rear bumper cover, version Leon 2017 - assembly overview
- - Bolt.
- 3 + 3 each
- 2.5 Nm
- - Wiring harness
- - Support plate
- - Soundproofing sump
- 2 off
- - Bolt.
- 1 + 1 each
- 2.5 Nm
- - Sensor seal for the rear
steering parking aid
- 4 off
- - Sensor holder for the rear
steering parking aid
- 4 off
- - Sensor for rear steering
parking aid
- Removing and installing
- - Rear view camera
- - Sealing cap
- - Bolt.
- 1 + 1 each
- 2.5 Nm
- - Trailer hitch cover
- - Number plate lights X4 / X5
- - Holder for rear view camera
- - Bumper trim
- Material: PP/EPDM
- - Reflector
- Left and right.
- Remove using the lever - U30800-
- - Clip
- 2 off
- - Bolt.
- 4 off
- 2.5 Nm
- - Lower spoiler (rear bumper)
- - Bolt.
- 1 + 1 each
- 1.7 Nm
- - Bolt.
- 1 + 1 each
- 2.5 Nm
- - Clip
- With plastic screws
- Unscrew the screw to remove it
- - Bolt.
- 3 + 3 each
- 2.5 Nm
- - Wiring harness
- - Guide profile
- - Tight spreader block
- 3 + 3 each
| DANGER! Risk of ingress of exhaust fumes in the passenger compartment
|
- - Spreader block
- 1 + 1 each
Rear bumper cover, version FR Leon 2017 - assembly overview
- - Tight spreader block
- 3 + 3 each
| DANGER! Risk of ingress of exhaust fumes in the passenger compartment
|
- - Guide profile
- - Support plate
- - Wiring harness
- - Soundproofing sump
- 2 off
- - Wiring harness
- - Sensor for rear steering
parking aid
- Removing and installing
- - Sensor seal for the rear
steering parking aid
- 4 off
- - Sensor holder for the rear steering parking aid
- 4 off
- - Bolt.
- 1 + 1 each
- 2.5 Nm
- - Sealing cap
- - Rear view camera
- - Bumper trim
- Material: PP/EPDM
- - Bolt
- 1 + 1 each
- 2.5 Nm
- - Bolt.
- 1 + 1 each
- 2.5 Nm
- - Reflector
- Left and right.
- Remove using the lever - U30800-
- - Number plate lights X4 / X5
- - Holder for rear view camera
- - Trailer hitch cover
- - Bumper cover
- - Lower spoiler (rear bumper)
- - Clip
- 2 off
- - Bolt.
- 4 off
- 2.5 Nm
- - Bolt.
- 1 + 1 each
- 1.7 Nm
- - Bolt.
- 3 + 3 each
- 2.5 Nm
- - Spreader block
- 1 + 1 each
Model ST rear bumper trim: exploded view
- - Tight spreader block
- 6 + 6 each
| DANGER! Risk of ingress of exhaust fumes in the passenger compartment
|
- - Guide profile
- Left-side
Removing
- Remove the bumper trim.
- Remove screws -27-.
- Remove the guide profile.
- Proceed in exactly the same manner to remove the guide profile on the other side.
fitting
Installation is done in reverse order of removal operations.
- - Support plate
- - Spreader block
- - Rear view camera
- - Moulding
- - Sensor for rear steering parking aid
- - Sensor seal for the rear steering parking aid
- 4 off
- - Soundproofing sump
- 1 + 1 each
- - Sensor holder for the rear steering parking aid
- 4 off
- - Bolt.
- 1 + 1 each
- 2.5 Nm
- - Trailer hitch cover
- - Bolt.
- 3 + 3 each
- 2 Nm
- - Lower spoiler (rear bumper):
- - Reflector
- 1 + 1
- Remove using the lever - 3409-
- - Quick locking nut
- - Bolt.
- 1 + 1 each
- 2.5 Nm
- - Quick locking nut
- - Rivet
- - Heat shield
- - Rear bumper cover reinforcement
- - Bumper trim
- Material: PP/EPDM
- - Holder for rear view camera
- - Bolt.
- 1 + 1 each
- 2.5 Nm
- - Bolt.
- 1 + 1 each
- 1.7 Nm
- - Bolt.
- 2 + 2 each
- 2 Nm
- - Bolt.
- 6 + 6 each
- 2.5 Nm
- - Spreader block
- 1 + 1 each
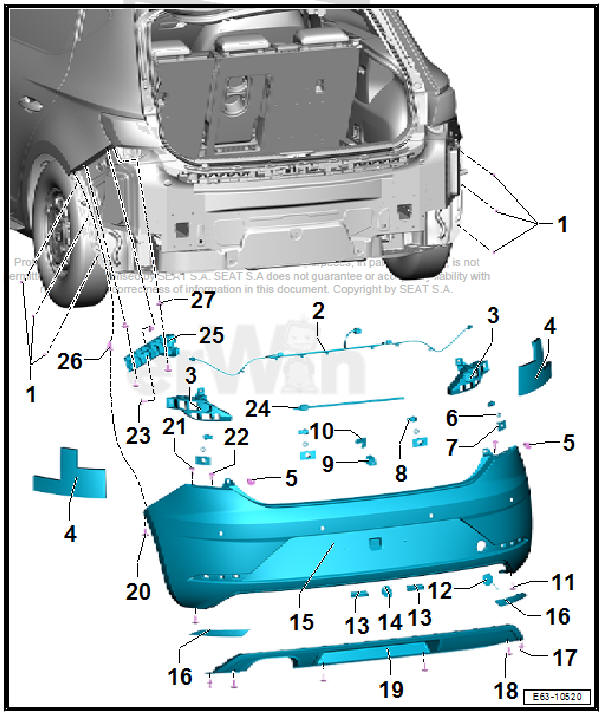
Rear bumper trim, X-PERIENCE model: Exploded view
- - Tight spreader block
- 6 + 6 each
| DANGER! Risk of ingress of exhaust fumes in the passenger compartment
|
- - Spreader block
- - Guide profile
- Left-side
Removing
- Remove the bumper trim
- Remove screws -31-.
- Remove the guide profile.
- Proceed in exactly the same manner to remove the guide profile on the other side.
fitting
Installation is done in reverse order of removal operations.
- - Support plate
- - Rear view camera
- - Sensor for rear steering parking aid
- - Sensor seal for the rear steering parking aid
- 4 off
- - Sensor holder for the rear steering parking aid
- 4 off
- - Soundproofing sump
- 1 + 1 each
- - Moulding
- - Top bumper trim
- Material: PP/EPDM
- - Holder for rear view camera
- - Rear bumper cover reinforcement
- - Lower bumper trim
- Material: PP/EPDM
- - Trailer hitch cover
- - Bolt.
- 3 + 3 each
- 2 Nm
- - Quick locking nut
- - Bolt.
- 1 + 1 each
- 2.5 Nm
- - Reflector
- 1 + 1
- Remove using the lever - 3409-
- - Lower spoiler (rear bumper)
- - Rivet
- - Heat shield
- - Bolt.
- 3 + 3 each
- 2 Nm
- - Bolt.
- 1 + 1 each
- 1.7 Nm
- - Spreader block
- 1 + 1 each
- - Bolt.
- 1 + 1 each
- 2.5 Nm
- - Bolt.
- 1 + 1 each
- 2.5 Nm
- - Bolt.
- 1 + 1 each
- 2.5 Nm
- - Heat shield
- - Rivet
- - Bolt.
- 6 + 6 each
- 2.5 Nm
Rear bumper trim, ST CUPRA model - exploded view
- - Tight spreader block
- 6 + 6 each
| DANGER! Risk of ingress of exhaust fumes in the passenger compartment
|
- - Spreader block
- - Guide profile
- Left-side
Removing
- Remove the bumper trim.
- Remove screws -30-.
- Remove the guide profile.
- Proceed in exactly the same manner to remove the guide profile on the other side.
fitting
Installation is done in reverse order of removal operations.
- - Soundproofing sump
- 1 + 1 each
- - Moulding
- - Rear bumper cover reinforcement
- - Wing extension
- - Sensor seal for the rear steering parking aid
- 4 off
- - Sensor for rear steering parking aid
- - Rear view camera
- - Sensor holder for the rear steering parking aid
- 4 off
- - Bumper trim
- Material: PP/EPDM
- - Holder for rear view camera
- - Bolt.
- 3 + 3 each
- 2 Nm
- - Trailer hitch cover
- - Lower spoiler (rear bumper):
- Removing and fitting
- - Bolt.
- 1 + 1 each
- 2.5 Nm
- - Reflector
- Left and right.
- Remove using the lever - 3409-
- - Bolt.
- 1 + 1 each
- 2.5 Nm
- - Quick locking nut
- - Bumper cover
- - Rivet
- - Heat shield
- - Quick locking nut
- - Bolt.
- 2 + 2 each
- 2 Nm
- - Bolt.
- 1 + 1 each
- 2.5 Nm
- - Bolt.
- 1 + 1 each
- 1.7 Nm
- - Spreader block
- 1 + 1 each
- - Support plate
- - Bolt.
- 6 + 6 each
- 2.5 Nm
- - Bolt.
- 1 + 1 each
- 2.5 Nm
Rear bumper trim, ST FR model - exploded view
- - Tight spreader block
- 6 + 6 each
| DANGER! Risk of ingress of exhaust fumes in the passenger compartment
|
- - Spreader block
- - Guide profile
- Left-side
Removing
- Remove the bumper trim.
- Remove screws -28-.
- Remove the guide profile.
- Proceed in exactly the same manner to remove the guide profile on the other side.
fitting
Installation is done in reverse order of removal operations.
- - Soundproofing sump
- 1 + 1 each
- - Moulding
- - Rear bumper cover reinforcement
- - Sensor seal for the rear steering parking aid
- 4 off
- - Sensor holder for the rear steering parking aid
- 4 off
- - Sensor for rear steering parking aid
- - Rear view camera
- - Bolt.
- 1 + 1 each
- 2.5 Nm
- - Quick locking nut
- - Bumper trim
- Material: PP/EPDM
- - Holder for rear view camera
- - Bolt.
- 3 + 3 each
- 2 Nm
- - Trailer hitch cover
- - Bumper cover
- - Bolt.
- 1 + 1 each
- 2.5 Nm
- - Reflector
- 1 + 1
- Remove using the lever - 3409-
- - Rivet
- - Heat shield
- - Quick locking nut
- - Bolt.
- 2 + 2 each
- 2 Nm
- - Bolt.
- 1 + 1 each
- 2.5 Nm
- - Bolt.
- 1 + 1 each
- 1.7 Nm
- - Spreader block
- 1 + 1 each
- - Support plate
- - Bolt.
- 6 + 6 each
- 2.5 Nm
- - Bolt.
- 1 + 1 each
- 2.5 Nm
 Rear bumper
...
 Exploded view - impact bar
Cross brace of the rear bumper cover, 3 and 5 door: assembly overview
- Cavity wax - AKR.308.SP5-
Note
To prevent water penetration
- Tight spreader block
5 off
DANGER ...
See also:
Overview of fitting locations - control units
- Parking aid control unit -
J446-
Removal and installation
- Remove and install the control
unit holder for the parking
assist - J446-
Removal and installation
- Moun ...
