
Seat Leon >> Tyre mobility system contents
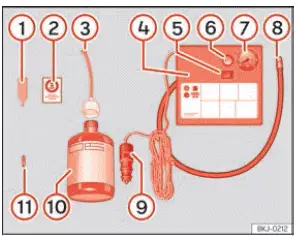
Fig. 257 Standard display: contents of the tyre mobility system.
The emergency Tyre Mobility System is stowed neatly in the storage recess located directly underneath the floor covering in the luggage compartment of your Seat Leon.
This repair kit includes the following factory components ››› Fig. 257:
- Valve insert removal tool
- Speed limit warning sticker to be adhered to the instrument cluster in the driver's direct field of view as a constant reminder of the maximum safe operating speed ("max. 80 km/h" or "max. 50 mph")
- Filler tube with protective sealing cap
- Portable 12V air compressor (pump housing design may vary slightly depending on vehicle trim level)
- Compressor ON/OFF power switch
- Air bleed screw for manual pressure relief (may be integrated directly into the inflator hose on select versions)
- Built-in pressure gauge for monitoring inflation level (may also be incorporated inline along the main inflator tube)
- Air hose for connecting compressor to tyre valve
- 12-volt power connector plug for vehicle auxiliary sockets
- Bottle of specialized liquid tyre sealant
- Replacement spare tyre valve insert
The valve insert removal tool 1 features a specialized notch at its base designed to fit over standard tyre valve cores. Using this tool is the only approved way to unscrew and reinstall the original valve insert or seat the replacement valve core 11 safely without stripping the threads.
Sealing and inflating a tyre
Sealing the tyre
- Unscrew the protective dust cap from the tyre valve stem. Next, place the notched valve core tool ››› Fig. 257 1 over the internal valve core, unscrew it counterclockwise, and set the extracted insert aside on a clean surface free of dirt or grit.
- Vigorously shake the bottle of tyre sealant ››› Fig. 257 10 to thoroughly mix the sealing compounds.
- Firmly screw the filler tube ››› Fig. 257 3 onto the mouth of the sealant bottle; this action automatically breaks the bottle's internal foil seal.
- Remove the protective cap from the end of filler tube ››› Fig. 257 3 and thread the open end of the tube directly onto the bare tyre valve stem.
- Invert the sealant bottle and squeeze it thoroughly until all of the liquid contents are completely emptied into the tyre interior.
- Unscrew the empty sealant bottle assembly from the valve stem.
- Carefully reinsert the valve core into the valve stem and tighten it securely using the removal tool ››› Fig. 257 1.
Inflating the tyre
- Thread the main air hose of the compressor ››› Fig. 257 8 tightly onto the tyre valve stem.
- Verify that the air bleed pressure relief screw is fully closed ››› Fig. 257 6.
- Start the engine of your Seat Leon and leave it idling throughout the inflation process to prevent draining the vehicle battery.
- Insert the 12-volt power plug ››› Fig. 257 9 into the nearest 12V auxiliary power outlet inside the cabin or boot.
- Power on the compressor unit using the main ON/OFF switch ››› Fig. 257 5.
- Run the air compressor until the tyre reaches an internal pressure between 2.0 and 2.5 bar (29–36 psi / 200–250 kPa). Do not operate the compressor continuously for more than 8 minutes.
- Switch off and disconnect the air compressor.
- If the pressure gauge fails to register the minimum required 2.0 bar pressure within 8 minutes, unscrew the air hose from the valve stem.
- Drive the vehicle forward or backward for approximately 10 metres to allow the liquid sealant to spread evenly across the inner surface of the tyre casing.
- Reconnect the compressor hose to the valve stem.
- Repeat the inflation attempt with the compressor.
- If the tyre still fails to inflate to 2.0 bar, the structural damage is too severe to be sealed by the kit. Cease the attempt immediately and contact an authorized service center or roadside assistance.
- Once the tyre achieves a stable pressure between 2.0 and 2.5 bar, disconnect the compressor, unscrew the hose from the valve stem, and drive cautiously without exceeding 80 km/h (50 mph).
- Affix the speed warning sticker ››› Fig. 257 2 onto the instrument cluster display directly in the driver's line of sight.
- Stop in a safe place after driving for 10 minutes to recheck the inflation pressure with the gauge.
WARNING During active inflation of the tyre, the portable air compressor unit and the flexible inflator hose can reach high temperatures due to mechanical compression and electrical operation.
- Protect your hands, fingers, and skin from direct contact with hot components to prevent burns.
- Never place the hot inflator hose or a recently operated air compressor directly on top of flammable materials, dry leaves, or paper.
- Allow the compressor unit and hose to cool down completely before packing and stowing the device back in its compartment.
- If the compressor fails to inflate the tyre to a minimum pressure of at least 2.0 bar (29 psi / 200 kPa) within 8 minutes, the puncture or structural casing damage is too severe. In this condition, the liquid sealant cannot adequately seal the tyre. Do not attempt to continue driving your Seat Leon; instead, seek professional roadside assistance.
NOTICE Always switch off the air compressor after a maximum of 8 minutes of continuous operation to prevent thermal overload and damage to the electric motor. Allow the unit to cool down for several minutes before powering it on again.
Check after 10 minutes of driving
After driving your Seat Leon for 10 minutes following the roadside repair, stop in a safe location, screw the compressor inflator tube ››› Fig. 257 8 back onto the valve stem, and check the current pressure reading on the built-in pressure gauge 7.
1.3 bar (19 psi / 130 kPa) or lower:
- Stop the vehicle immediately! A pressure reading this low indicates that the tyre cannot be sealed sufficiently or safely with the emergency tyre mobility set.
- You must abandon the journey and obtain professional assistance from a qualified towing or service provider.
1.4 bar (20 psi / 140 kPa) and higher:
- Adjust and reset the tyre inflation pressure back to the correct vehicle specification value using the compressor.
- Carefully resume your journey, driving at a moderate speed directly to the nearest specialized workshop or tyre center without exceeding the 80 km/h (50 mph) speed limit.
- Have the temporarily sealed tyre replaced with a new one by professional technicians.
WARNING Driving your Seat Leon with an inadequately sealed or dangerously deflated tyre is extremely hazardous and can cause a sudden loss of vehicle control, severe accidents, and personal injury.
- Never continue driving if the measured tyre pressure has dropped to 1.3 bar (19 psi / 130 kPa) or lower after the test run.
- Stop immediately and seek professional assistance.
 TMS (Tyre Mobility System) puncture repair kit
The Tyre Mobility System (TMS) emergency puncture repair kit is designed to reliably seal tread punctures caused by foreign objects up to approximately 4 mm in diameter. Do not pull out or remove embe ...
 Maintenance
...
See also:
Anti-theft wheel nuts
Fig. 251 Anti-theft wheel nut with cap and adapter.
Loosening the anti-theft wheel nut
Remove the plastic wheel trim, decorative cover, or protective nut cap to access the security bolt head ...
