
Seat Leon >> Location and use of the temporary spare wheel
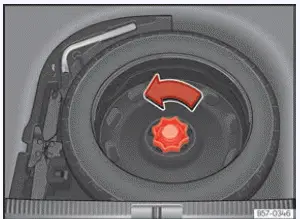
Fig. 247 In the luggage compartment: load floor raised.
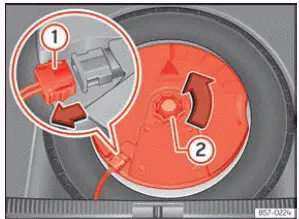
Fig. 248 In the luggage compartment: remove the subwoofer.
The temporary spare wheel is stowed neatly beneath the boot floor panel in the luggage compartment of your Seat Leon and is secured in place by a central thumbnut.
This compact spare wheel is strictly intended for short-term emergency use to get you safely to a workshop. Have your damaged standard tyre inspected and replaced or repaired as soon as possible by a SEAT Official Service centre or a qualified tyre specialist.
Never substitute the factory spare wheel with a spare taken from a different vehicle model, as hub dimensions and rolling circumferences may differ.
Removing the temporary spare wheel
- Lift the luggage compartment floor panel and hold it up securely to access the spare wheel well.
- Rotate the plastic securing thumbnut counterclockwise to unthread it ››› Fig. 247.
- Carefully lift and extract the temporary spare wheel from its recessed housing.
Getting the spare wheel out of vehicles fitted with the optional sound system (with subwoofer)
If your Seat Leon is equipped with the factory premium sound system, you must remove the subwoofer unit seated inside the wheel rim before accessing the spare wheel.
- For models without a variable load floor: pull the carpeted luggage compartment floor liner straight upward and remove it from the boot.
- For models equipped with a variable boot floor: lift the upper panel and lock it securely into its raised position.
- Press the release tab on the electrical connector and disconnect the subwoofer speaker cable ››› Fig. 248 1.
- Unscrew the central securing wheel by turning it counterclockwise ››› Fig. 248 2.
- Carefully lift out the subwoofer unit, then remove the emergency spare wheel underneath.
- When stowing the spare wheel back into position, lower the subwoofer gently into the center well of the wheel rim. Ensure the directional arrow marked "FRONT" on the subwoofer housing points directly toward the front of the vehicle.
- Reconnect the electrical speaker cable until it clicks, then turn the securing wheel firmly clockwise to lock both the subwoofer assembly and spare wheel tightly in place.
Chains
Due to physical clearance constraints and rim dimensions, snow chains must never be fitted onto the temporary spare wheel.
If a front tyre suffers a puncture while you are using snow chains on your Seat Leon, remove one of the intact rear road wheels and fit the temporary spare in its place. Mount the snow chain onto the removed rear wheel assembly, and then swap that full-sized wheel onto the front axle to replace the damaged front tyre.
WARNING
- After mounting the temporary spare wheel, verify its cold inflation pressure at the earliest opportunity. Driving on an under-inflated spare compromises vehicle stability and creates an accident risk. Proper cold pressure values are listed on the sticker located on the rear of the driver's door frame.
- Do not exceed a maximum speed of 80 km/h (50 mph) while the temporary spare wheel is mounted on your Seat Leon.
- Never drive more than 200 km continuously on a temporary compact spare wheel.
- Avoid aggressive acceleration, sudden hard braking, and sharp high-speed cornering while running on a temporary spare.
- Never install or drive with more than one temporary spare wheel fitted to your vehicle at the same time.
- Do not attempt to mount standard summer or winter tyres onto the narrow rim of the compact temporary spare wheel.
- When driving on the temporary spare wheel, the Adaptive Cruise Control (ACC) system may disengage automatically due to minor wheel rotation speed differences. Deactivate the system manually before setting off.
 Introduction
Attempt to change a wheel on your Seat Leon yourself only if you are fully familiar with the required mechanical procedures and safety protocols, possess all necessary tools, and can park the vehicle ...
 Integral wheel trim
Fig. 249 Remove the wheel cover.
Full plastic wheel covers must be removed from steel wheels to expose the underlying wheel nuts before loosening them.
Removing
Extract the box spanner wren ...
See also:
Exhaust emissions test, petrol engines,
with emissions testing station L - VAS 7320 A
Special tools and workshop equipment required
Emissions testing station L - VAS 7320 A
NOTICE The following description refers to vehicles fitted with "Onboard
diagnosis" OBD.
The OBD monit ...
