Seat Leon >> Removing and installing dust and pollen filter
Special tools and workshop equipment required
- Cover plate - T10532-
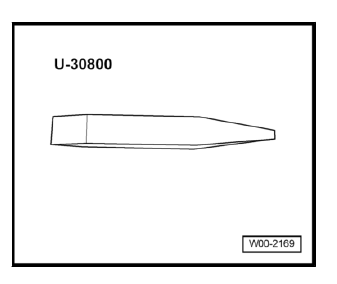
- Release lever - U30800-
- Conventional vacuum cleaner
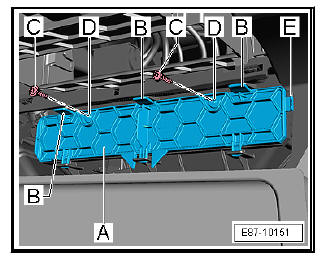
Should the retaining tabs -B- break (both on the air conditioning unit as well as the cover -A-), the cover -A- can also be attached to the air conditioning unit with 2 self-tapping screws -C- (e.g. 3.5 x 16 mm or 4.0 x 16 mm).
For this purpose two holes are to be drilled in the cover -A- at both attachment points marked with -D- with a diameter of 4.5 mm.
The cover -A- can be equipped with a hook -E- which is used for removal of the dust and pollen filter.
Note
- Different filters are provided for this vehicle depending on equipment.
- In vehicles with manual air conditioning control, the dust and pollen filter is installed ex-factory "without" activated carbon filter. When servicing, a dust and pollen filter with activated charcoal .
- The activated carbon filter takes over the function of a dust and pollen filter, but also filters dangerous gaseous pollutants such as ozone, benzene or nitrogen dioxide, etc.
- The activated charcoal layer in the dust and pollen filter becomes saturated after a certain length of time.
- A saturated filter can no longer absorb any hazardous substances.
Removal:
- Turn off the ignition and all electricity consumers.
Vehicles without access and start authorisation system
- Remove ignition key, if fitted.
Vehicles with access and start authorisation system
- Store ignition key outside the vehicle to prevent the ignition from being switched on unintentionally.
Continued for all vehicles
| WARNING Proceed cautiously with the property of customers in the glove compartment. |
- Open the glove compartment, remove the customers property and cover the surface with paper.
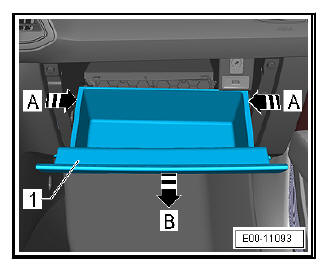
- Press inwards on the sides -arrow A- and move the glove compartment -1- to the lowest position -arrow B- (service position).
Vehicles with shelf in glove compartment:
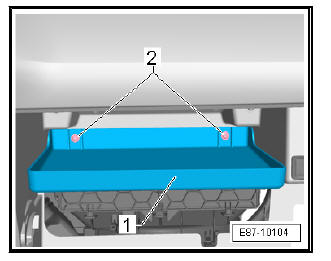
- Unscrew the screws -2- and remove the shelf -1-.
Vehicles with control unit 1 for information electronics - J794- in the glove compartment:
- Carefully pull out the decorative trim of the information electronics control unit 1 - J794-.
All vehicles (continued):
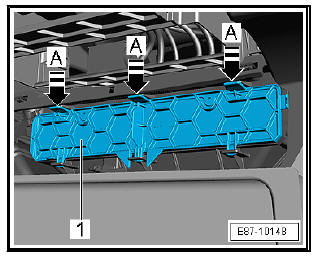
- Carefully release the retaining tabs -arrows A- with the lever - U30800- .
- Swivel the cover -1- backwards and remove.
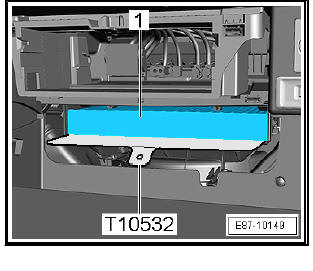
- Push the cover plate - T10532- under the pollen filter -1-.
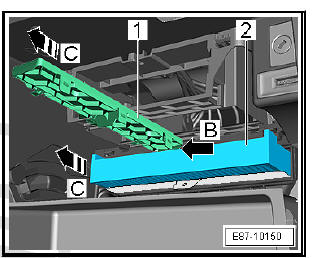
- Hook cover -1- into dust and pollen filter -2- -arrow -.
| WARNING Danger of damaging the fresh air blower - V2- when eliminating impurities from the dust and pollen filter. Take care to ensure that the cover plate - T10532- is not removed as well. |
- Take out the dust and pollen filter -2- with the cover -1- in -the direction of arrow C-.
- Using a conventional vacuum cleaner, remove residual dirt and leaves from the cover plate - T10532- .
Note Observe disposal regulations!
Installing
Install in reverse order of removal; note the following.
Note If you suspect that impurities have entered the fresh air blower - V2- , remove and clean the fresh air blower.
- Observe installation position of dust and pollen filter.
- Switch on the ignition and check the operation of the fresh air turbine - V2- .
 Removing and installing air distribution
housing
Removal:
Turn off the ignition and all electricity consumers.
Vehicles without access and start authorisation system
Remove ignition key, if fitted.
Vehicles with access and start author ...
 Removing and installing fresh air blower
- V2-
Removal:
Turn off the ignition and all electricity consumers.
Vehicles without access and start authorisation system
Remove ignition key, if fitted.
Vehicles with access and start author ...
See also:
Removing and installing front glass panel
Removing
Open glass panel -1- until trim -1- is accessible.
Release locking lugs -4- by pressing -arrow B- on rear -3-.
Pull trim -1- off downwards at rear end -arrow A-.
Push trim forward ...
