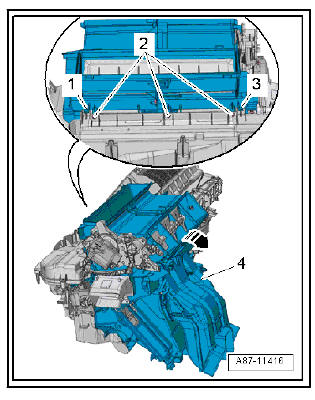
Seat Leon >> Removing and installing air distribution housing
Removal:
- Turn off the ignition and all electricity consumers.
Vehicles without access and start authorisation system
- Remove ignition key, if fitted.
Vehicles with access and start authorisation system
- Store ignition key outside the vehicle to prevent the ignition from being switched on unintentionally.
Continued for all vehicles
- Disconnect battery.
- Remove heater and air conditioner unit.
- Remove the coolant pipes at the heat exchanger.
- Unplug the connector at the fresh air and air recirculation flap control motor and lay bare the wiring harness.
- Remove bolts -2-
- Release mounting flanges -1- and -3-.
- Swivel the air distribution housing -4- to the rear -arrow- and disengage.
Installing
Install in reverse order of removal; note the following.

Note Even minute leakage at the tongue-and-groove joint between the air distribution housing and the evaporator housing can lead to whistling noise as a result of escaping air. For this reason, lubricate the connection points lightly with silicone grease or similar to completely seal the connection points. For silicone grease.
 Dismantling and assembling heater and
air conditioning unit
Note
There are different designs and makes of heater and air conditioning
unit. The individual components of the various heaters
and air conditioning units are similar but not identical. The
...
 Removing and installing dust and pollen
filter
Special tools and workshop equipment required
Cover plate - T10532-
Release lever - U30800-
Conventional vacuum cleaner
Should the retaining tabs -B- break (both on the ai ...
See also:
Differential: Adjust
Special tools and workshop
equipment required
End dimension plate - VW 385/17-
Universal dial gauge bracket - VW 387-
Tightening plate - VW 402-
Tightening plate - VW 401-
Die - VW 408- ...
