Seat Leon >> Removing and installing rain and light sensor
Removing and installing rain and light sensor - G397- , vehicles with front camera for driver assist systems
Note
- The rain and light sensor has a silicon layer (coupling pad) which forms the contact surface to the windscreen.
- The rain and light sensor has been designed so that it can be used again. A prerequisite for re-use is that the coupling pad is not damaged or dirty (check!).
Removing
- Switch off ignition and all electrical consumers.
Vehicles without access and start authorisation system
- Remove ignition key, if fitted.
Vehicles with access and start authorisation system
- Store the ignition key outside the vehicle to prevent the ignition from being switched on unintentionally.
Continued for all vehicles
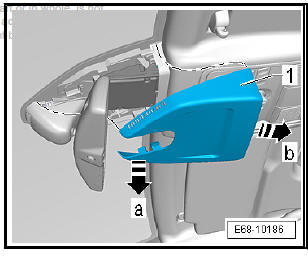
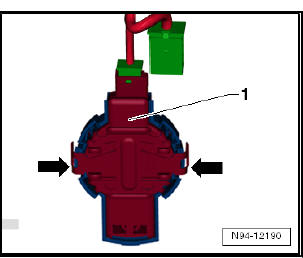
- Cover -1- of the front camera support is pushed downward -Arrow A- unclip and remove -Arrow A-
Note Wait at least 1 minute after releasing the retaining clip. This is necessary to ensure that the silicone coating is relieved of tension and will not be damaged during removal.
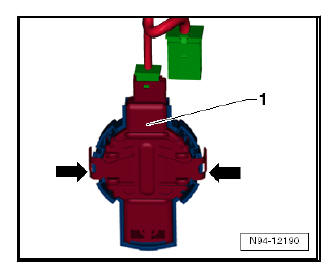
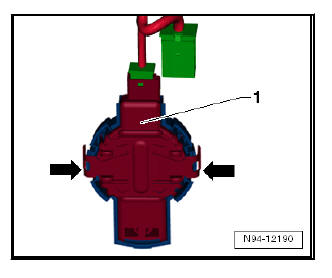
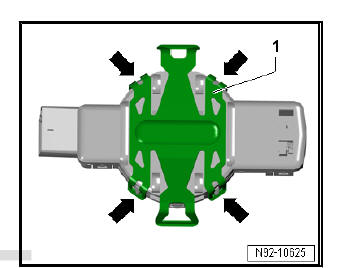
- Release retaining clip on left and right -arrows-.
- Carefully lever out rain and light sensor - G397- -1- from retaining frame on windscreen, starting from the top.
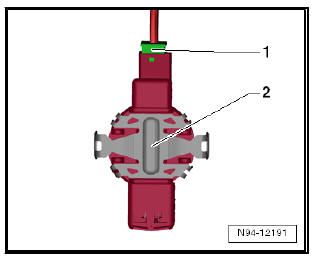
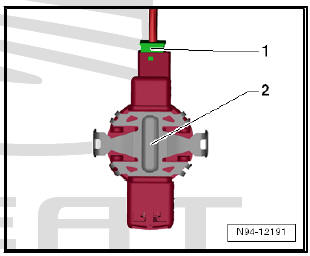
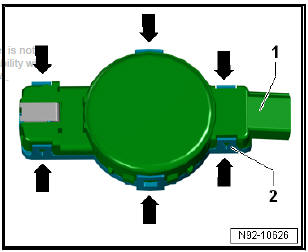
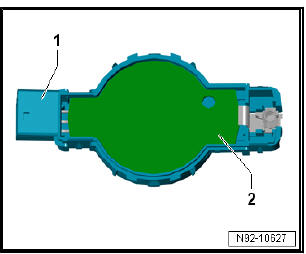
- Release and pull off connector -1- and remove rain and light sensor - G397- -2-.
| Caution Until the time comes to reinstall it, store removed rain and light sensor - G397- in a place where the coupling pad cannot be damaged or soiled from dust, etc. |
Installing
Installation is carried out in the reverse sequence; note the following:
Caution
|
Note If the surface of the coupling pad on the rain and light sensor - G397- is soiled, it may be possible to clean it by "sticking on" and then "pulling off" one or more adhesive strips.
- Clean windscreen within retaining plate thoroughly.
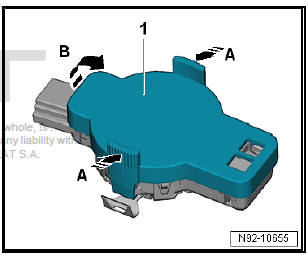
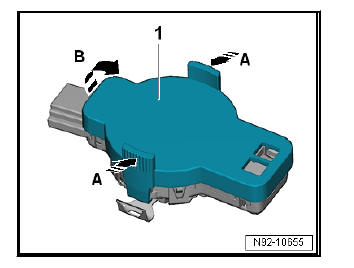
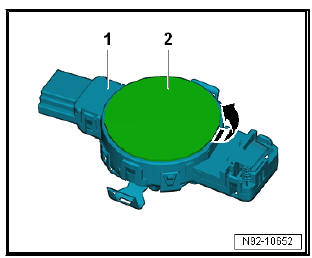
- If necessary, remove protective cap -1- from new rain and light sensor - G397- .
- Press grip in direction of arrow -A-.
- Remove protective cap -1- in direction of arrow -B-.
- Reconnect connector.
- Insert rain and light sensor - G397- -1- into retaining frame on windscreen.
- Push retaining clip on both sides -arrows- so that it can be heard to engage.
Note
- Even when sensor is installed correctly, small air bubbles may first appear between windscreen and coupling pad. After approx. 10 minutes, the contact surface must be free of bubbles.
- If the contact surface is not free of bubbles after 10 minutes, the rain and light sensor - G397- must be removed and installed anew.
- Air bubbles between the windscreen and coupling pad can lead to malfunctions in the rain and light sensor - G397- .
- If rain and light sensor - G397- was replaced, perform coding.
Code the rain and light sensor - G397-
- Connect vehicle diagnostic tester.
- Coding rain and light sensor - G397-.
Removing and installing rain and light sensor - G397- , vehicles without front camera for driver assist systems
Note
- The rain and light sensor has a silicon layer (coupling pad) which forms the contact surface to the windscreen.
- The rain and light sensor has been designed so that it can be used again. A prerequisite for re-use is that the coupling pad is not damaged or dirty (check!).
Removing
- Switch off ignition and all electrical consumers.
Vehicles without access and start authorisation system
- Remove ignition key, if fitted.
Vehicles with access and start authorisation system
- Store the ignition key outside the vehicle to prevent the ignition from being switched on unintentionally.
Continued for all vehicles
- Remove centre console.
Note Wait at least 1 minute after releasing the retaining clip. This is necessary to ensure that the silicone coating is relieved of tension and will not be damaged during removal.
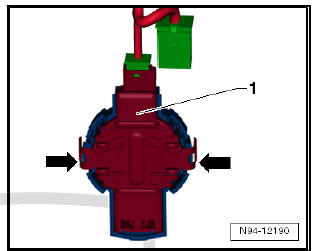
- Release retaining clip on left and right -arrows-.
- Carefully lever out rain and light sensor - G397- -1- from retaining frame on windscreen, starting from the top.
- Release and pull off connector -1- and remove rain and light sensor - G397- -2-.
| Caution Until the time comes to reinstall it, store removed rain and light sensor - G397- in a place where the coupling pad cannot be damaged or soiled from dust, etc. |
Installing
Installation is carried out in the reverse sequence; note the following:
Caution
|
Note If the surface of the coupling pad on the rain and light sensor - G397- is soiled, it may be possible to clean it by "sticking on" and then "pulling off" one or more adhesive strips.
- Clean windscreen within retaining plate thoroughly.
- If necessary, remove protective cap -1- from new rain and light sensor - G397- .
- Press grip in direction of arrow -A-.
- Remove protective cap -1- in direction of arrow -B-.
- Reconnect connector.
- Insert rain and light sensor - G397- -1- into retaining frame on windscreen.
- Push retaining clip on both sides -arrows- so that it can be heard to engage.
Note
- Even when sensor is installed correctly, small air bubbles may first appear between windscreen and coupling pad. After approx. 10 minutes, the contact surface must be free of bubbles.
- If the contact surface is not free of bubbles after 10 minutes, the rain and light sensor - G397- must be removed and installed anew.
- Air bubbles between the windscreen and coupling pad can lead to malfunctions in the rain and light sensor - G397- .
- If rain and light sensor - G397- was replaced, perform coding.
Code the rain and light sensor - G397-
- Connect vehicle diagnostic tester .
- Coding rain and light sensor - G397- .
Repairing rain and light sensor - G397- , TRW
There are different housings depending on the make of rain sensor.
The rain sensor housing with lens unit is always supplied as a replacement in individual parts with retaining clips. On vehicles for which these retaining clips are not required, the clips must be removed.
Carry out the following work:
- Remove rain sensor
| Caution The rain sensor electronics could become damaged.
|
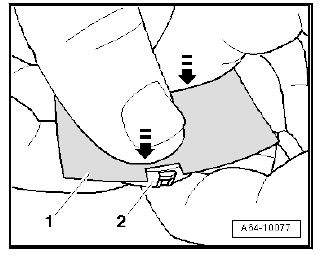
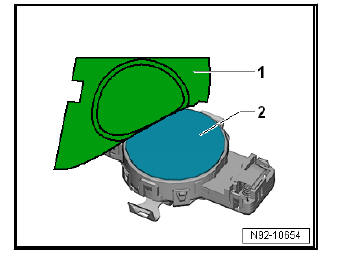
- Release 4 locking lugs -arrows- of retaining clip -1- using a suitable screwdriver, and remove retaining clip.
- Separate upper part of housing -1- together with lens unit from bottom part of housing -2- by releasing retaining lugs -arrows- on both sides.
| Caution The lens unit of the rain and light sensor may become damaged.
|
- Remove rain and light sensor electronics -2- from upper part of old housing -1- and insert into new upper part of new housing in exactly same way.
- Engage upper part of housing with lens unit and protective cover with lower part of housing.
- Install rain sensor.
Repairing rain and light sensor - G397- , Valeo
- Remove rain and light sensor - G397- .
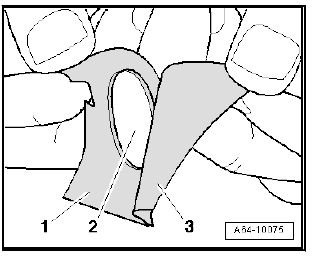
- Carefully remove sensor foil -2- or any sensor foil residues from rain and light sensor - G397- -1-.
| Caution The surfaces of the sensor must be completely free of remnants of foil. |
- Clean sensor surfaces with cleaning solution D 009 401 04.
- Pull silicone paper -3- off sensor foil -2-.
The transparent protective foil -1- remains initially on sensor foil as an assembly aid.
- Place sensor foil on rain and light sensor -2- with aid of transparent protective film -1-.
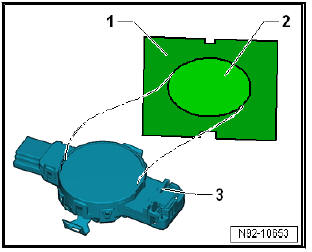
- Press sensor foil through protective film -1- onto rain and light sensor -2- making sure there are no air bubbles.
- Peel transparent protective film -1- off sensor foil -2-.
- Install rain sensor.
 Removing and installing windscreen
wiper motor V
Removing and installing windscreen
wiper motor V
Removing
Remove wiper arms.
Remove bolts -1, 3, 5-.
Take wiper frame -2- with linkage and wiper motor out of plenum
chamber.
Unplug the electrical connector -4-.
Installing
Installatio ...

See also:
Connectors
Unplugging door separating connector
(left-side)
Removing
Note
The removal and installation procedure is the same on both sides.
Open the door.
Release catch in direction of -arrow A- and de ...
