Seat Leon >> Assembly overview - windscreen wiper system
SEAT Leon Service and Repair Manual / Electrical system / Windscreen wash/wipe system / Windscreen wiper / Assembly overview - windscreen wiper system

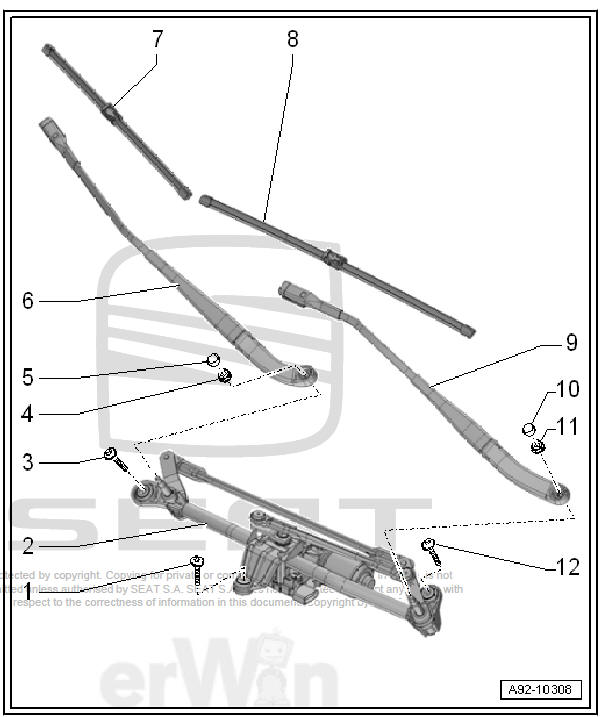
- - Screw
- Tightening sequence
- - Wiper motor - V-
- With wiper motor control unit - J400-
- Switch-off the APS
- Removal and installation
- - Screw
- Tightening sequence
- - Nut
- 18 Nm + - 2
- - Cap
- - Wiper arm, passenger's
side (LHD)
- Different length
- Removal and installation
- Adjusting
- - Wiper blade, passenger's
side (LHD)
- Different length
- Replace
- - Wiper blade, driver's side
(LHD)
- Different length
- Replace
- - Wiper arm, driver's side (LHD)
- Different length
- Removal and installation
- Adjusting
- - Cap
- - Nut
- 18 Nm + - 2
- - Screw
- Tightening sequence
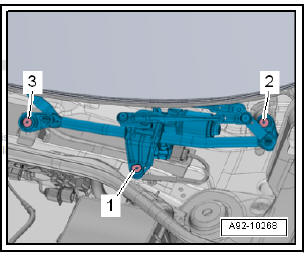
Wiper motor - tightening torque and tightening sequence
- Tighten bolts in stages in sequence shown:
| phase |
Bolts |
Tightening torque |
| 1 |
-2,3 and 1- |
Screw in bolts by hand until they make contact |
| 2 |
-2, 3 and 1- |
10 Nm + - 1 |

Moving windscreen wipers to service position
Note The front lid must be completely closed if the wiper motor needs to be run during repair work (the voltage supply to the wiper motor is cut off when the front lid is open).
- At sub-zero temperatures, first check that the wiper blades are not frozen onto the glass.
- Switch on ignition briefly and then switch off.
- Operate "touch wipe" function within 10 seconds.
- The wipers will run to the "service position".
| Caution The bonnet can be damaged if the wipers are allowed to run back to the park position.
|
 Windscreen wiper
...
 Removing and installing wiper blade
Removing
Move windscreen wipers to service position
Lift wiper arm off windscreen.
Push the retainer -arrow A- and pull on the wiper blade -1-, as
far as it will go. Bend the wiper blade and ...
See also:
1.0 l, 1.2 l and 1.4 l TSI engines and 1.6 l
MPI engines
Special tools and workshop equipment required
Puller - 3417-
NOTICE
Prevent engine oil from dripping onto components.
Before starting with the generator removal, cover with a cloth.
R ...
