Seat Leon >> Removing and installing the alternator
Removing and installing alternator - vehicles with 1.0 l FSI engine
Special tools and workshop equipment required
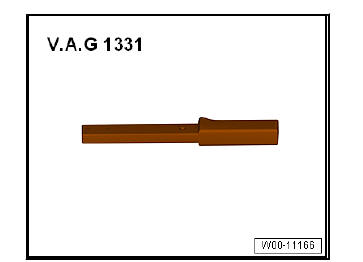
- Torque wrenches - V.A.G 1331-
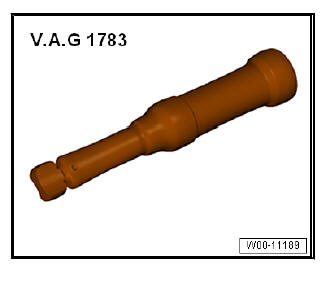
- Torque wrenches - V.A.G 1783-
Removing
- With the ignition switched off, disconnect battery earth cable.
- Remove the tensioning element for the Poly-V belt.
- Remove the lower engine noise insulation.
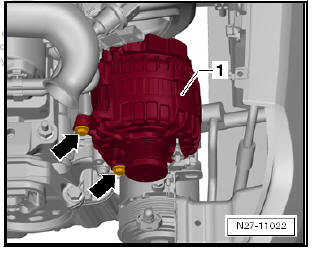
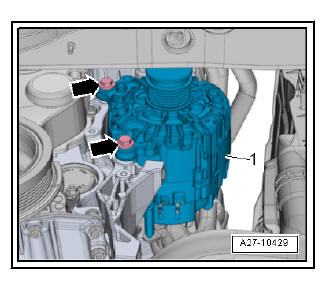
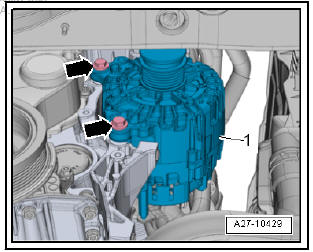
- Unscrew bolts -arrows-.
Note
- If alternator -1- is stuck in the bracket, screw bolts -arrows- back in by 2 turns.
- Carefully tap on the screw heads with the flat side of a hammer.
In doing so, loosen the bushes of the alternator fasteners.
- Pry off the cap -2- of the 30/B+ wire -4-.
- Unscrew nut.
- Remove 30/B+ cable -4-.
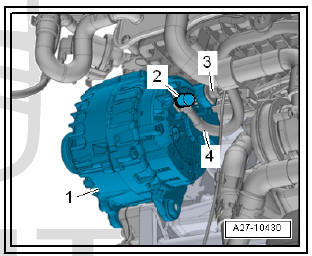
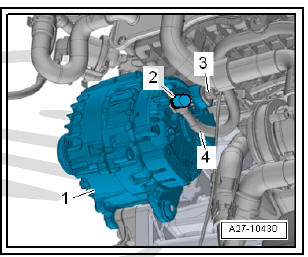
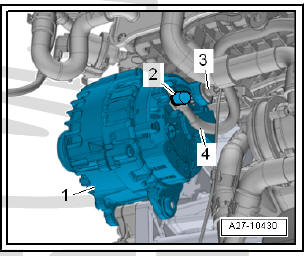
- Remove alternator -1- with connector -3- from bracket.
- Pull out the plug -3-.
- Remove alternator -1- downwards and to the right.
Installing
Install in reverse order to dismantling, noting the following.
- To facilitate positioning of alternator , slide bushes of alternator mounting slightly towards back.
Note Ensure that bushes of alternator mounting slide freely and are not to tight (loosen, if necessary); otherwise clamping force of sliding bushes is too low even if specified torque is applied.
- Connect the battery.
- Always start engine and check belt running after completing work.
Removing and installing alternator, vehicles with 1.2 l and 1.4 l TSI engines
Torque wrenches - VAG 1331-
Removing
- With the ignition switched off, disconnect battery earth cable.
- Remove the tensioning element for the Poly-V belt.
- Remove the lower engine noise insulation.
Vehicles with air conditioner
| Caution Risk of damage to air conditioner compressor, refrigerant lines and refrigerant hoses:
|
- Remove air conditioner compressor at bracket.
- Secure air conditioner compressor to lock carrier so that refrigerant lines are not under tension.
Continued for all vehicles
- Unscrew bolts -arrows-.
Note
- If alternator sticks in bracket, screw bolts back in again down to the last 2 turns.
- Tap carefully on bolt heads with flat side of hammer to release threaded bushes of alternator mountings.
- Remove alternator -1- from mounting with electrical wiring still connected.
- Unplug the electrical connector -3-.
- Remove the cap -2-, by levering.
- Unscrew nut and remove terminal 30/B+ -4-.
- Remove alternator -1- downwards and to the right.
| Caution Make sure that air conditioner compressor and refrigerant pipes and hoses are not damaged.
|
Installing
Installation is carried out in the reverse sequence; note the following:
- To facilitate the positioning of the alternator drive bushes for fixing screws back a bit.
Note If the alternator attachment sockets are difficult to move then this must be corrected otherwise the tightening force of the socket is weak despite being tightened to the correct torque.
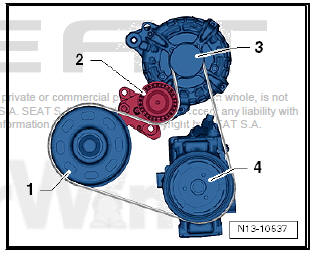
- Install the poly V-belt as depicted in the illustration:
- Vibration damper
- Tensioner for poly V-belt
- Alternator
- Air conditioning compressor
- Connect battery. Steps required.
- Start engine and check that belt runs properly.
Removing and installing alternator, vehicles with 1.6 l MPI engine
Special tools and workshop equipment required
- Torque wrenches - V.A.G 1331-
Removing
- Disconnect battery - A-.
- Remove poly V-belts .
- Remove the tensioning element for the Poly-V belt .
Vehicles with air conditioner
| Caution Risk of damage to air conditioner compressor, refrigerant lines and refrigerant hoses:
|
- Remove air conditioner compressor at bracket .
- Secure air conditioner compressor to lock carrier so that refrigerant lines are not under tension.
Continued for all vehicles
- Unscrew bolts -arrows-.
If alternator - C- -1- sticks in bracket, screw bolts back in again down to the last 2 turns.
Carefully tap on the screw heads with the flat side of a hammer.
In doing so, loosen the bushes of the alternator fasteners.
- Remove alternator - C- -1- from bracket with electrical wiring still connected.
- Release connector -3- and unplug.
- Remove the cap -2-, by levering.
- Unscrew nut and remove terminal 30/B+ -4-.
- Remove alternator - C- -1- downwards to the right.
Installing
Install in reverse order to dismantling, noting the following.
- To facilitate positioning of alternator - C- , slide bushes of alternator mounting slightly towards back.
Ensure that bushes of alternator mounting slide freely and are not to tight (loosen, if necessary); otherwise clamping force of sliding bushes is too low even if specified torque is applied.
- Connect battery - A- .
- Always start engine and check belt running after completing work.
Removing and installing alternator, vehicles with 1.8 l and 2.0 l TSI engines
Special tools and workshop equipment required
- Torque wrenches - VAG 1331-
- Engine bung set - VAS 6122-
Removing
- With the ignition switched off, disconnect battery earth cable.
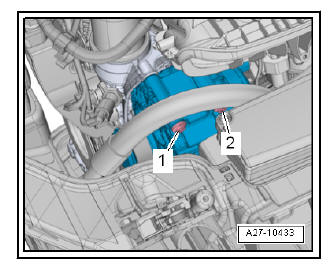
- Unscrew the attachment bolts -1- and -2- of the generator (alternator).
- Remove the lower engine noise insulation.
- Loosen hose clip -1-.
Note Item -2- can be disregarded.
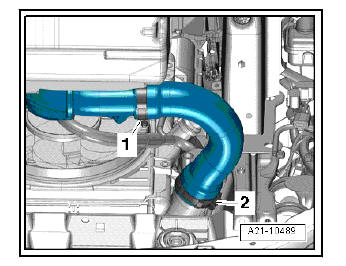
- Move clear coolant hose -3-.
- Release hose clip -2-.
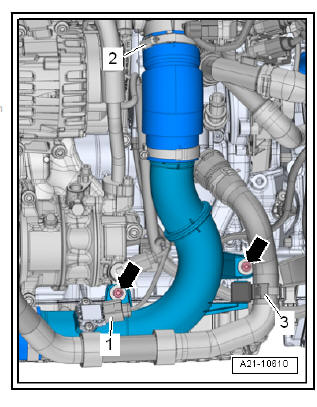
- Unscrew bolts -arrows-.
- Pull out the plug -1-.
- Remove the air pipe.
- Seal open lines and connections with suitable plugs from engine bung set - VAS 6122- .
- Remove the tensioning element for the Poly-V belt .
| Caution Risk of damage to air conditioner compressor, refrigerant lines and refrigerant hoses:
|
- Remove air conditioner compressor at bracket .
- Secure air conditioner compressor to lock carrier so that refrigerant lines are not under tension.
- Uncover the electrical wiring line -Arrow-.
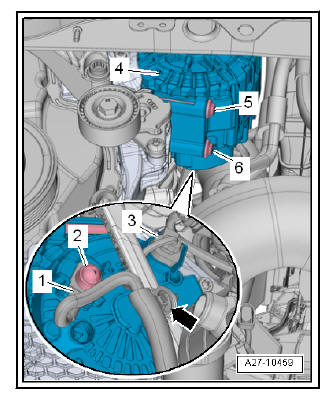
- Unscrew screws -5- and -6- and more alternator - C- -4- forward.
- Pull out the plug -3-.
- Remove the cap -2-, by levering.
- Unscrew nut and remove terminal 30/B+ -1-.
| Caution Risk of damage to air conditioner compressor, refrigerant lines and refrigerant hoses:
|
- Remove alternator - C- -4- downwards to the right.
Installing
Installation is carried out in the reverse sequence; note the following:
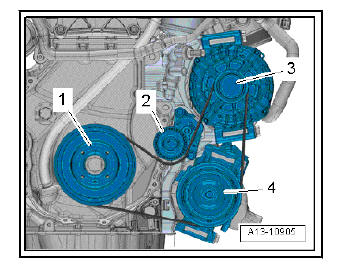
- Install the poly V-belt as depicted in the illustration:
- - Vibration damper
- - Tensioner for poly V-belt
- - Alternator
- - Air conditioning compressor
- Connect battery - A-.
- Always start engine and check belt running after completing work.
Removing and installing alternator, vehicles with 1.6 l and 2.0 l TDI engines
Removing
- With the ignition switched off, disconnect battery earth cable.
- Remove the tensioning element for the Poly-V belt .
- Remove the lower engine noise insulation .
- Remove air conditioner compressor at bracket .
- Secure air conditioner compressor to lock carrier so that refrigerant lines are not under tension.
- Unscrew bolts -arrows-.
Note
- If alternator sticks in bracket, screw bolts back in again down to the last 2 turns.
- Tap carefully on bolt heads with flat side of hammer to release threaded bushes of alternator mountings.
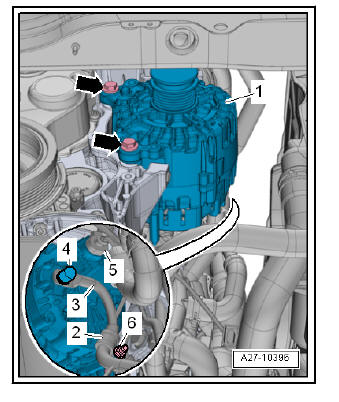
- Remove alternator -1- from mounting with electrical wiring still connected.
- Unplug the electrical connector -5-.
- Remove the cap -4-, by levering.
- Unscrew nut and remove terminal 30/B+ -3-.
- Unscrew nut -6- and pull off clamp -2-.
- Remove alternator downwards and to the right.
| Caution Make sure that air conditioner compressor and refrigerant pipes and hoses are not damaged.
|
Installing
Installation is carried out in the reverse sequence; note the following:
- To facilitate the positioning of the alternator drive bushes for fixing screws back a bit.
Note If the alternator attachment sockets are difficult to move then this must be corrected otherwise the tightening force of the socket is weak despite being tightened to the correct torque.
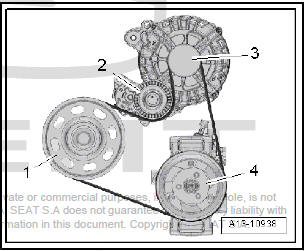
- Install the poly V-belt as depicted in the illustration:
- - Vibration damper
- - Tensioning roller
- - Alternator
- - Air conditioning compressor
- Connect battery. Steps required .
- Start engine and check that belt runs properly.
Checking alternator
- Checking alternator - C-
 Assembly overview - alternator
Assembly overview: Alternator without sliding bushes
- Screw
4 units.
23 Nm
- Alternator
Removal and installation
repairs
- Electric connector
- Terminal 30/B+
- ...
 Alternator: repairs
Assembly overview - Valeo alternator
- Alternator
- Voltage regulator
Removal and installation
Checking brushes
- Double bolt 2 Nm
- Cover
- Protective cap
- Hexagon bolt - ...
See also:
Selector lever locking
The selector lever lock prevents gears from being engaged
inadvertently, which would cause the vehicle to move.
Fig. 120 Deactivating the
lock
Releasing the selector lever lock
– Start the ve ...
