Seat Leon >> Removing and installing brake pads/linings
Removing and installing brake pads, vehicles with manual parking brake
Note Use brake filling and bleeding equipment - VAS 5234- to extract brake fluid from brake fluid reservoir.
Special tools and workshop equipment required
- Piston compressing tool - T10165-
- Torque wrenches - V.A.G 1331-
Removing:
Note If you are going to use the brake pads again, mark them when you remove them. Put them back in the same positions, otherwise, the braking effect will not be even.
- Remove wheels.
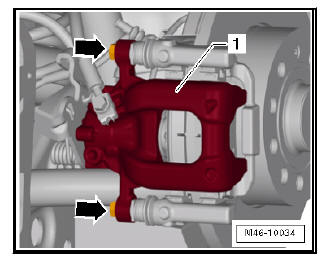
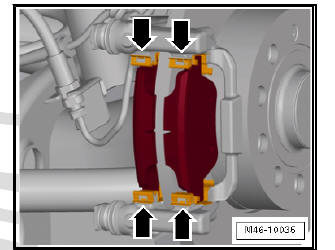
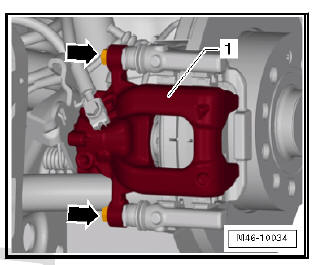
- Screw out securing bolts -arrows- of the brake caliper -1-. To do this the guide pins must be locked.
- Remove brake calliper -1- and secure with wire so that weight of brake calliper does not strain or damage brake hose.
Brake caliper CI 38 (live axle):
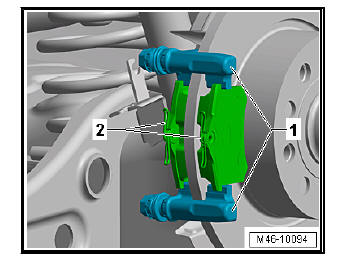
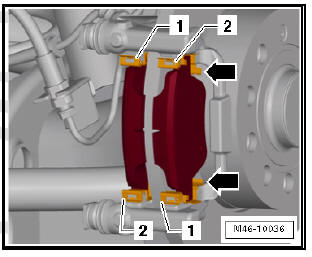
- Remove brake pads -2- from brake carrier -1-.
Brake caliper PC 38 y CII 41 (multi-link suspension):
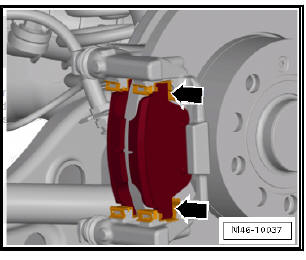
- Remove brake pads and pad retainers -arrows-.
Cleanliness:
| WARNING Never clean the brake system with compressed air; harmful dust particles will be released. Only use methylated spirits to clean the brake calliper. |
- Thoroughly clean contact surfaces -arrows- for brake pads on brake carrier -1-, and remove corrosion.
- Clean the brake calliper, especially the adhesive surface for the brake pads, they must be free of adhesive residues and grease.
Installation:
| Caution Before pressing piston back into cylinder with piston resetting tool, draw off brake fluid from brake fluid reservoir. Otherwise, if brake fluid has been refilled, this might leak and cause damage. |
- Insert piston compressing tool - T10165- so that collar rests on plate - T10165/1- .
- Use plate - T10165/1- for assistance when screwing in.
- Screw in piston by turning the thumb wheel of the piston compressing tool - T10165- clockwise; do not damage protective cap when doing so.
- If the piston will not move easily, a 13 mm open-end spanner can be applied at the flats provided -arrow A-.
- Ensure that protective caps are not damaged and are seated correctly .
- Check guide pins for ease of movement.
- Pull protective foil off backing plates for brake pads.
Brake caliper CI 38 (live axle):
- Insert brake pads -2- into brake carrier -1-.
Brake caliper PC 38 y CII 41 (multi-link suspension):
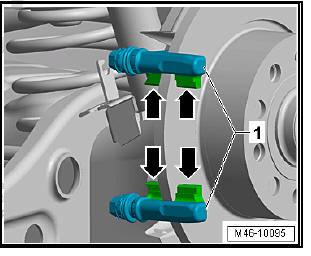
- Insert anti-rattle springs -1- and -2- into brake carrier.
Note Anti-rattle springs -1- and -2- are different. They can only be mounted diagonally to each other.
The guide tabs -arrows- must point outwards on both sides of the brake carrier.
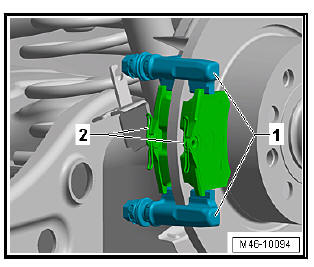
- Insert brake pads into brake holder.
- Ensure that brake pads are seated correctly in anti-rattle springs -arrows-.
Continued for all models:
When applying the brake calliper, care should be taken that the brake pads do not get stuck together with the brake calliper before the correct fitting location has been reached.
| Caution Use new bolts. The repair kit contains four auto-locking hexagonal bolts that must always be fitted. |
- Screw in the new bolts -arrows- of the brake caliper -1-.
- Fit the wheels.
Note After changing pads, check the brake fluid level.
| WARNING After installing the brake pads, depress pedal firmly several times with the vehicle stationary, so that the brake pads are properly seated in their normal operating position. Make sure that the brakes work properly before the vehicle is driven on the road. |
Removing and installing brake pads, vehicles with electronic parking brake
Special tools and workshop equipment required
- Vehicle diagnosis tester
- Thrust piece - T10145-

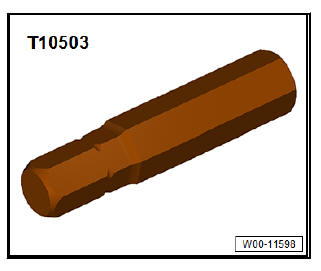
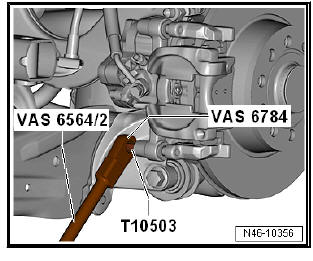
- Bit attachment (7 mm) - T10503-
- Torque wrenches - V.A.G 1331-
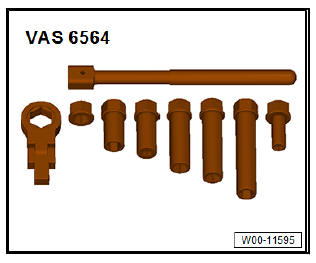
- Bleeder set - VAS 6564-
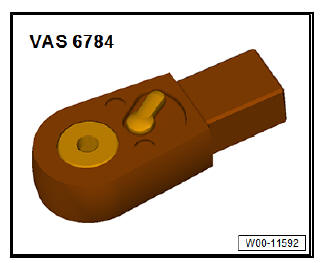
- Ratchet insert - VAS 6784-
Removing
Note The installation position of the brake caliper depends on the rear axle. This changes the removal and installation slightly, but an additional tool is necessary.
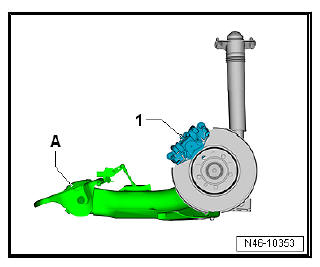
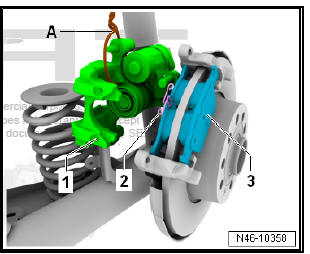
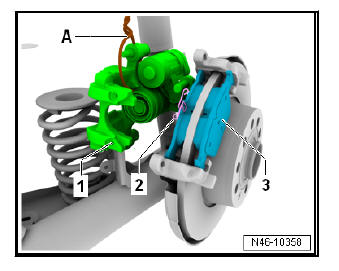
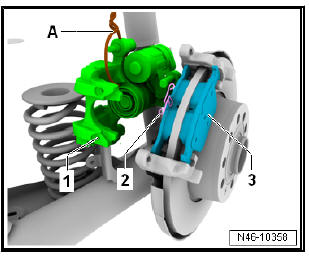
Installation position of brake caliper with torsion beam axle:
1 - Brake calliper
A - Torsion beam axle
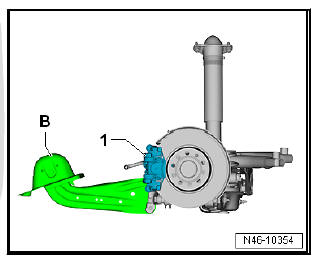
Installation position with multi-link suspension:
1 - Brake calliper
B - Multi-link suspension
Mark brake pads when removing if they are to be reused. They must be fitted in the same place, if not, this will result in uneven braking behaviour!
Note Do not separate connectors of parking brake motors.
- Electromechanical parking brake not operated.
- Remove rear wheels.
The electromechanical parking brake pistons must be moved back by means of - Vehicle diagnostic tester.
Note Before resetting pistons, draw off brake fluid from brake fluid reservoir.
Otherwise, if brake fluid has been replaced it might leak and cause damage.
- Move the pistons back using - Vehicle diagnostic tester.
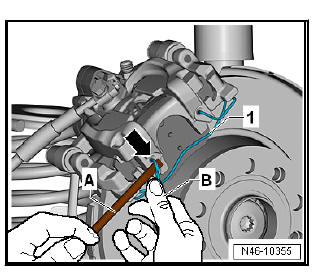
| DANGER! Risk of injury due to tensioned retaining spring. The retaining spring might jump out and cause injury to eyes and skin.
|
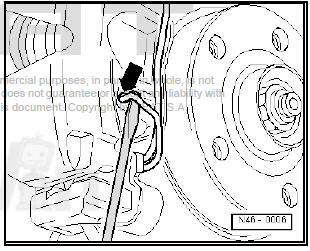
- Remove brake caliper -arrow- from the brake pad retaining spring -1- using a screwdriver -A-. Make sure to firmly hold the spring with the other hand.
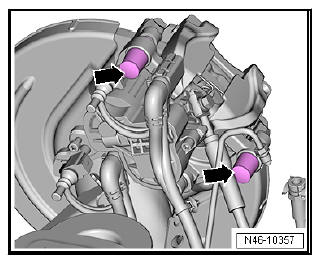
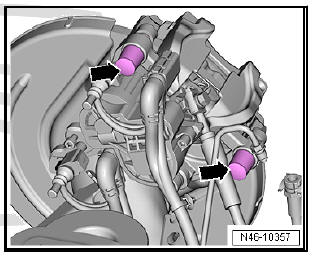
- Remove the protective caps -arrows-.
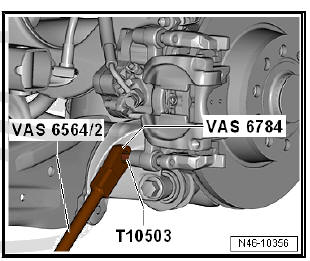
- Unscrew both guide pins from brake caliper using bit attachment (7 mm) - T10503- and ratchet insert - VAS 6784- .
- Remove brake caliper -1- and secure it with wire -A- so that weight of brake caliper does not strain or damage brake hose.
Note It is essential that the pistons are reset by means of - Vehicle diagnostic tester! The thrust nut in the piston is fitted on a floating bearing, so that the piston can only be compressed but not pulled back. Only the spindle with the thrust nut will be moved back.
- The piston must be reset beforehand with - Vehicle diagnostic tester.
- Press in the piston with the press tool - T10145- .
- Remove brake pads -2 and 3-.
Cleanliness:
| WARNING Health hazard due to poisonous dust coming out of brake system. Risk of irreversibly deposited dust particles in the lungs. Risk of respiratory health problems.
|
- Thoroughly clean the brake plate in the areas of contact with the brake pads and remove corrosion.
- Clean the brake calliper.
Note Only use methylated spirits to clean the brake calliper.
Installing
Carry out installation in the reverse sequence, noting the following:
- Insert brake pads -2- (inside) and -3- (outside) into brake carrier.
- Secure brake caliper.
- Insert cover caps -arrows-.
- Insert brake pad retaining spring into hole in brake caliper -arrow-.
Note Make sure that retaining spring is seated properly in holes in brake caliper.
- Move pistons forwards using - Vehicle diagnostic tester.
- Fit the wheels.
Specified torques
- Wheel bolts
Note After changing pads, check the brake fluid level.
 Assembly overview - rear brakes
Rear brake - exploded view, brakes CI 38 for live axle and manual parking
brake
- Brake carrier bolt
90 Nm + 90º
Renew
- Wheel bearing housing
Removing and installing
...
 Removing and installing brake calliper
Removing and installing brake calliper,
vehicles with manual parking brake
Note
Use brake filling and bleeding equipment - VAS 5234- to extract
brake fluid from brake fluid reservoir.
Before ...
See also:
Air filter: Clean housing and renew filter
element
Special tools and workshop equipment required
Torque wrench 2-10 Nm - VAG 1783-
Hose clip pliers - VAS 6362-
NOTICE
Always use a genuine air filter cartridge .
Use a silicone-free ...
