Seat Leon >> Removing and installing coolant pipes on heat exchanger
Removing and installing coolant pipes at heat exchanger (Valeo)
Note There are different designs and makes of heater and air conditioning unit. The individual components of the various heaters and air conditioning units are similar but not identical (distinguishing features). The combined fitting of different makes of component is therefore not permissible.
Removal:
- Set the air outflow direction to "defroster vent" for windscreen.
- Move front seat to rearmost position.
- Turn off the ignition and all electricity consumers.
Vehicles without access and start authorisation system
- Remove ignition key, if fitted.
Vehicles with access and start authorisation system
- Store ignition key outside the vehicle to prevent the ignition from being switched on unintentionally.
Continued for all vehicles
- Remove heater and air conditioner unit.
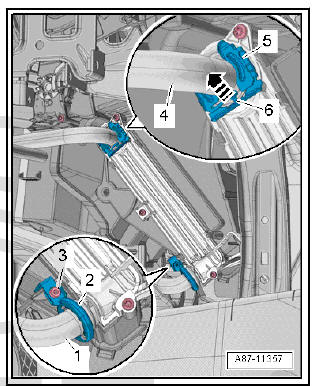
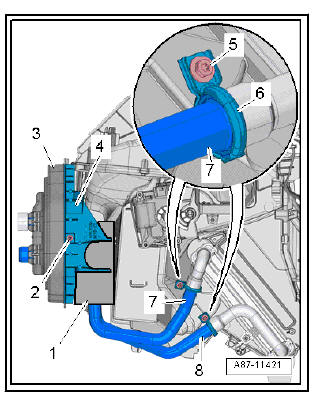
- Detach the sealing collar -3- to the plenum chamber bulkhead.
- Screw out bolt -2-.
- Detach the coolant pipe holder -4- to the left.
- Detach the foam -1-.
- Lift the locking element -7-, remove the clip -6- and detach the coolant line at the top -5- from the heat exchanger.
- Unscrew the bolt -8-.
- Remove the screw-type clamp -9- and detach the coolant line at the bottom -10- from the heat exchanger.
- Detach the coolant pipes.
Installing
Install in reverse order of removal; note the following.

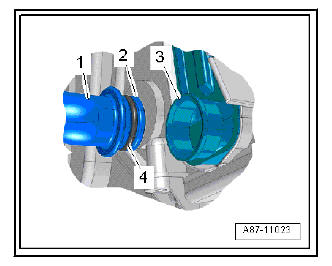
- Check connection -3- of the heat exchanger and connection -2- of the coolant pipes for damage or contamination.
- Clean and smooth sealing surface for O-ring.
- Moisten the new O-ring -4- with coolant (or lubricate lightly with silicone grease) and attach to the coolant pipe -1-.
- Slide coolant pipes into heat exchanger as far as stop.
| Caution Risk of leaks at heat exchanger.
|
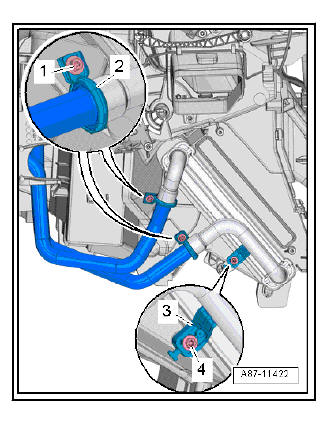
- Fit a new screw-type clamp -2- at the coolant pipe/heat exchanger joint.
Note When performing repairs, a screw-type clamp can also be fitted instead of the clip -5-, ignore -arrow-.
- Tighten the bolt -3- to torque.
- Check that screw-type clips are seated correctly on connections of heat exchanger and coolant pipes. They must not make contact with air distribution housing or other components.
- Fit the heater and air conditioning unit.
Coolant pipes on the heat exchanger: Removing and installing
Note There are different designs and makes of heater and air conditioning unit. The individual components of the various heaters and air conditioning units are similar but not identical (distinguishing features). The combined fitting of different makes of component is therefore not permissible.
Removal:
- Turn off the ignition and all electricity consumers.
Vehicles without access and start authorisation system
- Remove ignition key, if fitted.
Vehicles with access and start authorisation system
- Store ignition key outside the vehicle to prevent the ignition from being switched on unintentionally.
Continued for all vehicles
- Remove heater and air conditioner unit.
- Detach the sealing collar -3- to the plenum chamber bulkhead.
- Unscrew the bolt -2-.
- Detach the coolant pipe holder -4- to the left.
- Detach the foam -1-.
- Screw out the bolt -5- and detach the screw-type clamp -6-.
- Detach the coolant pipes -7, 8- from the heat exchanger.
Installing
Install in reverse order of removal; note the following.
- Check connection -3- of the heat exchanger and the connection of the coolant pipes -2- for damage or dirt.
- Clean and smooth sealing surface for O-ring.
- Moisten the new O-ring -4- with coolant (or lubricate lightly with silicone grease) and attach to the coolant pipe -1-.
- Slide coolant pipes into heat exchanger as far as stop.

| Caution Risk of leaks at heat exchanger.
|
- Fit new screw-type clamps -2- at the coolant pipe/heat exchanger joint.
- Tighten the bolt -1- to torque.
- Check that screw-type clips are seated correctly on connections of heat exchanger and coolant pipes. They must not make contact with air distribution housing or other components.
- Fit the heater and air conditioning unit.
 Removing and installing heat exchanger
Heat exchanger: removing and installing;
manufacturer, Valeo
Note
There are different designs and makes of heater and air conditioning
unit. The individual components of the various heaters and
a ...
 Removing and installing evaporator
temperature sensor - G308-
Removing and installing evaporator
temperature sensor - G308-
Note
Vehicles with air conditioner only, opening in heater is sealed off
on vehicles with heater.
Removal:
Turn off the ignition and all electricity consumers.
Vehicles without access and st ...
See also:
Seat belts: testing
CAUTIONThe seatbelt system must be systematically
verified following
every accident. If tests reveal any damage then the customer
must be informed of the need to change the seatbelts. ...
