Seat Leon >> Removing and installing side window (ST model)
- Electric cutter - SAT 1561A-
- Knife set - SAT 1561/20-
- Removal kit for flush bonded windows - VAS 6452- 22)
- Release lever - U 30800-
- Measuring tool - U 40807-
- Window suction pads - VAG 1344-
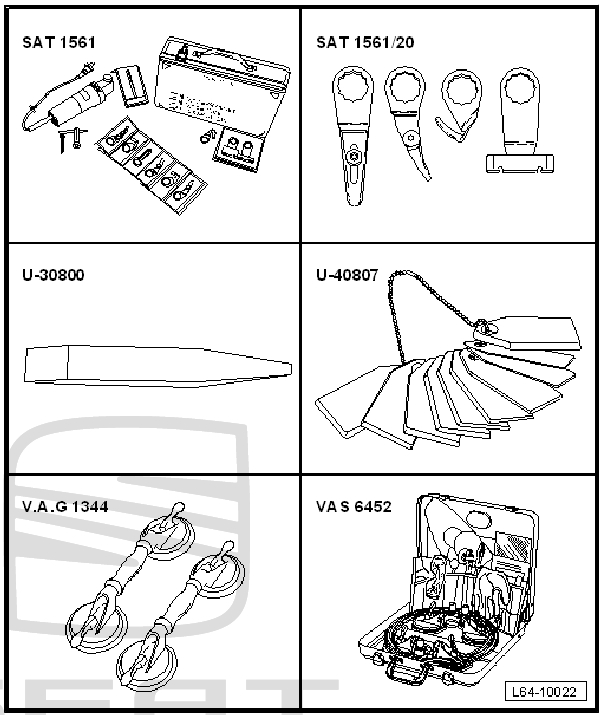
Special tools and workshop equipment required
- Window sealant pistol - SAT 5350-
- Cable holder knob - VAG 1351/1-
- Removal equipment - VAG 1474B-
- Window extraction kit - VAG 1755-
- Cartridge heater - VAG 1939A-
- Dual component window sealant - VAS 5237-
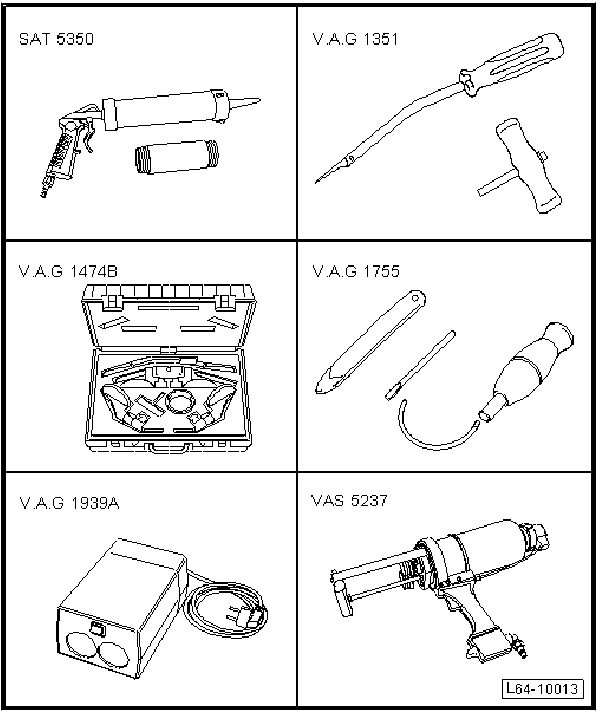
Materials
- Cutting wire
- Cutting cord
- 1 component glue 23) 25)
- Two-component adhesive 24)
- Actuator for washers
- Cleaning solution
- Applicator
- Adhesive remover
- Primer (glass/paint)
22) Note the manufacturer's instructions in the packaging insert slip.
23) To apply this material use the window sealant pistol - SAT 5350- .
24) To apply this material use the window glue pistol - SAT 5360- .
25) Note drying times.
Undamaged side window, ST model: removal
- Remove side trim.
- Rosen and secure upper B-pillar cover.
- Rosen and secure upper C-pillar cover.
| DANGER!
When removing a screen you must wear protective goggles
and leather gloves. Note the manufacturer's instructions in the packaging insert slip. |
- To remove the side window on the model ST, use the splitter - VAG 1474B- with two rollers of the reel device and the cutting cord.
- Use wire reel - VAS 6452/1- to reel off about 2.50 metres of cutting wire (corresponding to 2 turns) and cut off.
| Caution Risk of damage to paintwork. |
- Protect the vicinity of the working area and the body surface around the reamer exit point with body tape -2- and with the protective film on the separating fixture - VAG 1474B- .
| Caution Risk of perforation of the profile surrounding the window. |
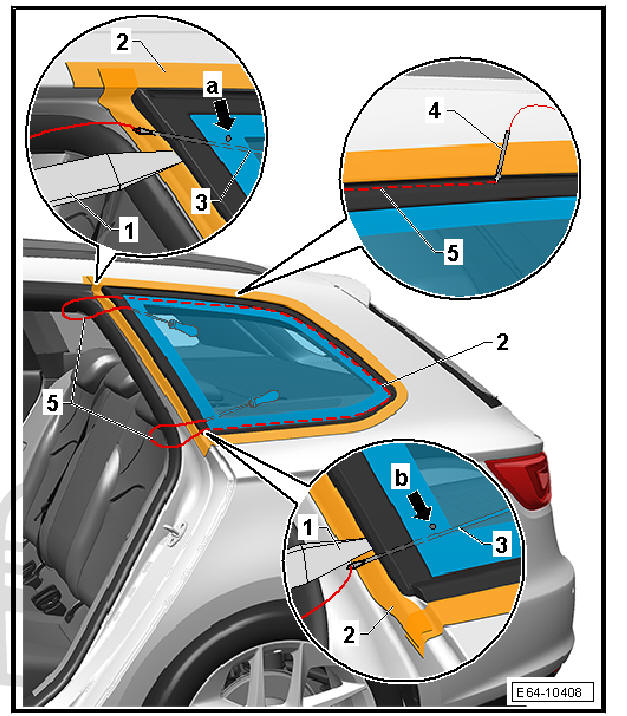
- Cut through the surrounding profile -1- with the plastic wedge, cutting from surface of body beside the reamer exit point.
| DANGER! Risk of injury. |
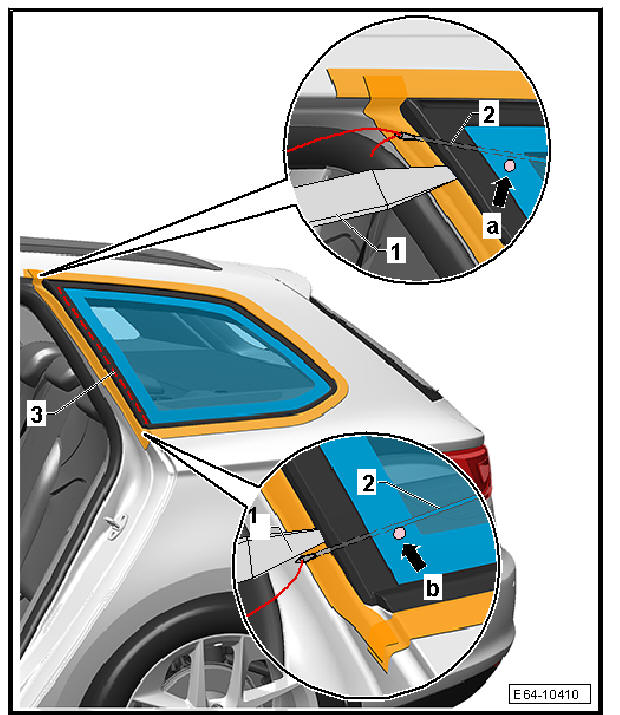
- Pierce through the bead of adhesive sealant (PUR) with an awl -3- from the inside to the outside at the top left-hand corner of the window below the attachment block -arrow a-.
- Pierce the adhesive bead once again using another awl -3- from the inside to the outside at the bottom left-hand corner of the window exactly below the securing block -Arrow b-.
- Lace both ends of the cutting wire -5- into the awl -3-. Pull on the awl and guide the ends of the thread in the passenger compartment.
Note
- Note that the ends of the thread need to be sufficiently long to reach the top right edge of the window.
- To ease insertion of the cutting cord, spray the window's surrounding profile with soapy water.
- Using the fixture -4- on the window removal kit - VAG 1755- , position the cutting thread -5- under the surrounding profile of the window.
- As shown on the figure, secure the reeling fixture of the window removal kit - VAG 1755- by attaching suckers to the inside surface of the window.
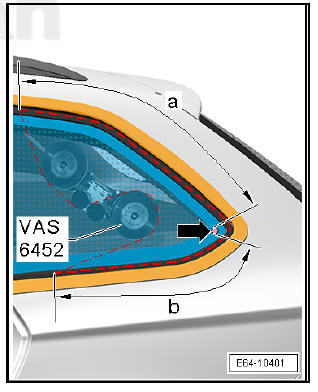
- Guide both ends of the cutting thread -1- into the rollers -2- on the reeling fixture of the cutting fixture for windows - VAS 6452- .
Note
- During the cutting process, use the reamer whenever the cutting thread is near to the edges of the body panel.
- Of the two securing blocks -arrows- you should only retain the bottom one. The top block is cut by the cutting cord.
- With the aid of the reel device of the window splitter - VAS 6452- , cut off the adhesive bead in the zones defined by dimensions -a- and -b-.
- Release the thread in a controlled manner using the rollers on the reeling fixture, then move the reeling fixture into its new position as shown in this Fig.
Note
- During the cutting process, use the reamer whenever the cutting thread is near to the edges of the body panel.
- In this process, the retaining block -Arrow- should be retained.
- With the aid of the reel device, cut off the adhesive bead at the zones defined by dimensions -a- and -b-.
- Release the thread in a controlled manner using the rollers on the reeling fixture and remove the reeling fixture from the window.
- With the wire unrolling device - VAS 6452/1- , unroll approx. 1.50 m of cutting wire (this equates to one complete turn of the wire unrolling device) and cut to length.
- Protect the body surface area near the exit point of the reamer -2- with body tape.
| Caution Risk of perforation of the profile surrounding the window. |
- Cut through the surrounding profile -1- with the plastic wedge, cutting from surface of body beside the reamer exit point.
- With the aid of the cut already made in the adhesive bead, push the awl -2- through from the inside to the outside at the top left-hand corner of the window -arrow a-, exactly above the securing block previously cut with the cutting cord.
- Push another awl -2- through the cut-off adhesive bead from the inside to the outside at the left-hand bottom corner of the window - exactly above the securing block -arrow b-.
- Guide the two ends of the cutting thread through the aperture in reamer -2-. Pull on the awl and guide the ends of the thread in the passenger compartment.
Note
- Care is to be taken to ensure that the ends of the cord are long enough to reach the top corners of the window.
- To ease insertion of the cutting cord, spray the window's surrounding profile with soapy water.
- Using the fixture -1- on the window removal kit - VAG 1755- , position the cutting thread -2- under the surrounding profile of the window.
- As shown on the figure, secure the reeling fixture of the window removal kit - VAG 1755- by attaching suckers to the inside surface of the window.
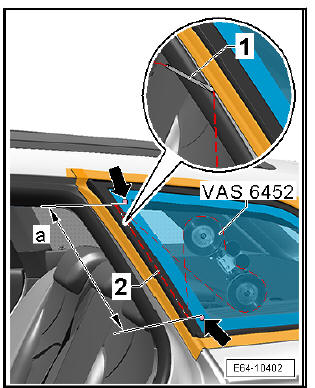
- Guide both ends of cutting thread -2- into the rollers of the reeling fixture on the separating fixture for windows - VAS 6452- .
Note
- During the cutting process, use the reamer whenever the cutting thread is near to the edges of the body panel.
- In this process the cutting thread ends cross each other.
- Of the two securing blocks -arrows- you should only retain the bottom one. The top block was cut in the preceding operation.
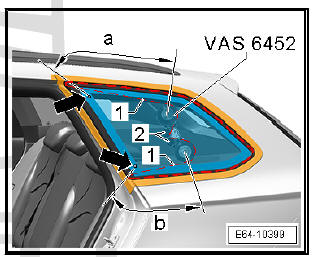
- By applying the coil guide -arrow- cut the adhesive bead in the area of the dimension -a-.
- Release the thread in a controlled manner using the rollers on the reeling fixture and remove the reeling fixture from the window.
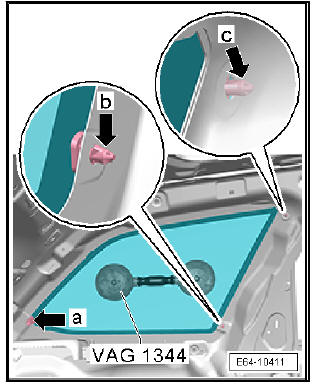
- Move the suction lifter - VAG 1344- onto the outside face of the window and hold the window pressed down against the body flange. Push from the inside of the vehicle against the retaining tab of the securing block -b-.
Note
- The retaining block -a- is not secured to the body; it is only there for positioning purposes.
- The securing block -c- is not accessible and was cut in the preceding operation.
| Caution Risk of damage to paintwork |
- Remove the window from the body with the aid of the suction lifter - VAG 1344- .
Damaged side window, model ST: removal
Special tools and workshop equipment required
- Protective goggles and leather gloves
- Remove side trim.
- Rosen and secure upper B-pillar cover.
- Rosen and secure upper C-pillar cover.
| Caution The blades are marked with the manufacturer's part no. This number is engraved on the blade. To avoid damaging the paintwork, protect the surfaces near the work areas with masking tape and with the protective film of the splitter - VAG 1474B- . |
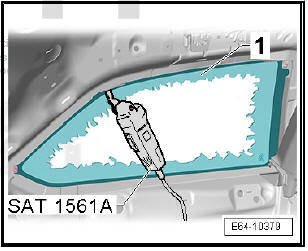
- To remove a damaged side window on the model ST, use the electric knife - SAT 1561A- and the set of blades - SAT 1561/20-
| DANGER! Always wear safety goggles and leather gloves. |
| WARNING When cutting the adhesive material (PUR) with glass residues attached, take care not to damage the body. |
- Protect the chassis and the interior from the glass remains -1-.
- Remove the pieces of glass as far as the adhesive bead.
- Using the electric knife - SAT 1561A- and the set of blades - SAT 1561/20- cut off the adhesive bead stuck to the body flange.
Side window, model ST: installation
Note Follow the instructions accordingly.
 Side window, 3 door model: removal and installation
Electric cutter - SAT
1561A-
Knife set - SAT 1561/20-
Separator for windows -
VAS 6452- 18)
Release lever - U 30800-
Measuring tool - U 40807-
Window suction pads -
VAG 1344-
S ...
 Door windows
...
See also:
Removing and installing door seal
Special tools and workshop equipment required
Release lever - 3409-
Thrust piece - T20098-
Back door seal: Removing
Note
The sequences below describe the processes for removal and
...
