Seat Leon >> Removing and installing sliding sunroof frame
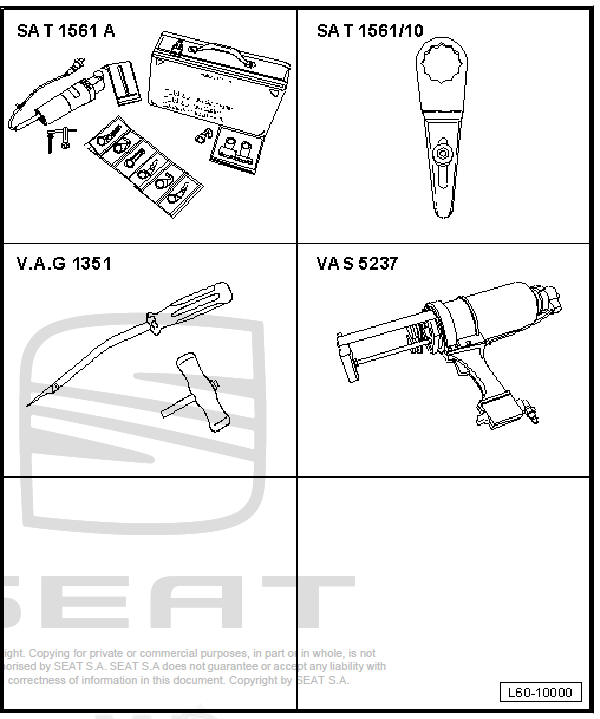
Special tools and workshop equipment required
- Electric cutter - SAT 1561A-
- Knife 207 - SAT 1561/12-
- Pull handle - VAG 1351/1- (x2)
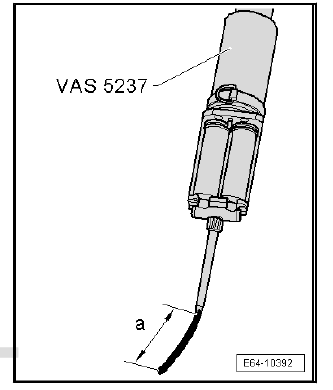
- Dual component window sealant - VAS 5237-
Materials
- Dual-component glue - D 004 660 M2- 1) 2)
- Cleaning solvent - D 009 401 04-
- Applicator - D 009 500 25-
- Glue solvent - D 002 000 A2-
- Primer (Glass/Paint) - D 009 200 02-
- Cutting thread - 357 853 999 B-
1) To apply this material use the window sealant pistol - VAS 5237- .
2) Note drying times.
Removing
| Caution The method for removing the sliding/tilting sunroof frame is similar if an undamaged or new frame is used. |
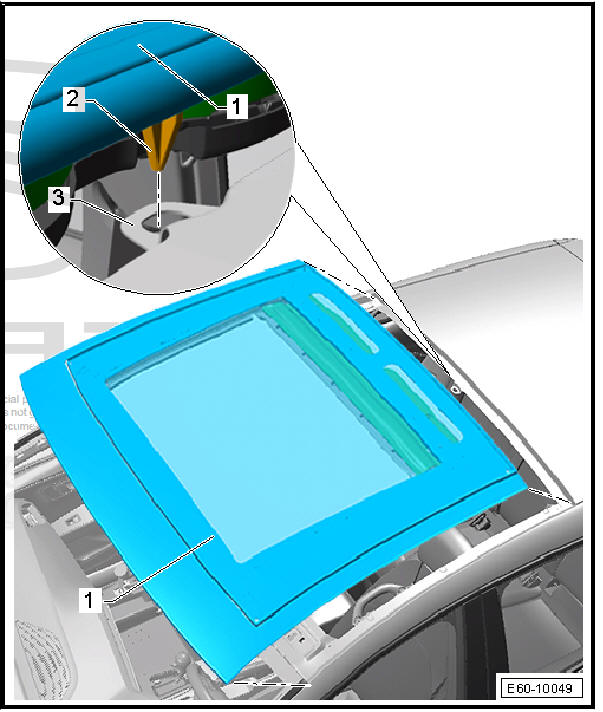
- Remove panoramic window.
- Remove the trim panel of the sliding/tilting sunroof.
- Unplug electrical connectors for sliding/tilting sunroof.
- Removing roof trim .
- Remove curtain airbag with initiator Driver side curtain airbag initiator - N251- / Passenger side curtain airbag initiator - N252- .
| Caution Risk of damage of the plug connector or cutting the electrical cable. |
- With help from the masking tape on the windscreen attach the sun panel connector.
Note
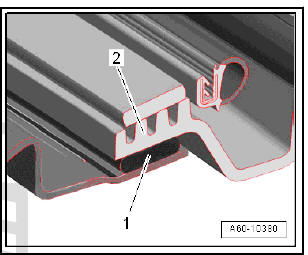
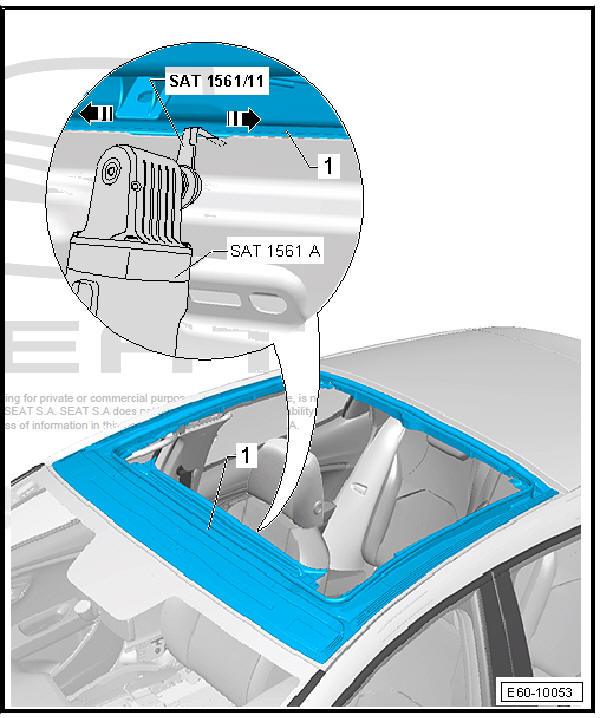
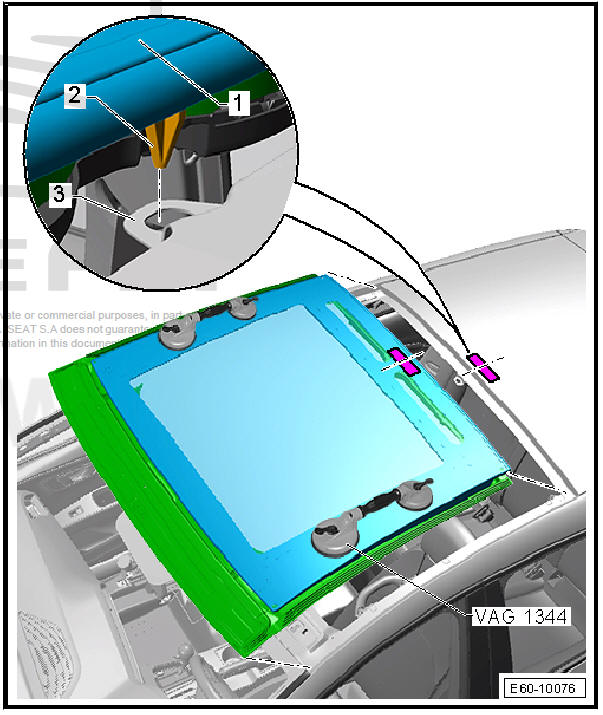
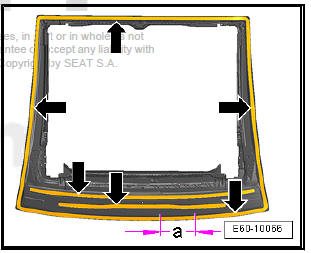
- The removal of the sliding/tilting sunroof frame remains when cutting the adhesive sealing material (PUR) -1 - between the frame -2- and the bodywork.
- The -arrows -identify the position of the adhesive sealant material.
| WARNING Risk of paintwork damage |
- Protect the lateral and rear area of the exterior mirror housing near the work area with masking tape.
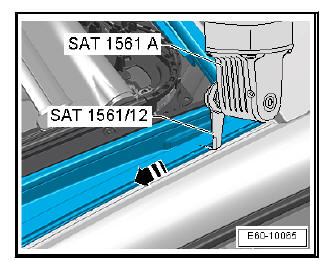
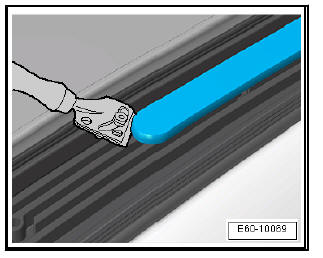
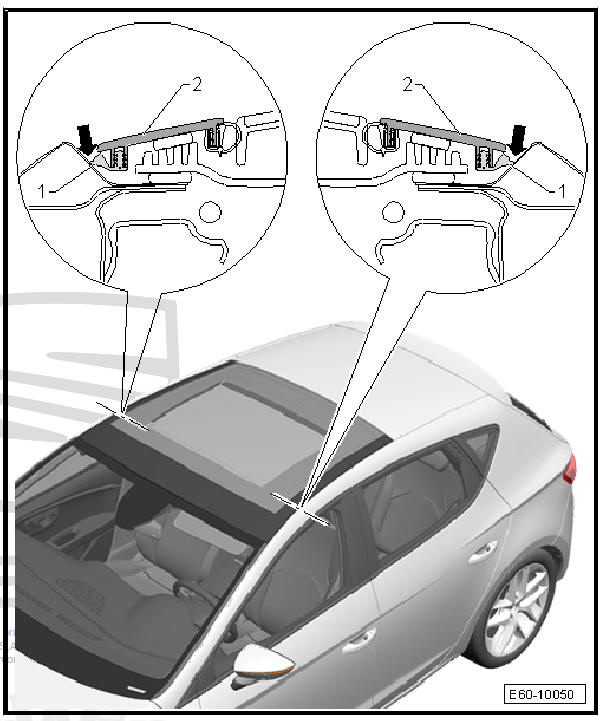
- Insert in the rear of the frame the electrical cutter - SAT 1561Awith blade 207 - SAT 1561/12- between the bodywork and trim panel. Cut open the bonding bead on both sides up to the front area of the frame.
- Cut open the front bonding bead on the front of the frame.
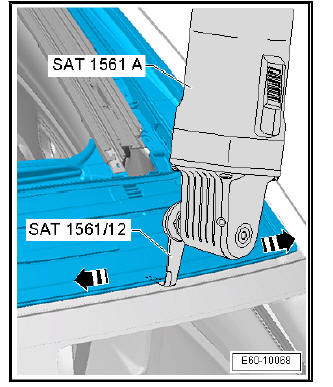
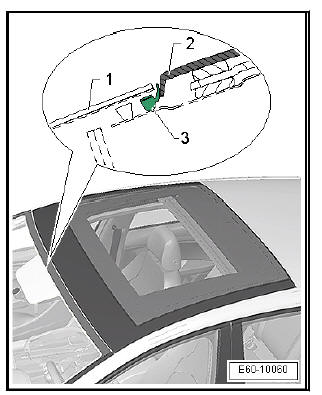
- From the vehicle interior cut open the bonding bead: for this insert the electrical cutter - SAT 1561A- using blade 207 - SAT 1561/12- between the centre recess -arrow -of the bodywork and the sliding/tilting sunroof frame.
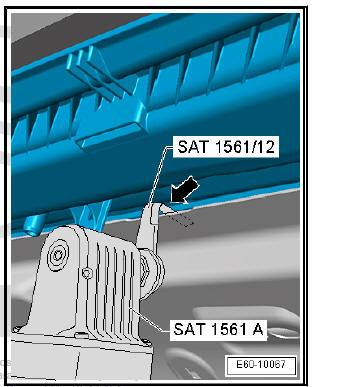
- In both lateral directions cut open according to the -arrows-.
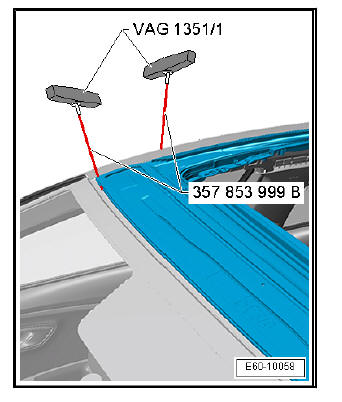
- With help from two cable holder knobs - VAG 1351/1- with cutting thread - 357 853 999 B- insert the thread via the completed cuts in the front area, and pull alternating on both knobs until the adhesive material string is completely removed.
- Remove the frame of the sliding/tilting sunroof.
Caution
|
Bodywork flange: preparation for installing the sliding/tilting sunroof frame
If a (new or used) frame has to be installed, the adhesive bead and adhesive sealing material (PUR) must be cut back from the body flange. For this purpose follow these instructions:
Caution
|
- Shortly before re-applying the adhesive to the sliding/tilting sunroof, cut back the adhesive bead stuck to the bodywork flange to a height of 1 to 2 mm using the electric knife - SAT 1561A- and set of blades - SAT 1561/20- .
Note
- The remaining material is required as a base for the new adhesive sealing material (PUR).
- If the bodywork flange has been reworked or partially replaced, after painting, the new zone must be cleaned and primed correspondingly.

| Caution The bonding surfaces must be free of dust and grease. Do not apply primer to the previously cut-back adhesive bead and do not treat with solvent. |
Undamaged sliding/tilting sunroof frame: preparing for installation and removal
| Caution If an undamaged sliding/tilting sunroof is reused, the adhesive sealing material strings (PUR) must be cut back. It must be observed that the top adhesive beads (for connecting the sliding/tilting sunroof trim panel) and the bottom adhesive beads (for connecting to the bodywork) must be cut back. The adhesive material strings are cut back shortly before reinserting the sliding/tilting sunroof frame. If an adhesive bead is not applied to the frame immediately after being cut, this must be "activated" with the glass activator - D 181 802 M1- . |
- Shortly before applying the adhesive to the frame, cut back the adhesive bead stuck to the frame to a height of 1 to 2 mm.
Note
- In areas with tabs, as displayed in the figure, the adhesive material must be cut back until it is flush with the upper part of the tabs.
- The remaining material is required as a base for the new adhesive sealing material (PUR).
| Caution The bonding surfaces must be free of dust and grease. Do not apply primer to the previously cut-back adhesive bead and do not treat with solvent. |
- Remove the sliding/tilting sunroof frame and install according to the instructions.
Install the undamaged trim panel of the sliding/tilting sunroof
Special tools and workshop equipment required
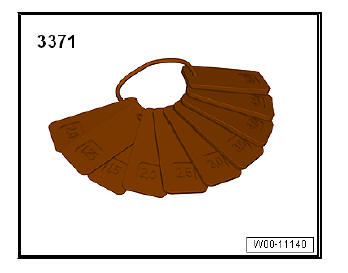
- Adjustment gauges - 3371-

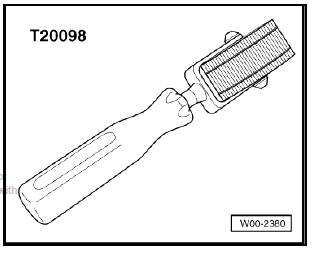
- Thrust piece - T20098-
- Undamaged window of the sliding/tilting sunroof is prepared for installation.
- Bodywork flange is prepared for the installation of sliding/tilting sunroof frame.
- Install on the sliding/tilting sunroof frame:
- frame with drive mechanism
- panoramic window
Note The rear seal of the panoramic window may NOT be installed to allow the correct alignment of the sliding/tilting sunroof frame in reference to the bodywork.
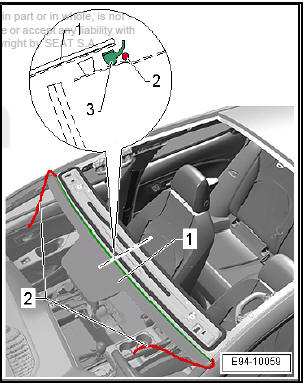
- Apply the masking tape -1- in the stated areas of the panoramic window -4- and the roof -3-.
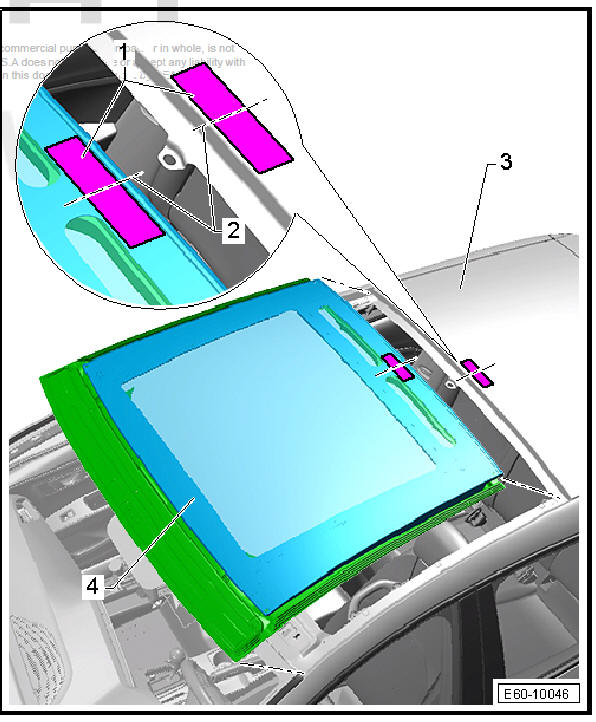
- Mark the masking tape using a felt tip pen -2- in the centre of the panoramic window -4- and the roof -3-.
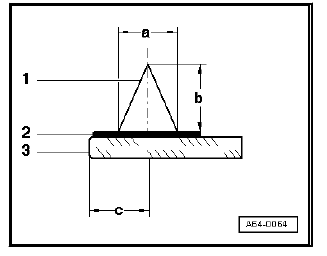
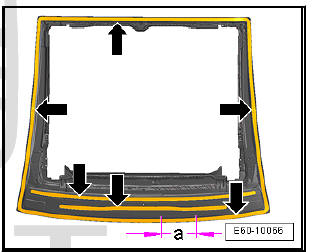
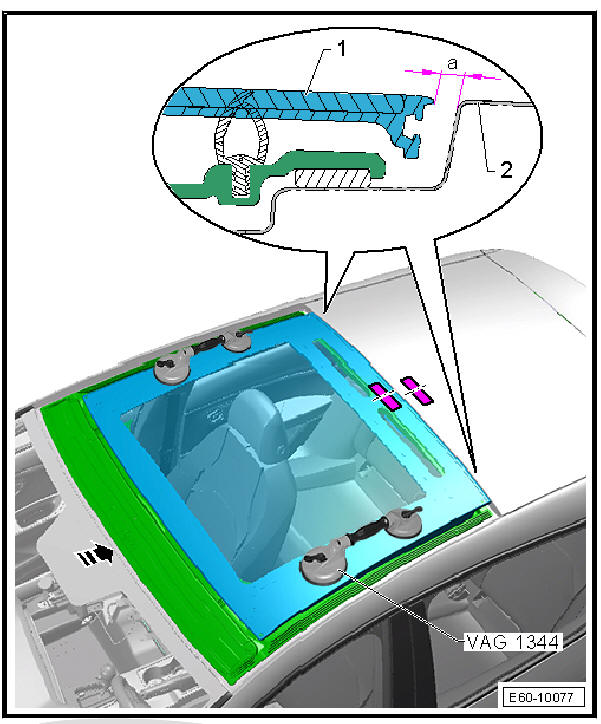
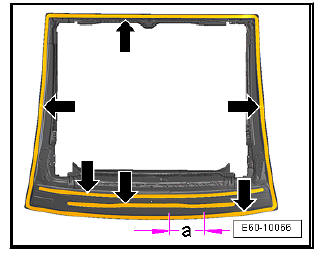
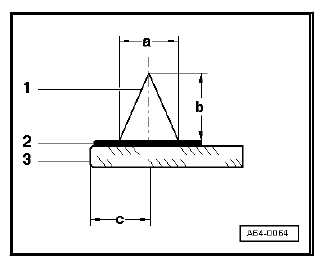
Features of the adhesive bead and adhesive sealing material (PUR)
- - Bead of glue
- - Primer
- - Sliding/tilting sunroof frame.
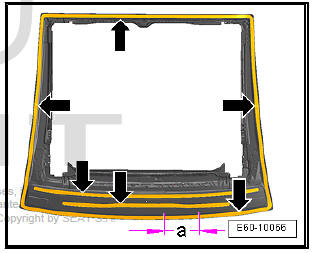
- Distance -a- = 8 mm
- Dimension -b- = 12 mm
- Dimension -c- = the area for the application of the adhesive sealing material (PUR) is different depending on the sliding/ tilting sunroof frame imprinting.
Note
- If the sliding/tilting sunroof trim frame is not damaged, apply
the material on the old adhesive bead previously cut back.
Follow the instructions accordingly.
- With a new frame, apply the material on the primer layer. Follow instructions below:
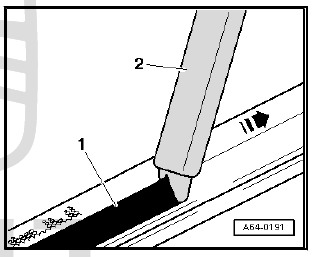
General requirements for applying the adhesive bead
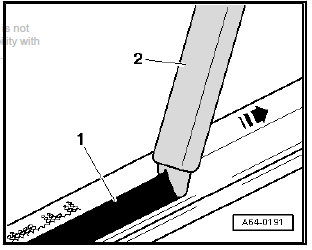
Note In order to ensure for the homogeneous properties of the dual component mixture, apply a bead -a- with 10 cm to a clean surface and dispose of the first piece of the product.
- The sleeve -2- must rest flush.
- Hold the gun permanently at right angles to the parts being treated.
- The -Arrow- indicates the direction of travel.
- The diameter of the adhesive bead -1- will depend on the width of the hole in the applicator and the speed of application.
- Apply on the indicated area of the frame using the twin cartridge gun - VAS 5237- an adhesive bead of the dual component adhesive - D 004 660 M2- -arrows-.
- -a-= about 50 mm, adhesive bead overlapping zone.
fitting
| WARNING The glass must be fitted before 10 minutes elapse, as the adhesive properties of the adhesive sealing material (PUR) are reduced after that time. |
- Attach a rope -2- in the upper area of the window -1- underneath the sealing lip -3-.
Note
- Keep the rope in this position until the bonding process for the sliding/tilting sunroof frame is completed.
- The rope is used to reposition the lip in reference to the sliding/ tilting sunroof trim panel.
- At each side of the panorama roof install a suction lifter - VAG 1344- .
- With the assistance of a second mechanic, lay the frame and glass -1- on the roof flange and insert the centring pin -2- into the opening in the bodywork -3-. Push evenly against the frame.
| Caution There is a risk of the adhesive curing too soon!
|
- Check to make sure the felt pen markings are aligned on top of each other. If necessary, adjust.
- In the rear area of the panoramic window (with the rear seal removed) insert on each side, a 5 millimetre long brake lever from the brake lever kit - 3371- , between the window -1- and the roof flange -2-. Push frame and window into the -direction of the arrow- to make sure that the distance -a- = 5 mm.
Note During the task described last, check the front and rear parts of the frame (for example with an 8 mm drill bit) and make certain that the gap to the roof flange is equal on both sides. If necessary, adjust.

- For this purpose use the suction lifters - VAG 1344- as an aid and hold everything steady with the support equipment - T10038- .
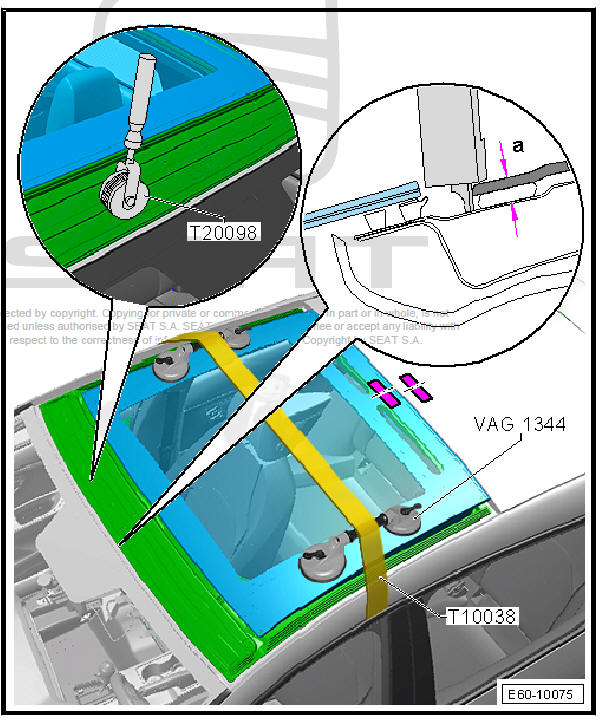
- Check the front of the sliding/tilting sunroof with a setting gauge in at least three places for height -a= 7.1 mm- between the top edge of the frame and the bodywork. If necessary, push with the pressure piece - T20098- in order to achieve the specified height.
New frame on sliding/tilting sunroof: Assembly
Special tools and workshop equipment required
- Adjustment gauges - 3371-
| Caution The sliding/tilting sunroof frame intended as a spare part has the following features:
|
- Bodywork flange is prepared for the installation of sliding/tilting sunroof frame
- Install on the sliding/tilting sunroof frame:
- frame with drive mechanism
- panoramic window
Note The rear seal of the panoramic window may NOT be installed to allow the correct alignment of the sliding/tilting sunroof frame in reference to the bodywork.
- Attach a rope -2- in the upper area of the window -1- underneath the sealing lip -3-.
Note
- Keep the rope in this position until the bonding process for the sliding/tilting sunroof frame is completed.
- The rope is used to reposition the lip in reference to the sliding/ tilting sunroof trim panel.
The following steps must be followed for preparing installation of the new frame:
- Using a cleaning solvent - D 009 401 04- clean the surface for the adhesive bead -arrows-. Then rub edge of window dry using a lint-free cloth.
- Apply glass/paint primer - D 009 200 02- on the surface for the adhesive bead -arrows-.
Note Apply the primer evenly and in one step using a fully drenched felt.
- Primer width approx. 20 mm
- Apply primer centrally in relation to adhesive bead.
- Flashing-off time, approx. 10 minutes.
Features of the adhesive bead and adhesive sealing material (PUR)
- - Bead of glue
- - Primer
- - Sliding/tilting sunroof frame.
- Distance -a- = 8 mm
- Dimension -b- = 13.5 +- 1.5 mm
- Dimension -c- = the area for the application of the adhesive sealing material (PUR) is different depending on the sliding/ tilting sunroof frame imprinting.
General requirements for applying the adhesive bead
- The sleeve -2- must rest flush.
- Hold the gun permanently at right angles to the parts being treated.
- The -Arrow- indicates the direction of travel.
- The diameter of the adhesive bead -1- will depend on the width of the hole in the applicator and the speed of application.
- Apply on the indicated area of the frame using the twin cartridge gun - VAS 5237- an adhesive bead of the dual component adhesive - D 004 660 M2- -arrows-.
- -a-= about 50 mm, adhesive bead overlapping zone.
fitting
| WARNING The glass must be fitted before 10 minutes elapse, as the adhesive properties of the adhesive sealing material (PUR) are reduced after that time. |
- Set the frame and window -1- on the roof flange and insert the centring pin -2- in the opening -3-.
- Exercise even pressure on the frame until the spacer caps are resting on the bodywork flange.
- Check to make sure the felt pen markings are aligned on top of each other. If necessary, adjust.
- In the rear area of the panoramic window (with the rear seal removed) insert on each side, a 5 millimetre long brake lever from the brake lever kit - 3371- , between the window -1- and the roof flange -2-. Push the frame and window against the feeler gauges to maintain the clearance -a-= 5 mm.

- Push the frame and window down to make sure that the seal -1- of the trim panel -2- touches the bodywork -arrow-.
Note The bodywork form allows the frame and window to be positioned in centre.
- Minimum curing period.
- Taking the sliding/tilting sunroof trim panel -2- as a reference, reposition the sealing lip -3- previously mounted in area of windscreen -1-.
- Install sealing of the panoramic window.
Touching up paint damage
Repair paint work according to specifications in - repair guidelines for vehicle paint work ; if necessary, perform recommended corrosion protection measures.
For damage to paintwork in unseen zones, proceed as follows:
- Repaint twice (wet on wet) leaving both coats to air.
Frame on sliding/tilting sunroof: Minimum curing time
| WARNING For safety reasons, only use non-conductive dual component adhesive with the designations listed below when installing the sliding/tilting sunroof frame. You must NOT drive the vehicle until the minimum drying time has elapsed, as the vehicle is otherwise not safe to drive. |
| Adhesive material | Minimum drying time (in hours) | |
| Sliding/tilting sunroof frame |
2-component window adhesive - DA 004 600 A2- |
3 |
Removing any soiling that has been caused by the adhesive material
- Use of glue removal is recommended for cleaning - Electronic parts catalogue . Observe safety precautions when using.
| WARNING When cleaning from the inside of the vehicle, do not press the newly-placed glass outwards. |
- First clean painted surface as well as possible using a dry cloth. Remove contamination residues with glue remover - Electronic parts catalogue .
- Cleaning plastic trims: Allow the sealant to harden (approx. 1 hour) and then remove.
 Assembly overview - sliding sunroof sun blind
- Tension bow
- Sliding piece (bottom part)
- Sliding piece (top part)
This element has a
spring on its right side
- Spring
1x
Only for the right side
- Spring cov ...
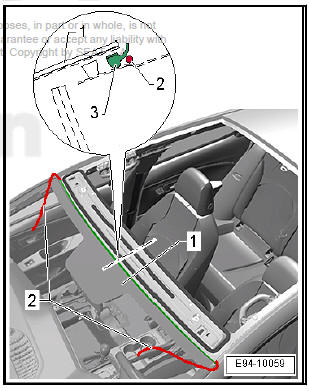
 Removing and installing wind deflector
Removing
Note
To remove the wind deflector -3- it is not necessary to remove the
bracket -1-.
Completely open the panoramic window.
Push against the frame of the wind deflector -3- to loosen ...
See also:
Removing and installing the cover for
the lock of the outside handle (back
door)
Special tools and workshop equipment required
Hooks - T40207-
Release lever - 3409-
Removing
Release the anti-jam protection -1- and guide the hook -
T40207- in the position sho ...
