Seat Leon >> Removing and installing clutch position sender - G476-
SEAT Leon Service and Repair Manual / 5-speed manual gearbox 0AH / Clutch / Clutch mechanism / Removing and installing clutch position
sender - G476-
Removing
- Push driver's seat as far back as possible.
- If fitted, remove footwell cover on driver side .
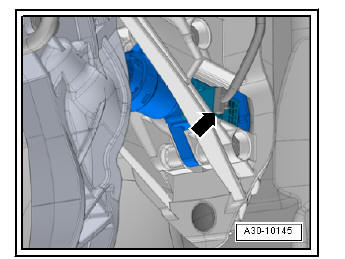
- Unplug electrical connector -arrow- at clutch position sender - G476- .
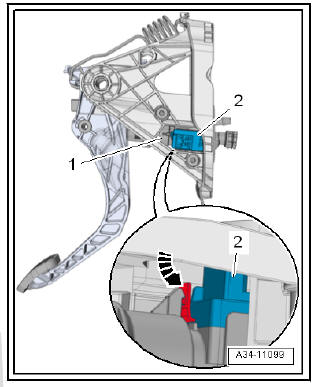
- Unclip clutch position sender - G476- -item 2- at clutch master cylinder -1- -arrow- and remove.
Installing
Carry out installation in the reverse sequence, noting the following:
- The latch -arrow- at the clutch position sender - G476- must be in good order.
- The clutch position sender - G476- must audibly engage.
- Adapt clutch position sender - G476- in Guided fault finding using - Vehicle diagnostic tester.
Repair the clutch release assembly
Special tools and workshop equipment required
- Torque wrenches - V.A.G 1331-
- Grease for clutch plate splines
- For grease allocation, refer to - Electronic parts catalogue (ETKA) .
Removing and installing clutch release lever -A- with release bearing and guide sleeve
- The gearbox must be removed.
- Remove bolts -arrows-.
- Pull clutch release lever with release bearing and guide sleeve off input shaft and ball stud.

Installation is carried out in the reverse order.
- Installing gearbox
Specified torques
- Guide sleeve to gearbox
Removing and installing guide sleeve for clutch release bearing
- Remove clutch release lever together with release bearing and guide sleeve.
- Remove the guide sleeve -3- from the clutch release collar -2- by pressing upwards.
- Rotate guide sleeve -3- about 90º in the direction of the arrow in relation to the clutch release collar -2- until the tabs of the guide sleeve are in the recesses -4- of the clutch release collar.
- Pull guide sleeve out of release bearing in this position.
Installation is carried out in the reverse order.
- Install clutch release lever with release bearing and guide sleeve
Removing and fitting the clutch release bearing
- Remove clutch release lever together with release bearing and guide sleeve.
- Press locking lugs -arrows- together on reverse side of clutch release lever and remove release bearing -A- from clutch release lever.
- To install, push release bearing -A- into clutch release lever until the retaining lugs -arrows- engage.
- Lubricate the contact point of the release lever with the ballhead pin with lubricant for the grooved clutch .
- Install clutch release lever with release bearing and guide sleeve.

 Bleeding clutch mechanism
Special tools and workshop equipment required
Brake filling and bleeding equipment - VAS 5234-
Note
After carrying out work on the hydraulic clutch mechanism, the
system must be bled.
...
 Clutch
Exploded view - clutch unit
- Flywheel
Removing and installing
check that the centring
pins are correctly seated
Contact surface for
clutch lining must be
free of grooves, oil ...
See also:
Removing and installing bonnet
Special tools and workshop equipment required
Torque wrench - V.A.G 1331-
Removing
Lift the front bonnet. Use the rod to keep it open.
Remove the supply hose -1- of the windscreen washer sys ...
