Seat Leon >> Repair instructions
Notes on general repairs
Extremely careful way of working as well as the highest possible cleanliness are necessary to ensure the trouble free repairing of the gearbox. Furthermore, the tools must be in perfect condition.
Naturally, the customary basic safety rules must be observed during repair work.
A number of general notes on the individual repair procedures, which were otherwise repeated in the relevant sections of the manual, are summarised here. These instructions are valid for this Repair Manual,
Special tools
For a complete list of special tools used in this Workshop Manual - Workshop equipment and special tools
Gearbox:
- When installing the manual gearbox, ensure that the dowel sleeves between the engine and gearbox are positioned correctly.
- Clean contact surfaces on fitting blocks, supports or waxed components. The surfaces must be completely free from wax or grease.
- Allocate bolts and other components using - Electronic parts catalogue (ETKA) .
- If the gearbox is repaired, fill with gear oil.
Gaskets, seals
After removing gaskets and seals, always inspect contact surface of housing or shaft for burrs resulting from removal or for other signs of damage.
- Thoroughly clean parting surfaces and apply sealant .
- Equivalent - Electronic spare parts catalogue (ETKA)
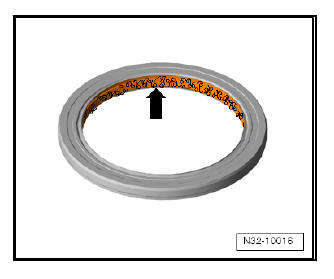
- Before installing the oil seal, fill the space between the sealing lips halfway with sealing grease -arrow-.
- For grease allocation, refer to - Electronic parts catalogue (ETKA) .
- The open side of the seals should face the liquid to be retained.
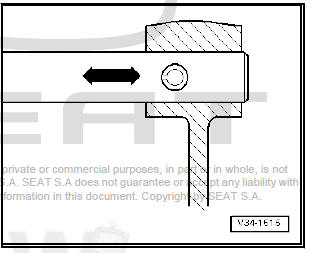
- Lightly oil O-rings before installing; this prevents the rings being crushed when inserted.
Sealant
- Thoroughly clean housing contact surfaces before applying sealing paste.
- Apply sealing paste uniformly but not too thick.
- Equivalent - Electronic spare parts catalogue (ETKA)
- Breather holes must remain free of sealant .
Retaining rings

- Replace safety rings.
- Do not over-expand safety rings.
- The securing rings must be perfectly seated in their groove.
- Replace split pins. Installation position: the groove must face parallel to the direction in which force is transferred.
Bolts, nuts
- Loosen and tighten bolts and securing nuts for covers and housings diagonally.
- For delicate parts, e.g. the clutch press, do not tilt them and always loosen the bolts gradually and in diagonal sequence
- The specified torque values listed apply to unlubricated nuts, bolts and screws.
- Renew self-locking nuts and bolts after each removal.
- Contact surfaces, bolts and nuts for all threaded joints must be waxed when fitted if necessary.
- Use a thread chaser to clear residual locking fluid from all
threaded holes into which self-locking bolts are to be screwed.
Otherwise there is a danger of the bolts shearing off the next time they are removed.
- Check pitch of thread, to ensure correct thread chaser is used to clean threads and to ensure the threads are not damaged.
Antifriction bearings
- Lubricate all bearings with gear oil before installing.
- Install the new conical roller bearings unchanged and without greasing it.
- Install needle bearings with lettered side (thicker metal) towards fitting drift.
- Conical roller bearings fitted into one same shaft must be replaced together. They must have the same manufacturer.
- The inner rings of the tapered roller bearing must be heated to about 100 ºC before the installation with the inductive heater unit - VAS 6414- .
- Do not confuse the outside and inside rings of the bearing with the rings from other bearings of the same size. The bearings come in matched pairs.
Shims
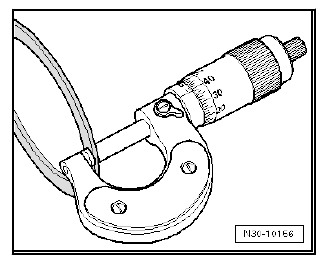
- Check shim settings at various points, using a micrometer.
The various thicknesses make it possible to achieve the exact shim thickness required.
- Check that it is not burred or damaged.
- Only fit shims in perfect state.
Synchromesh rings
- Do not interchange. Do not mix up synchroniser rings from different gears.
- Check for wear and replace if necessary.
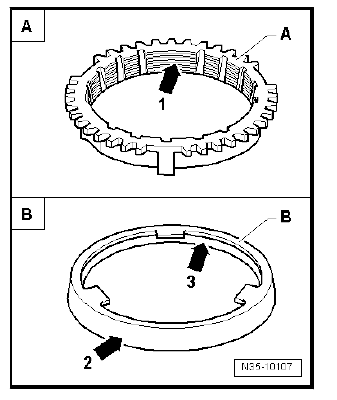
- Check grooves -arrow 1- of synchro-ring -A- and inner ring for flat spots (worn grooves).
- If synchro-rings are coated, coating must not be damaged.
- If an intermediate ring -B- is installed, check the outer friction surface -arrow 2- and inner friction surface -arrow 3- of this intermediate ring for "scoring", "signs of abnormal wear" and "blue discolouration (due to overheating)".
- Check the cone of the synchromeshed gear for "scoring" and "signs of abnormal wear".
- Moisten synchromesh mechanism with gear oil before installing.
Gears and synchro-hubs
- Before installing, clean and heat with the inductive heater - VAS 6414- to maximum 100º C.
- Note correct installation position.
Mobile pinions
- After assembly, check synchromeshed gears for slight play, or for freedom of movement.
Clutch mechanism
Disconnect battery.
When the battery is re-connected.
Clutch
- Ensure that the pressure plate is kept straight: loosen and tighten bolts in a diagonal sequence and in several gradual stages.
- If the clutch has burnt out, thoroughly clean the clutch housing as well as the friction surface of flywheel with a cloth to reduce the smell of burnt linings.
Technical data
Filling quantity

Allocation gearbox - engine
Glean following data from :
- Individual gear ratios
- Gear oil
- Allocation of clutch type
Ratio calculation
As an example:

i = ZG2 : ZG1 1)
iG = Gear ratio = ZG2: ZG1= 33 : 46 = 0.717
iA = Final drive ratio = ZA2 : ZA1 = 70 : 24 = 2.917
itotal. = overall ratio = iG x iA = 0.717 x 2.917 = 2.091
1) T1 = No. of teeth on driving gear, T2 = No. of teeth on driven gear
 Identification
Gearbox codes
Configuration of identification codes and construction data on
manual gearbox -arrow-
Identification letters and production date of the gearbox -arrow-
Additional data identify ...
 Overview of the drive force
Transmission layout - front-wheel drive
Denomination
-Arrows- point in direction of travel.
- Engine
- Clutch
- Manual gearbox
- Input shaft
- Secondary shaft
- Differential:
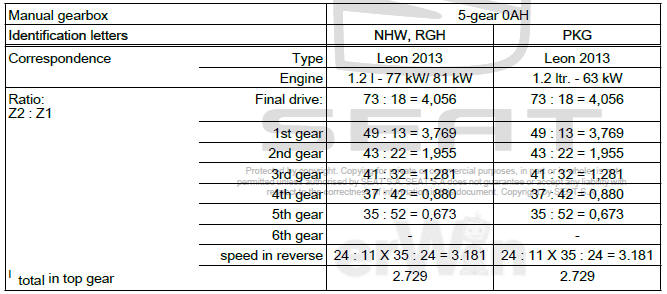
Rati ...
See also:
Glove compartment light - W6- : Removing
and installing
Special tools and workshop equipment required
Lever - U30800-
Note
For removing and installing of components located in a visible
zones (switches, covers, linings, etc.) always protect the ...
