Seat Leon >> Assembly overview - steering column
SEAT Leon Service and Repair Manual / Running gear, axles, steering / Steering / Steering column / Assembly overview - steering column
Note
- Always replace self locking nuts following their removal.
- Always renew corroded nuts and bolts.
- Replace the nuts and screws that are tightened with specified tightening angle.
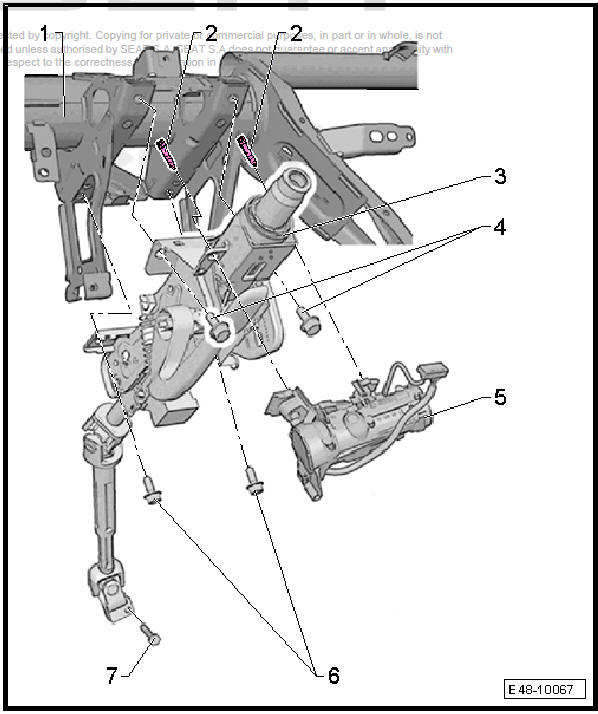
- - Central tube of the dash panel
- - Shear bolt
- - Steering column
- Removing and installing
- When installing, steering column must be engaged at mounting bracket for central tube for dash panel (assists with installation).
- Different versions possible.
- - Bolt
- 20 Nm
- Always renew after removing
- - Steering lock housing with
lock cylinder and ignition/starter
switch
- Version for vehicles with
mechanical locking system.
Removing and installing
- Version for vehicles with keyless entry and start system "Keyless Access": Removing and installing
- Version for vehicles with
mechanical locking system.
- - Bolt
- Observe tightening sequence
- Always renew after removing
- 20 Nm
- - Bolt
- 20 Nm +90º
- Replace after removing
- Clean threaded hole (e.g. with a thread tap) before fitting new bolt
Checking steering column for damage
Visual inspection
- Check all steering column parts for damage.
Checking function
- Check that steering column turns smoothly and easily.
- Check whether steering column can be moved in the longitudinal direction and vertically.
 Steering column
...
 Handling and transporting steering column
WARNING
These instructions for handling the steering column MUST
be observed at all times.
Incorrect handling can damage the steering column and
thus cause a safety risk.
...
See also:
Alternator: repairs
Assembly overview - Valeo alternator
- Alternator
- Voltage regulator
Removal and installation
Checking brushes
- Double bolt 2 Nm
- Cover
- Protective cap
- Hexagon bolt - ...
