Seat Leon >> Headlights - check adjustment
Special tools and workshop equipment required
- Headlight adjustment unit
The following descriptions for adjustment and verification are generally valid for all countries. However, national legislation and guidelines for individual countries must be adhered to.
Testing and adjusting conditions
- The vehicle and the lamp regulating equipment should be on a flat surface.
- Fuel tank full
- Tyre pressure is correct
- The headlamp glass should not be damaged or dirty
- Reflectors and lamps are okay
- Allow headlight to cool down to ambient temperature - with bonnet open, check by touching housing cover on back of headlight with your hand.
- Load: with one person or 75 kg on the driver's seat and the rest of the vehicle empty (empty weight)
- Headlamp regulating control set to "0"
- The vehicle must have run a little, or the front and rear shock absorbers should be pushed up and down several times, so the springs are correctly seated.
- The parking brake should not be pressed so that the vehicle is not clamped
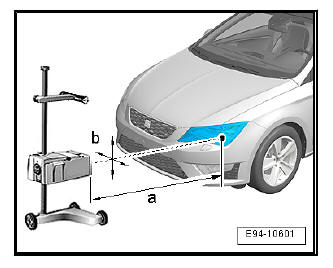
- The vehicle and the headlight setting unit must be aligned.
- Halogen headlights: Distance -a- must be 20 to 30 cm - Operating Manual on the headlight adjustment unit
- LED headlights: Distance -a- should be 30 to 70 cm and distance -b- should be not more than 3 cm from the reference LED.
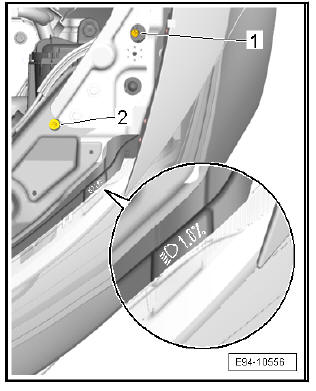
The inclination heights in "%" are engraved on the left-hand side of the headlamp. Headlights must be adjusted according to this information. The percentage is based on a projection interval of 10 m. Example: Converting a dip setting of 1.0 % = 10 cm.
For vehicles with halogen headlights and manual light range adjustment, the following applies:
- Headlight range adjuster knob must be set to -0-.
With one person or 75 kg on the driver's seat and the vehicle otherwise unloaded (curb weight).
The unladen weight is the weight of the vehicle ready for operation with full fuel tank (at least 90 %) including the weight of all equipment normally carried (e.g. spare wheel, tools, jack, fire extinguisher, etc.).
If the fuel tank is not at least 90% full put in additional weight as follows:
- Read fuel level in fuel tank from the fuel gauge. Determine additional weight from following table and place weight in luggage compartment.
Fuel gauge table
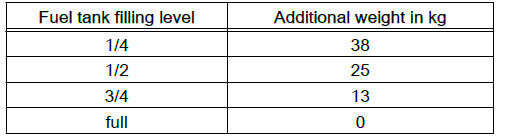
As an example: When the tank is half full an additional weight of 25 kg must be placed in the boot if the vehicle is front-wheel drive.
NOTICE As an additional weight it is best to use a fuel canister filled with water (a 5 litre fuel canister filled with water weighs approx. 5 kg).
Write the weight in kg on the container and secure it against being opened again in order to prevent misuse.
In order to avoid dirt, place a mat/board of some kind in the luggage compartment.
For vehicles with LED headlights:
- Turn light switch - E1- to "dipped beam" position - not to "Auto" position.
- Switch off ignition and on again so that the headlight is set at position 0.
- Close all doors and the rear lid and keep them closed during the complete checking and adjusting procedure.
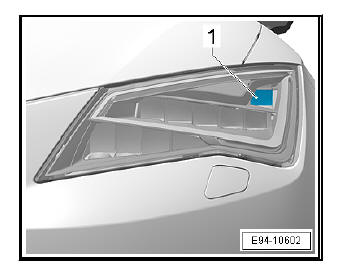
- Headlight adjustment unit must be centrally aligned with uppermost LED lens -1-.
Halogen headlights: Check setting
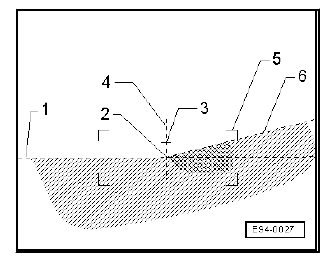
Verification of the headlight setting (with new screen without adjustment line of 15º)
Perform the following check of the main headlamps:
- Check that with the dipped beam on, the bright/dim horizontal limit touches the dividing line -1- of the verification surface.
- Check that the point of inflection -2- between the horizontal left part and the right raising part of the bright/dim limit passes the vertical by the central mark -3-. The clear centre of the light beam should be, in this case, to the right of the vertical -4-.
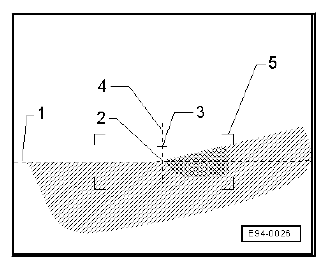
Verification of the headlight setting (with new screen with adjustment line of 15º)
Perform the following check of the main headlamps:

- Check that with the dipped beam on, the bright/dim horizontal limit touches the dividing line -1- of the verification surface.
- Check if the right raising part touches the Bright/dim limit of the adjusting line of 15º, which starts to go up after the point of inflection -2-. The clear centre of the light beam should be, in this case, to the right of the vertical -4-.
For both methods
NOTICE To better locate the point of inflection -2-, follow the bright/dim limit on the extreme limits -5- from left to right, and find the intersection point with the prolongation of the line of 15º of the bright limit/ dim limit, following from top to bottom.
After the regulatory dipped beam adjustment, half of the light beam of the road lamp should be on the central mark -3-.
If the alignment unit of the headlamps is well regulated, it may be verified that in the final lamp position the acceptable limit value of light intensity is not overshot (normally < 1 lx). If this limit is exceeded, the adjustment must be repeated in order not to blind other drivers - Operating instructions of the headlight adjustment device and country specific guidelines .
Moreover, the final position of the headlamps may be verified with a vertical wall situated 10 metres from the vehicle with the lamp alignment unit method. - Instruction manual for the headlamp alignment unit
Control of full-beam lights
Switch on the main beams after adjusting the passing beam. A very illuminated area can be seen in the centre of the plate. If this is not the case, adjust the headlights to the left or right.
Fog lights
- Check whether the upper light-dark border touches the setting line and runs horizontally over the entire width of the test screen.
NOTICE If necessary, adjust this setting after checking the headlights.
LED headlights: Check setting
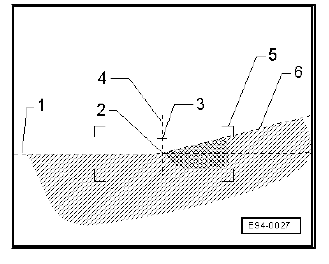
Check the adjustment of headlights (with a new display without an adjustment line of 15º)
Perform the following check of the main headlamps:
- Check that with the dipped beam on, the bright/dim horizontal limit touches the dividing line -1- of the verification surface.
- Check that the point of inflection -2- between the horizontal left part and the right raising part of the bright/dim limit passes the vertical by the central mark -3-. The clear centre of the light beam should be, in this case, to the right of the vertical -4-.
Check the adjustment of headlamps (with display with adjustment line of 15º)
Perform the following check of the main headlamps:
- Check that with the dipped beam on, the bright/dim horizontal limit touches the dividing line -1- of the verification surface.
- Check if the right raising part touches the Bright/dim limit of the adjusting line of 15º, which starts to go up after the point of inflection -2-. The clear centre of the light beam should be, in this case, to the right of the vertical -4-.
For both methods:
NOTICE To better locate the point of inflection -2-, follow the bright/dim limit on the extreme limits -5- from left to right, and find the intersection point with the prolongation of the line of 15º of the bright limit/ dim limit, following from top to bottom.
After the regulatory dipped beam adjustment, half of the light beam of the road lamp should be on the central mark -3-.
If the alignment unit of the headlamps is well regulated, it may be verified that in the final lamp position the acceptable limit value of light intensity is not overshot (normally < 1 lx). If this limit value is overshot, the alignment should be repeated to avoid dazzling other drivers. - Instructions for the use of the lamp alignment unit and valid regulations in each country.
It is recommended to align the headlights with the screen at an adjust line of 15 º.
Moreover, the final position of the headlamps may be verified with a vertical wall situated 10 meters from the vehicle with the lamp alignment unit. - Operating instructions for the headlight setting device
Fog lights
- Check whether the upper light-dark border touches the setting line and runs horizontally over the entire width of the test screen.
NOTICE If necessary, adjust this setting after checking the headlights.
Adjusting the headlights
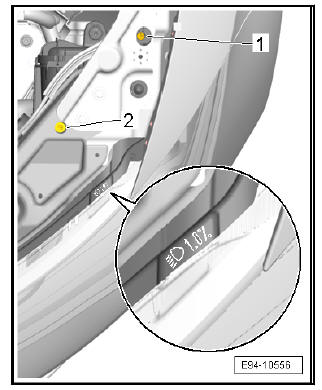
Headlight
- Carry out adjustment with the correct screwdrivers, taking care not to damage the regulating gears.
The left headlamp is shown in the figure. The arrangement of adjuster screws on the right-hand headlight is symmetrically opposite.
- - Screws for the height adjustment
- - Lateral adjustment screw
- To set the height, turn screw -1-.
- For lateral adjustment, turn screw -2-.
NOTICE The inclination heights in "%" are engraved on the left-hand side of the headlamp. Headlights must be adjusted according to this information. The percentage is based on a projection interval of 10 m. Example: Converting a dip setting of 1.0 % = 10 cm.
Also check that both headlamps work at the same time when headlamp adjustment is activated.
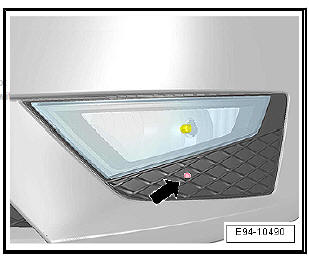
Fog lights
- The conditions for checking and adjustment are the same as for the main headlamps.
- Regulate the fog light range, turning the alignment screw -arrow- with a screwdriver.
Tilting figure:
- -1 % + -0.2
Fog lights FR
- The conditions for checking and adjustment are the same as for the main headlamps.
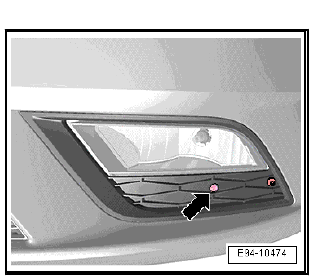
- Regulate the fog light range, turning the alignment screw -arrow- with a screwdriver.
Tilting figure:
- -1 % + -0.2
Other additional lights
Additionally retrofitted lights of other systems must be checked and set according to valid guidelines.
 Brake fluid and clutch: Renew
CAUTION
Do not under any circumstances allow brake fluid to come
into contact with fluids that contain mineral oils (e.g. oil,
petrol,
cleaning agents). Mineral oils will damag ...
 Particulate filter: checking
Special tools and workshop equipment required
Vehicle diagnosis tester
Work sequence
NOTICE
If no indications are displayed on the screen during these operations:
- operating instructions ve ...
See also:
General notes
Identification plates
Type plate, vehicles with refrigerant
R134a
- Name of refrigerant
- Refrigerant capacity
- Name of refrigerant oil
Note
A tolerance of 500 +- 15 g is permissib ...
