Seat Leon >> Other control components
Removing and installing left vent temperature sender - G150-
Note Vehicles with automatically controlled air conditioner only. On vehicles with a heater or manually controlled air conditioner, the openings in the air ducts are sealed with a plug.
Removal:
- Turn off the ignition and all electricity consumers.
Vehicles without access and start authorisation system
- Remove ignition key, if fitted.
Vehicles with access and start authorisation system
- Store ignition key outside the vehicle to prevent the ignition from being switched on unintentionally.
Continued for all vehicles
- Remove dash panel air vent on left.
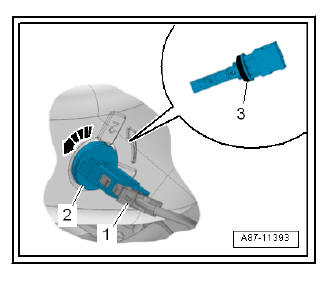
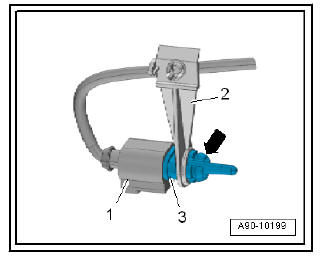
- Turn the vent temperature sender -2- anti-clockwise -arrow- and pull it out of the mount.
- Detach the electrical connector -1-.
Installing
Install in reverse order of removal; note the following.
- Replace the sealing ring -3- if damaged or defective.
Removing and installing right vent temperature sender - G151-
Note Vehicles with automatically controlled air conditioner only. On vehicles with a heater or manually controlled air conditioner, the openings in the air ducts are sealed with a plug.
Removal:
- Turn off the ignition and all electricity consumers.
Vehicles without access and start authorisation system
- Remove ignition key, if fitted.
Vehicles with access and start authorisation system
- Store ignition key outside the vehicle to prevent the ignition from being switched on unintentionally.
Continued for all vehicles
- Remove dash panel air vent on right.
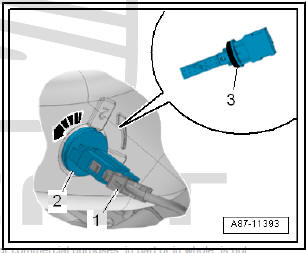
- Turn the vent temperature sender -2- anti-clockwise -arrow- and pull it out of the mount.
- Detach the electrical connector -1-.
Installing
Install in reverse order of removal; note the following.
- Replace the sealing ring -3- if damaged or defective.
Removing and installing footwell vent temperature sender - G192-
Note Vehicles with automatically controlled air conditioner only. On vehicles with a heater or manually controlled air conditioner, the opening in the air duct is sealed with a plug.
Removal:
- Turn off the ignition and all electricity consumers.
Vehicles without access and start authorisation system
- Remove ignition key, if fitted.
Vehicles with access and start authorisation system
- Store ignition key outside the vehicle to prevent the ignition from being switched on unintentionally.
Continued for all vehicles
- Remove footwell vent on driver side.
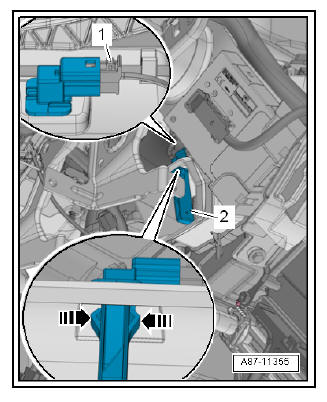
- Use a narrow screwdriver to release the retainer tabs -arrows- on the left and right.
- Remove the footwell vent temperature sender - G192- -2- upwards.
- Detach the electrical connector -1-.
Installing
Installation is carried out in the reverse order.
Removing and installing humidity sender for air conditioning system - G260-
The humidity sender for air conditioning system - G260- and the light/rain sensor - G397- form one component and are installed depending on vehicle equipment.
Coolant circulation pump - V51- : Removing and installing
Note Depending on engine version, the continued coolant circulation pump - V51- is installed in the coolant circuit.
Removing and installing coolant shut-off valve - N82-
Note Depending on engine version, the coolant shut-off valve - N82- is installed in the coolant circuit.
Removing and installing photo sensor 2 for sunlight penetration - G134-
Removal:
- Turn off the ignition and all electricity consumers.
Vehicles without access and start authorisation system
- Remove ignition key, if fitted.
Vehicles with access and start authorisation system
- Store ignition key outside the vehicle to prevent the ignition from being switched on unintentionally.
Continued for all vehicles
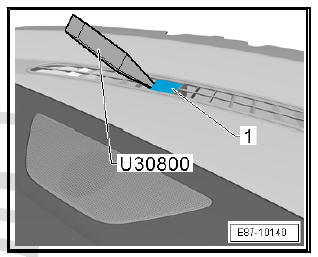
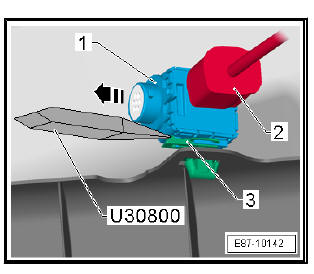
- Remove the Sunlight penetration photosensor 2 - G134- -1- using the wedge - U30800- .
- Unplug electrical connector.
Installing
Installation is carried out in the reverse order.
Removing and installing ambient temperature sensor - G17-
Removal:
- Turn off the ignition and all electricity consumers.
Vehicles without access and start authorisation system
- Remove ignition key, if fitted.
Vehicles with access and start authorisation system
- Store ignition key outside the vehicle to prevent the ignition from being switched on unintentionally.
Continued for all vehicles
- Removing front bumper cover.
- Pull out the temperature sensor for external temperature - G17- -3- from the holder -2-.
- Detach the electrical connector -1-.
Installing
Installation is carried out in the reverse order.
Removing and installing air quality sensor - G238-
Note The air quality sensor - G238- is only installed with automatically controlled air conditioners.
Removal:
- Remove plenum chamber cover.
- Remove the rain channel.
- Unclip the securing tag -3- and remove the air quality sensor - G238- -1- in the direction of the -arrow-.
- Detach the electrical connector -3-.
Note The air quality sensor - G238- removed must not be stored in areas where it could come into contact with solvents, fuels or certain chemical compounds (liquids or vapours).
Installing
Install in reverse order of removal; note the following.
Note Water may flow via the drip rail into the fresh air intake if the plenum chamber cover is damaged or not properly fitted.
 Control and display unit
Removing and installing control and display
unit
Special tools and workshop equipment required
Lever for the front-end - 3370-
Removal:
Note
The picture shows a vehicle with Climatronic. ...
 Maintenance
Technical data of the engines
Petrol engines
1) Unleaded RON 91 can also be used, but will result in a slight
loss of power.
2) Unleaded RON 91 can also be used, but will result in a slight ...
See also:
Glove compartment light - W6- : Removing
and installing
Special tools and workshop equipment required
Lever - U30800-
Note
For removing and installing of components located in a visible
zones (switches, covers, linings, etc.) always protect the ...
