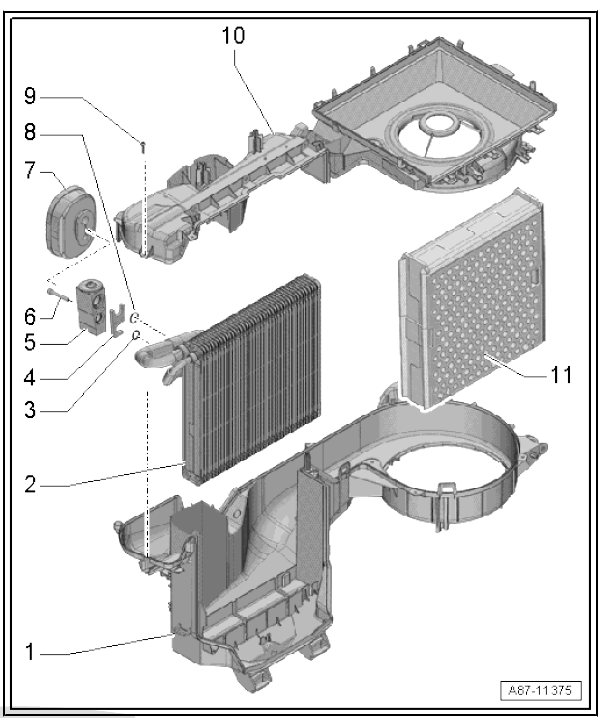
Seat Leon >> Assembly overview - evaporator housing
SEAT Leon Service and Repair Manual / Heating and air conditioning / Air conditioning system / Front heater and air conditioning unit / Assembly overview - evaporator housing
Note
- There are different designs and makes of heater and air conditioning unit. The individual components of the various heaters and air conditioning units are similar but not identical. The combined fitting of different makes of component is therefore not permissible.
- The following illustration shows a "Valeo" evaporator housing, distinguishing features with respect to other makes of heater and air conditioning unit

- - Evaporator housing (bottom section)
- - Evaporator
- with AC only
- Check foam seals for damage and proper attachment
- Removing and fitting
- - O-ring
- Replace
- Moisten with refrigeration oil before fitting
- - Retaining plate
- with AC only
- For fixing refrigerant line in position and securing expansion valve
- - Expansion valve
- with AC only
- Assembly overview
- - Bolt.
- with AC only
- Tightening torque
- - Sealing and insulation
- Heat insulation for expansion valve
- There is no opening for the expansion valve in the plenum chamber back wall seal or this is closed off by a foam pad on vehicles with no air conditioner
- - O-ring
- with AC only
- Replace
- Moisten with refrigeration oil before fitting
- - Bolt.
- 8 off
- 1.5 Nm
- - Evaporator housing (top section)
- - Honeycomb element
- Only fitted on vehicles with heater (with no air conditioner)
 Exploded view - flaps and partitions in air distribution housing
View from front
Note
Arrow = Direction of movement
- Right flap for warm air
from heat exchanger
Actuated by way of right
cold air flap
- Operating lever
For flap control
...
 Removing and fitting the evaporator
WARNINGDanger from refrigerant escaping under pressure!
Freezing of skin and other body parts.
Evacuate the refrigerant and then open the refrigerant
circuit
immediately.
...
See also:
Removing and installing expansion
valve
Special tools and workshop equipment required
Air conditioner service station
Engine bung set - VAS 6122-
Removal:
Turn off the ignition and all electricity consumers.
Vehicles ...
