Seat Leon >> Removing and fitting the condenser
Removing and fitting the condenser
Special tools and workshop equipment required
- Air conditioner service station
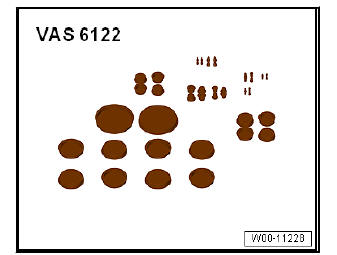
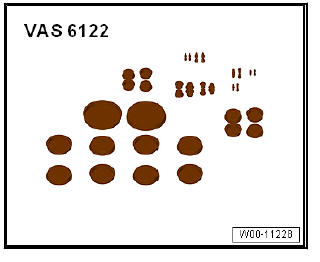
- Engine bung set - VAS 6122-
Removal:
- Turn off the ignition and all electricity consumers.
Vehicles without access and start authorisation system
- Remove ignition key, if fitted.
Vehicles with access and start authorisation system
- Store ignition key outside the vehicle to prevent the ignition from being switched on unintentionally.
Continued for all vehicles
- Extract refrigerant.
- Observe instructions when working on refrigerant circuit
- Removing front headlights .
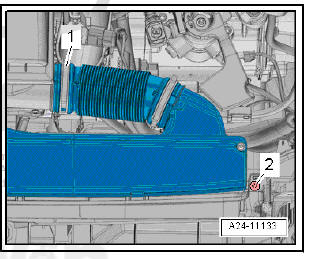
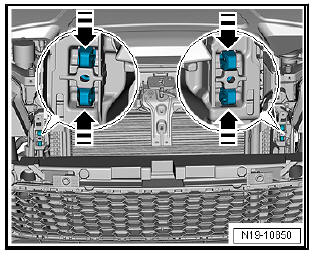
- Remove air duct in the lock carrier, remove clamp -1- and unscrew bolt -2- left and right.
Note During installation and removal, differences that exist based on the particular engine type must be taken into account.
- Separate and take out air duct in the lock carrier.
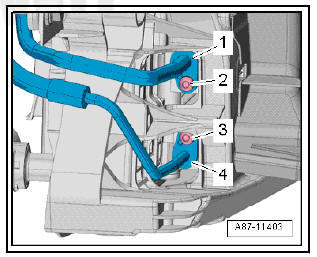
- Screw out the bolts -2, 3- and detach the refrigerant lines -1, 4-.
- Seal open lines and connections with clean plugs from the Engine sealing plug set - VAS 6122- .
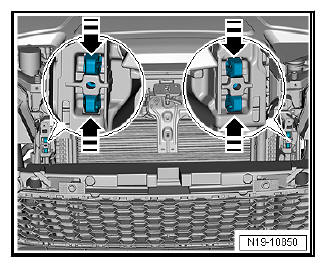
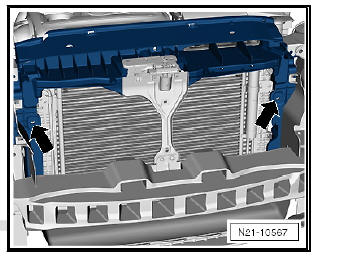
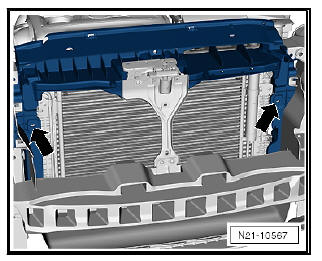
- Separate the left and right fasteners -arrows- on the bracket of the holder of the cooler bracket with a side cutter. Press the radiator for coolant lightly from above in the direction of the engine.
Note
- The rubber bush of the radiator will be used later in the
installation.
It is then screwed on together with the lock carrier.
- When these fasteners were previously separated, these screws are to be unscrewed.
- Undo the radiator and tip as far as possible towards the engine
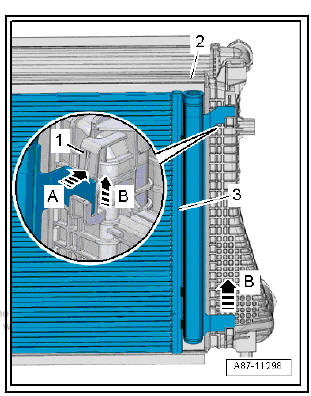
- Release the retaining clips -1- in the -direction of arrow A- and lift the condenser -3- upwards out of the mounts of the charged air cooler / radiator of the refrigerant circuit for charged air - 2- -arrows B-.
Note The cowl may have to be removed depending on the version of the engine.

- Remove condenser.
Installing
Install in reverse order of removal; note the following.
Note
- Screw the rubber bushing of the radiator on to the lock carrier, after you have cut the fasteners -arrows- on the rubber bushing.
- Even if fitted correctly, there may be slight pressure marks on the radiator and condenser fins. This does not mean that the components are damaged. Neither radiator nor condensers are to be replaced on account of such minor pressure marks.
- Slight bending of the condenser (up to 4 mm) is not a problem as long as there is enough of a gap (at least 4 mm) between the condenser and the radiator, the condenser is still functioning properly and there is no leakage. If there are slight deformations, the condenser does not have to be renewed.
- If the condenser and radiator are no longer parallel as a result
of slight deformation at the securing lugs on the sides of the
condenser (e.g. following an accident), this can be corrected
by bending the lugs back into position, provided that the condenser
is still functioning properly and that there is no leakage.
If the lugs are slightly deformed, the condenser does not have to be renewed.
- Refill with refrigerant and refrigerant oil.
Installing and removing condenser, CUPRA versions
Special tools and workshop equipment required
- Air conditioner service station
- Engine bung set - VAS 6122-
Removal:
- Turn off the ignition and all electricity consumers.
Vehicles without access and start authorisation system
- Remove ignition key, if fitted.
Vehicles with access and start authorisation system
- Store ignition key outside the vehicle to prevent the ignition from being switched on unintentionally.
Continued for all vehicles
- Extract refrigerant.
- Observe instructions when working on refrigerant circuit.
- Set the lock carrier to its Service position .
- Removing front headlights .
- Unscrew bolts -2- and -3- and remove refrigerant lines -1- and -4-.
- Seal open lines and connections with clean plugs from the Engine sealing plug set - VAS 6122- .

- Separate the left and right fasteners -arrows- on the bracket of the holder of the cooler bracket with a side cutter. Press the radiator for coolant lightly from above in the direction of the engine.
Note
- The rubber bush of the radiator will be used later in the
installation.
It is then screwed on together with the lock carrier.
- When these fasteners were previously separated, these screws are to be unscrewed.
- Undo the radiator and tip as far as possible towards the engine
- Release the retaining clips -1- in the -direction of arrow A- and lift the condenser -3- upwards out of the mounts of the charged air cooler / radiator of the refrigerant circuit for charged air - 2- -arrows B-.
Note The cowl may have to be removed depending on the version of the engine.
- Remove condenser.
Installing
Install in reverse order of removal; note the following.
Note
- Screw the rubber bushing of the radiator on to the lock carrier, after you have cut the fasteners -arrows- on the rubber bushing.
- Even if fitted correctly, there may be slight pressure marks on the radiator and condenser fins. This does not mean that the components are damaged. Neither radiator nor condensers are to be replaced on account of such minor pressure marks.
- Slight bending of the condenser (up to 4 mm) is not a problem as long as there is enough of a gap (at least 4 mm) between the condenser and the radiator, the condenser is still functioning properly and there is no leakage. If there are slight deformations, the condenser does not have to be renewed.
- If the condenser and radiator are no longer parallel as a result
of slight deformation at the securing lugs on the sides of the
condenser (e.g. following an accident), this can be corrected
by bending the lugs back into position, provided that the condenser
is still functioning properly and that there is no leakage.
If the lugs are slightly deformed, the condenser does not have to be renewed.
- Refill with refrigerant and refrigerant oil.
 Removing and installing expansion
valve
Removing and installing expansion
valve
Special tools and workshop equipment required
Air conditioner service station
Engine bung set - VAS 6122-
Removal:
Turn off the ignition and all electricity consumers.
Vehicles ...
 Coolant lines on condenser - disconnect
and connect
Coolant lines on condenser - disconnect
and connect
Special tools and workshop equipment required
Air conditioner service station
Engine bung set - VAS 6122-
Removal:
Turn off the ignition and all electricity consumers.
Vehicles witho ...
See also:
Removing and installing brake calliper
Removing and installing brake calliper,
vehicles with manual parking brake
Note
Use brake filling and bleeding equipment - VAS 5234- to extract
brake fluid from brake fluid reservoir.
Before ...
