Seat Leon >> Tweeter H2 / Woofer H7: installing and removing
Installing and removing tweeter H2 / woofer H7, vehicles with horns on the right longitudinal chassis beam
Removing
- Switch off ignition and all electrical consumers.
Vehicles without access and start authorisation system
- Remove ignition key, if fitted.
Vehicles with access and start authorisation system
- Store the ignition key outside the vehicle to prevent the ignition from being switched on unintentionally.
Continued for all vehicles
- Place the vehicle on a lifting platform.
- Remove the lower engine noise insulation.
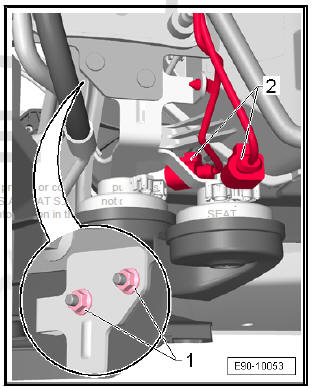
- Unscrew the fixing nuts -1- of the horn bracket on the bodywork.
- Unplug electrical connectors -2-.
- Unit bracket - Remove the signal horn.
Installing
Installation is carried out in reverse order.
Installing and removing tweeter H2 / woofer H7, vehicles with horns on both longitudinal chassis beams
Note Removal and installation are described for the left side. Removal and installation on the right side are carried out laterally reversed in the same way.
Removing
- Switch off ignition and all electrical consumers.
Vehicles without access and start authorisation system
- Remove ignition key, if fitted.
Vehicles with access and start authorisation system
- Store the ignition key outside the vehicle to prevent the ignition from being switched on unintentionally.
Continued for all vehicles
- Place the vehicle on a lifting platform.
- Remove the left front wheel .
- Remove the spoiler on the front left wheel well .
- Remove the lower engine noise insulation .
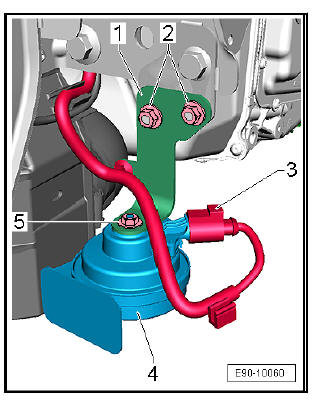
- Unplug the electrical connector -3-.
- Remove fixing nut-5- of signal horn.
- Take out the signal horn -4-.
- Unscrew nuts -2-.
- Take out the signal horn retainer -1-.
Installing
Installation is carried out in reverse order.
 Assembly overview - horn
Assembly overview - Horn, vehicles with horns on the right longitudinal
chassis beam
- Bracket/bearing/support
Removal and installation
- Nuts
13 +- 2 Nm
- Nut
10 +- 2 ...

See also:
Opening and closing the sliding/tilting roo
The sliding/tilting sunroof is opened and closed using the
rotary button when the ignition is switched on.
Fig. 69 Detail of the
sunroof: rotary button for
sliding/tilting sunroof
Closing the s ...
