Seat Leon >> Battery: removing and installing
Removing
- Switch off ignition and all electrical consumers.
Vehicles without access and start authorisation system
- Remove ignition key, if fitted.
Vehicles with access and start authorisation system
- Store the ignition key outside the vehicle to prevent the ignition from being switched on unintentionally.
Continued for all vehicles
- Open cover in heat insulation sleeve.
- Connect the battery charging device for battery supported operation.
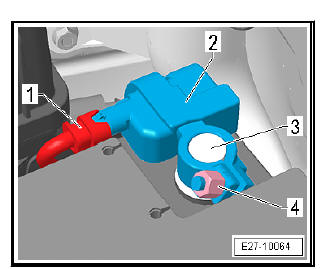
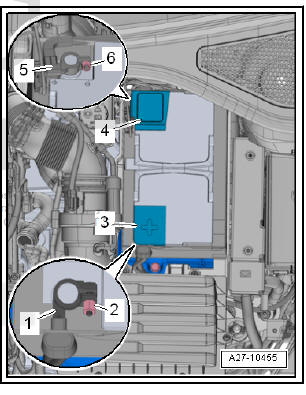
- Open cover -4- over negative battery terminal.
- Slacken off nut -6- several turns and disconnect battery clamp -5- of earth cable from negative battery terminal.

Vehicles with start / stop system
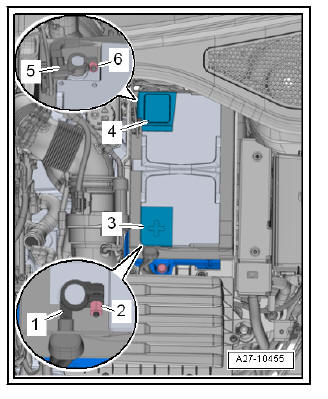
- Disconnect the connector -1- on the control unit for monitoring the battery - J367- -2-.
- Slacken the fixing nut -4- and disconnect the control unit for monitoring the battery - J367- -2- from the negative terminal -3-.
Continued for all versions
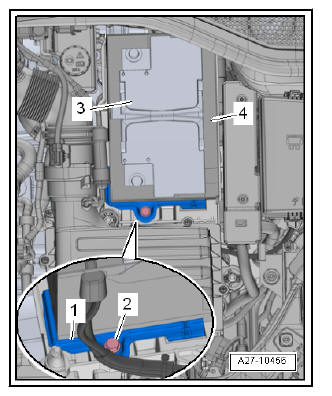
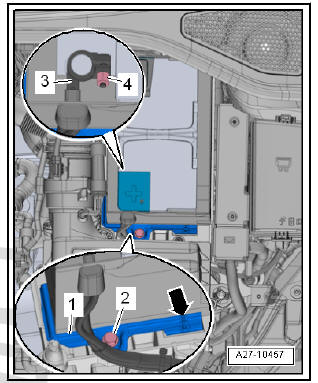
- Open cover -3- over positive battery terminal.
- Slacken off nut -2- several turns and disconnect battery clamp -1- of positive cable from positive battery terminal.
- Pull heat insulation sleeve -4- upwards slightly.
- Remove bolt -2- on battery retainer plate -1-.
- Pull battery -3- out of battery tray and lift out of engine compartment.
| Caution A loosely fitted battery creates the following dangers:
|
Vehicles with start/stop system
Note
- Because of their higher deep-cycle resistance, only special batteries are used in vehicles equipped with a Start/Stop system.
- When renewing the battery, note the correct part designation.
- Batteries intended for use in vehicles with a Start/Stop system are marked "AGM" (Absorbent Glass Mat) or "EFB" (Enhanced Flooded Battery).
Installing
- Insert battery in battery tray -1- so that battery base strip makes contact at bottom and side of stop -arrows-.
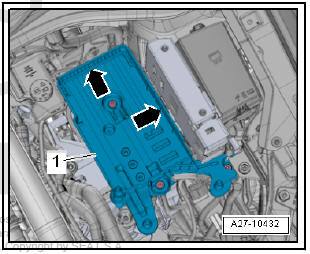
Depending on the battery used in the vehicle, the battery holder is equipped with three securing positions; mount the fixing bar -Position 1, 2 or 3-.

- Place battery retainer plate -1- in position.
- Lug -arrow- on battery retainer plate must engage in recess in battery base strip.
- Tighten bolt -2- for battery retainer plate.
- Connect up battery in the following sequence with ignition and electrical equipment switched off:
- First connect battery clamp -3- of positive cable by hand to positive battery terminal "+" and tighten nut -4-.
- Attach the battery terminal clamp -5- of the earth lead onto the negative "-" terminal of battery by hand and tighten nut -6-.
The following measures must be carried out after re-connecting battery:
- Activate the automatic open / close function of electric window lifters .
- Connecting vehicle diagnosis tester .
- Call up and delete the event memory .
Note After re-connecting the power supply, the ESP warning lamp may not go out until the vehicle has been driven a few metres.
 Battery
Assembly overview - battery
- Retainer
- Screw
15 Nm
- Positive wire
Disconnecting and connecting
- Nut
6 Nm
- Heat shield
- Cover for positive terminal
- ...
 Disconnecting and reconnecting battery
CautionObserve the following instructions and
precautions on safety
when working on pyrotechnic components:
When working on pyrotechnical components (such as the
airbag, belt ...
See also:
Side indicators
Fig. 173 Indicator
– Press the indicator on one of its sides to take it out.
– Remove the lamp holder from the indicator.
– Remove the failed glass bulb and replace with a new bulb.
– In ...
