Seat Leon >> Preparing body flange for installation
If a (new or used) window has to be installed, the adhesive bead and adhesive sealing material (PUR) must be cut back from the body flange. For this purpose follow these instructions:
Caution
|
- Shortly before re-applying the adhesive to the window, cut back the adhesive bead stuck to the window to a height of 1 to 2 mm using the electric knife - SAT 1561A- and set of blades - SAT 1561/20- .
Note
- The remaining material is required as a base for the new adhesive sealing material (PUR).
- If the bodywork flange has been reworked or partially replaced, after painting, the new zone must be cleaned and primed correspondingly.
| Caution The bonding surfaces must be free of dust and grease. Do not apply primer to the previously cut-back adhesive bead and do not treat with solvent. |
Only for the windscreen flange
Note To ensure the correct seating between windscreen and body flange, you must insert distance blocks on each side.
- Place the distance block -1- in the body flange. In order to do this, remove the bead of adhesive sealant material (PUR) from the body on both sides; this applies to the zone defined by the -dimension of approx. C= 80 mm -. For this purpose take the fourth rivet -3- as reference point (measured from the top edge of the mounting of the water drainage strip).
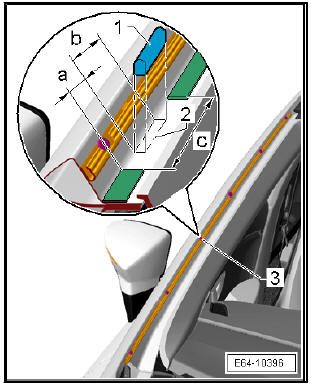
Note Clean the zone defined by -dimension c- with isopropyl alcohol or heptanol.
- Bond a new distance block into both sides. When doing so observe that -dimension a- = 17 mm to the fourth rivet -3- (measured from the top edge of the mounting of the water drainage strip).
- Dimension b- = 40 mm (approximate length of the distance block).
Note
- The embedded marking on both sides of the body -2- indicates the bonding zone for the distance block.
- Depending upon the production status of the vehicle it is possible that the bodywork does not have any such markings.-2-.
Touching up paint damage
Repair paint work according to specifications in - repair guidelines for vehicle paint work ; if necessary, perform recommended corrosion protection measures.
For damage to paintwork in unseen zones, proceed as follows:
- Repaint twice (wet on wet) leaving both coats to air.
Cleaning off excess adhesive
- Use of glue removal is recommended for cleaning - Electronic parts catalogue . Observe safety precautions when using.
| WARNING When cleaning from the inside of the vehicle, do not press the newly-placed glass outwards. |
- First clean painted surface as well as possible using a dry cloth. Remove contamination residues with glue remover - Electronic parts catalogue .
- Cleaning plastic trims: Allow the sealant to harden (approx. 1 hour) and then remove.
 Preparing new windows for installation
CautionNew panes of glass have the following
characteristics:
You make a reference line on the inside in order to make
the application of the adhesive sealing material (PUR)
...
 Windscreen
...
See also:
Main menu
The menu enables access to the different display functions.
Fig. 42 Windscreen wiper
lever: button A to confirm
the menu point and rocker
switch B to change the
menu
Open main menu
– Switch ...
