Seat Leon >> Exploded view - transverse links
SEAT Leon Service and Repair Manual / Running gear, axles, steering / Rear suspension / Suspension link, track rod / Exploded view - transverse links
Assembly overview - transverse link, multi-link suspension, front-wheel drive
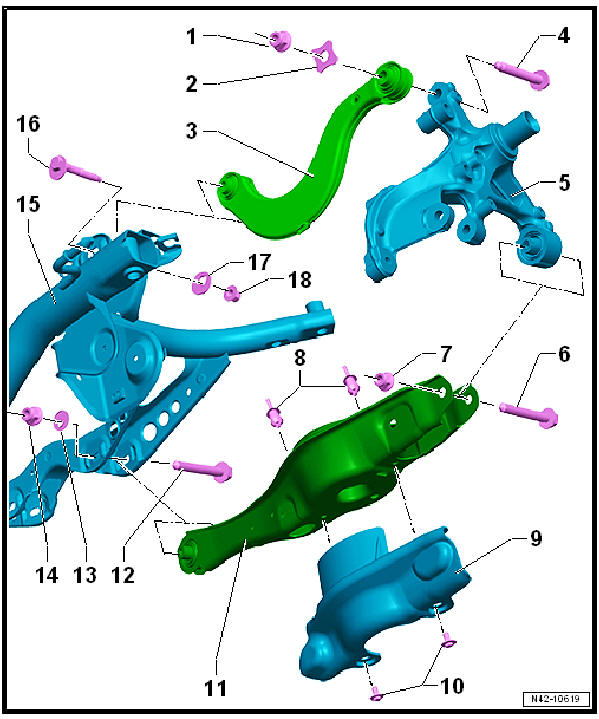
- - Nut
- Always renew after removing
- - Plate
- - Lower transverse swinging
arm
- Removing and installing
- - Bolt
- Always renew after removing
- Always tighten bolted joints with suspension in unladen position
- 130 Nm +180º
- - Wheel bearing housing
- - Bolt
- Always renew after removing
- Always tighten bolted joints with suspension in unladen position
- 70 Nm +180º
- - Nut
- Always renew after removing
- - Expanding rivet
- - Stone deflector
- - Bolt
- 8 Nm
- - Lower transverse arm
- Removing and installing
- - Eccentric bolt
- A wheel alignment check must be performed if loosened
- Do not turn more than 90º to the left or to the right (that is, from the permitted minimum adjustment range to the maximum)
- - Eccentric washer
- Inner hole with lug
- - Nut
- Always renew after removing
- Always tighten bolted joints with suspension in unladen position
- 95 Nm
- - Sub-frame
- - Eccentric bolt
- A wheel alignment check must be performed if loosened
- Do not turn more than 90º to the left or to the right (that is, from the permitted minimum adjustment range to the maximum)
- - Eccentric washer
- Inner hole with lug
- - Nut
- Always renew after removing
- Always tighten bolted joints with suspension in unladen position
- 95 Nm
Assembly overview - transverse link, multi-link suspension, four-wheel drive
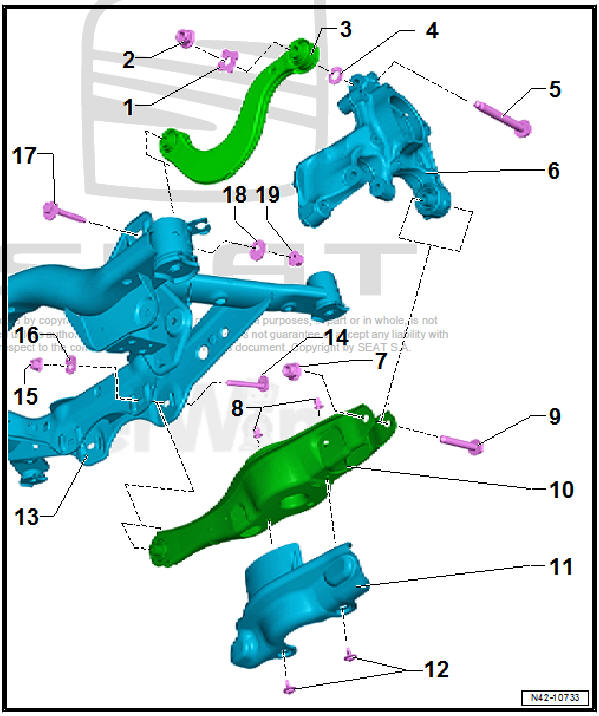
- - Flat washer
- - Nut
- Always renew after removing
- - Lower transverse swinging
arm
- Removing and installing
- - Flat washer
- - Bolt
- Always renew after removing
- Always tighten bolted joints with suspension in unladen position
- 130 Nm +180º
- - Wheel bearing housing
- - Nut
- Always renew after removing
- - Expanding rivet
- - Bolt
- Always renew after removing
- Always tighten bolted joints with suspension in unladen position
- 70 Nm +180º
- - Lower transverse arm
- Removing and installing
- - Stone deflector
- - Bolt
- 8 Nm
- - Sub-frame
- - Eccentric bolt
- A wheel alignment check must be performed if loosened
- Do not turn more than 90º to the left or to the right (that is, from the permitted minimum adjustment range to the maximum)
- - Nut
- Always renew after removing
- Always tighten bolted joints with suspension in unladen position
- 95 Nm
- - Eccentric washer
- Inner hole with lug
- - Eccentric bolt
- A wheel alignment check must be performed if loosened
- Do not turn more than 90º to the left or to the right (that is, from the permitted minimum adjustment range to the maximum)
- - Eccentric washer
- Inner hole with lug
- - Nut
- Always renew after removing
- Always tighten bolted joints with suspension in unladen position
- 95 Nm

 Exploded view - track rod
Assembly overview - track rod, multi-link suspension, front-wheel drive
- Sub-frame
- Bolt
Always renew after removing
70 Nm +180º
- Wheel bearing housing
- Connecting rod
...
See also:
Layout - telephone
Structure - Telephone, versions without control unit 1 for information
electronics
- J794-
- Mobile charging cradle -
R265-
Removal and installation
- Telephone microphone -
R3 ...
