Seat Leon >> Removing and installing swivel joint
Special tools and workshop equipment required
- Ball joint puller - 3287 A-
- Rotation angle spanner - V.A.G 1756-
- Insertable ring tool - V.A.G 1332/10-

Special tools and workshop equipment required
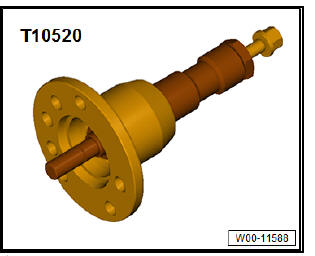
- Puller - T10520-
Removing
- Loosen drive shaft bolt at wheel hub.
| Caution Wheel bearings must not be subjected to load after loosening bolt securing drive shaft at wheel hub. If they have to support the weight of the vehicle they will be damages and their service life will be reduced. It is not permissible to turn drive shaft bolt more than 90º anticlockwise if vehicle is standing on its wheels. Do not attempt to move the vehicle without the drive shafts fitted; this would result in wheel bearing damage. If it is necessary for a vehicle to be moved, please comply with the following instructions:
|
- Loosen wheel bolts.
- Remove front wheel on affected side.
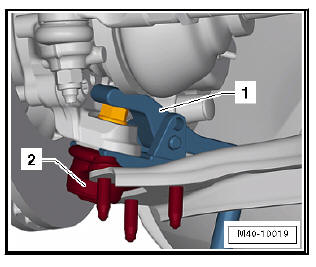
Vehicles with vehicle level senders
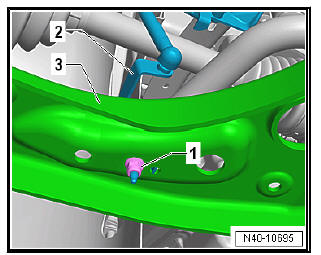
- Remove nut -1-.
- Pull bracket -2- for front left vehicle level sender - G78- and/or for front right vehicle level sender - G289- out of suspension link -3-, as applicable
Continuation for all models:
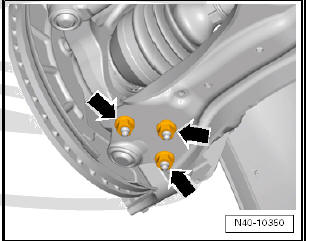
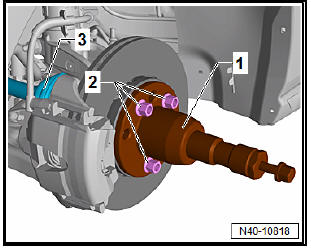
- Unscrew nuts -arrows-.
- Pull drive shaft slightly out of wheel hub.
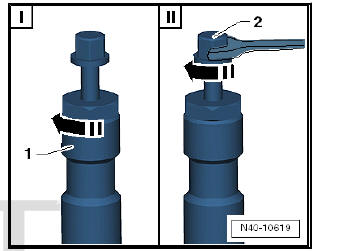
If the drive shaft cannot be pulled out of the wheel bearing by hand, use press tool - T10520- .
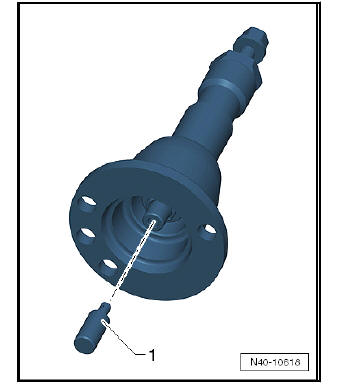
Before using press tool - T10520- ensure that thrust piece -1- is inserted.
Using press tool - T10520- :
- To be able to press out the drive shaft -3-, secure press tool - T10520- -1- to the wheel hub -2- using 3 wheel bolts.
- It is essential to follow specified sequence.
I - Tighten knurled nut -1- hand-tight.
II - Turn only bolt -2- using a spanner in order to press out drive
shaft with press tool - T10520- .
Note At the end of the procedure or for pressing out drive shaft further the spindle must be moved to its original position in order to deploy the hydraulic force!
- Pull swivel joint out of suspension link.
- Bend suspension link downwards as far as necessary.
- Loosen nut from suspension link -2- but do not remove completely.
| Caution Loosen the bolt by a couple of turns and leave on the ball joint to protect the thread. |
- Press swivel joint off wheel bearing housing using ball joint puller - 3287 A- -1-.
- Unscrew nut, and remove swivel joint -2-.
Installing
Carry out installation in the reverse sequence, noting the following:
- Fit swivel joint in wheel bearing housing.
- Fit drive shaft in wheel hub.
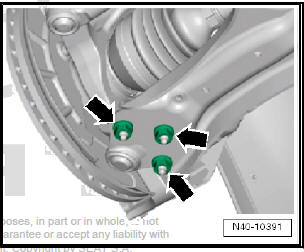
- Screw on new self-locking nut and counterhold with Torx key - T40- .
- Tighten nuts -arrows-.
Note Ensure that bellows are not damaged or twisted.
Note
- Lever on vehicle level sender must face towards outside of vehicle.
- Thread of vehicle level sender must be screwed into outer hole in suspension link. Retaining lug for vehicle level sender must engage in inner hole in order to guarantee correct installation position.
- Fit and secure wheel.
- Tighten drive shaft bolt at wheel hub.
Note During this step, vehicle must not be standing on its wheels or wheel bearing will be damaged.
- On vehicles with vehicle level sender, carry out basic settings for wheel damper electronics - Vehicle diagnostic tester.
 Removing and installing lower suspension
link
Removing and installing lower suspension
link
Removing and installing lower suspension
link, vehicle with manual gearbox or
dual clutch gearbox 0CW
Special tools and workshop equipment required
Torque wrenches - V.A.G 1332-
Removing
...
 Renewing bonded rubber bush for lower
suspension link
Renewing bonded rubber bush for lower
suspension link
Renewing front bonded rubber bush for lower suspension link
Special tools and workshop
equipment required
attachment tool - T10219-
Tightening plate - VW 402-
Die - VW 411-
Die - VW ...
See also:
Service interval indicator: Adjust the
programming
NOTICE
Vehicles with PR number "QI6" are equipped with activated
Longlife Service (flexible service intervals) ex-factory, it is however
possible, to modify the programming to time or distance
dep ...
