Seat Leon >> Removing and installing refrigerant line with internal heat exchanger
SEAT Leon Service and Repair Manual / Heating and air conditioning / Air conditioning system / Refrigerant circuit / Removing and installing refrigerant line
with internal heat exchanger
Special tools and workshop equipment required
- Air conditioner service station
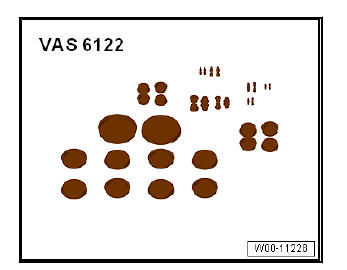
- Engine bung set - VAS 6122-
Removal:
- Turn off the ignition and all electricity consumers.
Vehicles without access and start authorisation system
- Remove ignition key, if fitted.
Vehicles with access and start authorisation system
- Store ignition key outside the vehicle to prevent the ignition from being switched on unintentionally.
Continued for all vehicles
- Extract refrigerant.
- Observe instructions when working on refrigerant circuit.
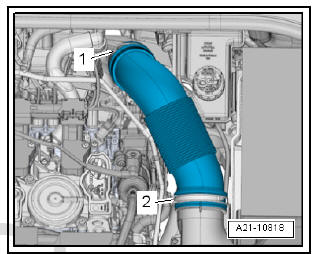
Vehicles with petrol engine:
- Release hose clips -1- and -2- and remove air intake pipe.
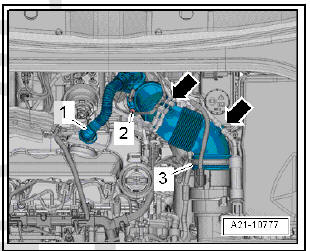
Diesel engine vehicles:
- Press the release buttons at the crankcase breather hose -1- and detach the hose from the cylinder head cover.
- Lay bare the vacuum hoses at the air pipe -arrows-.
- Release hose clip -3-.
- Screw out the bolt -2-, swivel the air pipe with connection to the rear and detach from the turbocharger.
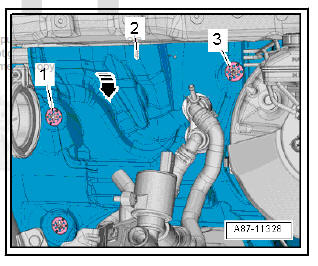
All vehicles (continued):
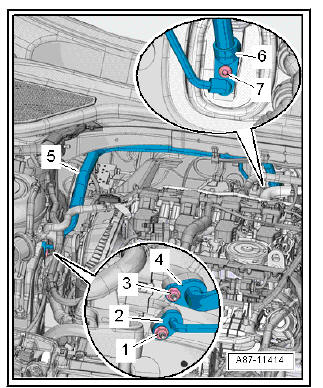
- Unscrew speed nuts -1- and -3-.
- Fold the heat shield -2- as far forwards as possible -arrow-.
- Unscrew the bolt -7-.
- Detach refrigerant line -6- with internal heat exchanger from expansion valve.
- Unscrew nuts -1- and -3- and remove refrigerant lines -2- and -4-.
- Take out the refrigerant line -5- with internal heat exchanger to the right.
- Seal open lines and connections with clean plugs from the Engine sealing plug set - VAS 6122- .
Installing
Install in reverse order of removal; note the following.
- Renew O-rings.
- Clean the connections at the expansion valve -2- and at the internal heat exchanger -4- and check for damage.
- Thoroughly clean connection area of refrigerant lines and check for damage.
Note
- Moisten O-rings with refrigerant oil before installing.
- Pay attention to correct positioning of the O-rings in the groove of the corresponding refrigerant pipe.

- Insert the O-rings -1, 3- in the groove at the connection of the internal heat exchanger.
- Insert internal heat exchanger at expansion valve.
- Tighten bolt -5-.
- Clean connections on refrigerant lines and check for damage.
- If applicable, check the fitted pin -4- for damage and correct positioning.
- Check the guide ring -2- at the refrigerant line connection for damage.
Note
- Moisten O-rings with refrigerant oil before installing.
- Pay attention to correct positioning of the O-rings in the groove of the corresponding refrigerant pipe.
- Insert the O-ring -3- in the groove -arrow- at the connection of the refrigerant line -1-.
- Insert the refrigerant lines in the corresponding connection.
- Tighten the nuts.
Note Routing and attachment of refrigerant lines.
- Refill with refrigerant and refrigerant oil.
 Removing and installing refrigerant circuit
pressure sender - G805-
Removing and installing refrigerant circuit
pressure sender - G805-
WARNINGDanger from refrigerant escaping under pressure!
Freezing of skin and other body parts.
If when loosening the G805 refrigerant escapes for more
than 1 second from the cool ...
 Removing and installing expansion
valve
Removing and installing expansion
valve
Special tools and workshop equipment required
Air conditioner service station
Engine bung set - VAS 6122-
Removal:
Turn off the ignition and all electricity consumers.
Vehicles ...
See also:
Changing engine oil
The engine oil must be changed at the intervals given in the
service schedule.
We recommend that you have the engine oil changed by an Authorised
Service Centre.
The two different oil change int ...
