Seat Leon >> Adjust headlights
Adjusting headlights, headlight with halogen bulb
In principle, the following conditions for adjustment and verification are valid for all countries. But legal guidelines and prescriptions of each country should be followed
Special tools and workshop equipment required
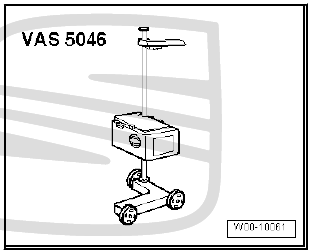
- Headlight adjustment unit - VAS 5046A
Testing and adjusting conditions
- The vehicle and the lamp regulating equipment should be on a flat surface.
- Fuel tank full
- Tyre pressure is correct
- The headlamp glass should not be damaged or dirty
- Reflectors and lamps are okay
- Load: with one person or 75 kg on the driver's seat and the rest of the vehicle empty (empty weight)
- Headlamp regulating control set to "0"
- The vehicle must have run a little, or the front and rear shock absorbers should be pushed up and down several times, so the springs are correctly seated.
- The handbrake must be released to avoid tension in the suspension.
- The vehicle and the headlight adjuster - VAS 5046A- must be aligned
- The distance between the lamp alignment unit and the lamp should be 20 to 30 cm .
The inclination heights in "%" are engraved on the left-hand side of the headlamp. Headlights must be adjusted according to this information. The percentage is based on a projection interval of 10 m. Example: Converting a dip setting of 1.0 % = 10 cm.
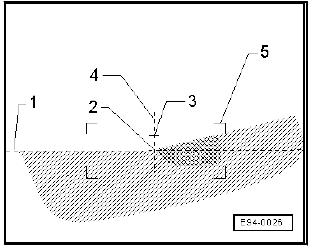
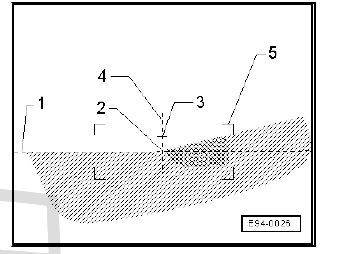
Check the adjustment of headlights (with a new display without an adjustment line of 15º)
Perform the following check of the main headlamps:
- Check that with the dipped beam on, the bright/dim horizontal limit touches the dividing line -1- of the verification surface.
- Check that the point of inflection -2- between the horizontal left part and the right raising part of the bright/dim limit passes the vertical by the central mark -3-. The clear centre of the light beam should be, in this case, to the right of the vertical -4-.
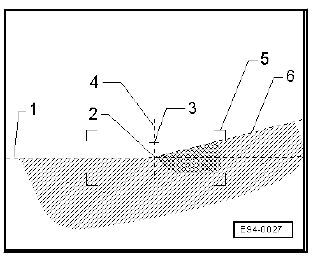
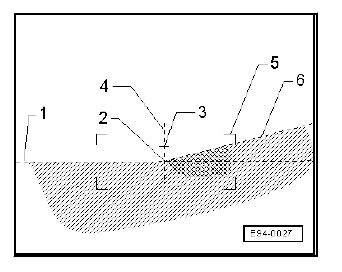
Check the adjustment of headlamps (with display with adjustment line of 15º)
Perform the following check of the main headlamps:
- Check that with the dipped beam on, the bright/dim horizontal limit touches the dividing line -1- of the verification surface.
- Check if the right raising part touches the Bright/dim limit of the adjusting line of 15º, which starts to go up after the point of inflection -2-. The clear centre of the light beam should be, in this case, to the right of the vertical -4-.
For both methods:
Note
- To better locate the point of inflection -2-, follow the bright/dim limit on the extreme limits -5- from left to right, and find the intersection point with the prolongation of the line of 15º of the bright limit/ dim limit, following from top to bottom.
- After the regulatory dipped beam adjustment, half of the light beam of the road lamp should be on the central mark -3-.
- If the alignment unit of the headlamps is well regulated, it may be verified that in the final lamp position the acceptable limit value of light intensity is not overshot (normally < 1 lx). If this limit is exceeded, the adjustment must be repeated in order not to blind other drivers .
- It is recommended to align the headlights with the screen at an adjust line of 15 º.
- Moreover, the final position of the headlamps may be verified with a vertical wall situated 10 metres from the vehicle with the lamp alignment unit method.
Control of full-beam lights
Switch on the main beams after adjusting the passing beam. A very illuminated area can be seen in the centre of the plate. If this is not the case, adjust the headlights to the left or right.
Note After the adjustment is checked and if an adjustment is necessary.
Adjusting headlight, LED headlight
In principle, the following conditions for adjustment and verification are valid for all countries. But legal guidelines and prescriptions of each country should be followed
Special tools and workshop equipment required
- Headlight adjustment unit - VAS 5046A

Testing and adjusting conditions
- The vehicle and the lamp regulating equipment should be on a flat surface.
- Fuel tank full
- Tyre pressure is correct
- The headlamp glass should not be damaged or dirty
- Reflectors and lamps are okay
- Allow headlight to cool down to ambient temperature - with bonnet open, check by touching housing cover on back of headlight with your hand.
- Load: with one person or 75 kg on the driver's seat and the rest of the vehicle empty (empty weight)
- Headlamp regulating control set to "0"
- The vehicle must have run a little, or the front and rear shock absorbers should be pushed up and down several times, so the springs are correctly seated.
- The handbrake must be released to avoid tension in the suspension.
- The vehicle and the headlight adjuster - VAS 5046A- must be aligned
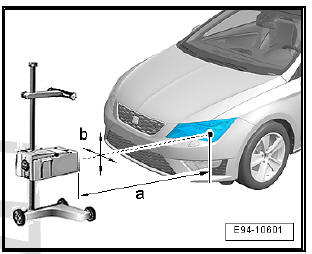
- Position headlight adjustment unit in front of headlight at distance -a- 30 ... 70 cm. Dimension -b- = 3 cm must not be exceeded (measured from centre of reference LED).
- The degree of inclination is pre-set on the headlight setting unit.
- The degree of inclination is imprinted on the upper edge of the headlight in "%".
- The inclination for this headlight is 1%
Note
- Set the headlight according to the degree of inclination imprinted on the headlight.
- The percentage is based on a projection interval of 10 m. Example: Converting a dip setting of 1.0 % = 10 cm.
Preparation work
- Vehicle must be on a level surface.
- To prepare the headlight setting, switch off the ignition and switch on again.
- Turn light switch - E1- to "dipped beam" position - not to "Auto" position.
- Close all doors and the rear lid and keep them closed during the complete checking and adjusting procedure.
Headlight setting
- Headlight adjustment unit must be centrally aligned with uppermost LED lens -1-.
Check the adjustment of headlights (with a new display without an adjustment line of 15º)
Perform the following check of the main headlamps:

- Check that with the dipped beam on, the bright/dim horizontal limit touches the dividing line -1- of the verification surface.
- Check that the point of inflection -2- between the horizontal left part and the right raising part of the bright/dim limit passes the vertical by the central mark -3-. The clear centre of the light beam should be, in this case, to the right of the vertical -4-.
Check the adjustment of headlamps (with display with adjustment line of 15º)
Perform the following check of the main headlamps:
- Check that with the dipped beam on, the bright/dim horizontal limit touches the dividing line -1- of the verification surface.
- Check if the right raising part touches the Bright/dim limit of the adjusting line of 15º, which starts to go up after the point of inflection -2-. The clear centre of the light beam should be, in this case, to the right of the vertical -4-.
For both methods:
Note
- To better locate the point of inflection -2-, follow the bright/dim limit on the extreme limits -5- from left to right, and find the intersection point with the prolongation of the line of 15º of the bright limit/ dim limit, following from top to bottom.
- After the regulatory dipped beam adjustment, half of the light beam of the road lamp should be on the central mark -3-.
- If the alignment unit of the headlamps is well regulated, it may be verified that in the final lamp position the acceptable limit value of light intensity is not overshot (normally < 1 lx). If this limit is exceeded, the adjustment must be repeated in order not to blind other drivers.
- It is recommended to align the headlights with the screen at an adjust line of 15 º.
- Moreover, the final position of the headlamps may be verified with a vertical wall situated 10 metres from the vehicle with the lamp alignment unit method.
Note After the adjustment is checked and if an adjustment is necessary.
Correcting installation position of headlight
Special tools and workshop equipment required
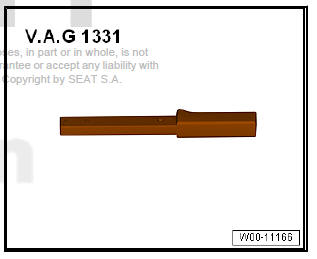
- Torque wrenches - VAG 1331-
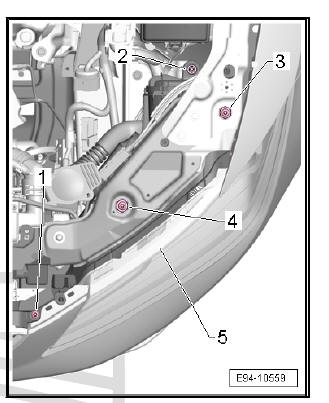
Note Clearance and concision of the headlight on the assembly (fender, bumper and hood).
- Undo the screws -1, 2, 3 and 4-.
- Adjust the height and angle of the headlight using the hexagonal nuts.
- Tighten the screws -1-, -3-, -2- and -4- in this sequence so that the headlight -5- fits flush to the chassis.
Note The adjustment must be carried out following each removal and installation or after correcting the installation position in all cases.
 Removing and installing headlight
Headlights: removing and installing, left
headlight
Note
Removal and installation are described for the left side. Removal
and installation on the right side are carried out laterally reversed
in ...
 Installing and removing the bulb for front
blinker light M5 / M7
Installing and removing the bulb for front
blinker light M5 / M7
Note
The figures show the replacement of the left turn signal lamp
of the left headlamp. The turn signal in the right-hand headlamp
is replaced in the same way.
The headlight does not have t ...
See also:
Repairing the puncture
To repair the puncture, once the preliminary tasks are done,
follow these steps.
Apply the sealant
– The instructions for using the sealant correctly are on the packaging
Inflate the tyres.
– ...
