Seat Leon >> Exploded view - underbody trim
SEAT Leon Service and Repair Manual / General body repairs, exterior / Exterior equipment / Underbody trim / Exploded view - underbody trim
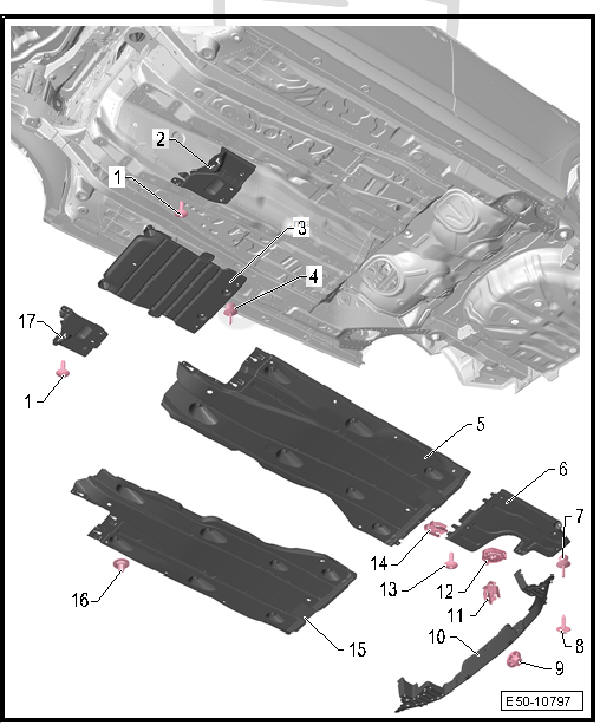
- - Bolt.
- 1 + 1 each
- 2 Nm
- - Guard for the window lifter
bracket
- Left-side
Removing
- Unscrew the screw and release the locking elements of the side at the rear.
- - Centre noise insulation, bottom
- Depending on version
Removing
- Take off the expanding catches
- - Expansion rivet
- 4 off
- - Left underbody protection
Removing
- Remove the guard for the window lifter bracket
- Unscrew hex. nuts
The nuts remain attached to the trim due to the fixing tabs.
- - Underbody trim in the area of the exhaust pipe
- Depending on version
Removing
- Remove the bolt
- Remove the expanding rivet
- Remove the fastening rings
- - Expansion rivet
- 1x
- - Bolt.
- 6 + 6 each
- - Nut
- 3 off
- Plastic material
- - Rear underbody protection
Removing
- Remove rear bumper cover
- Remove screws still inserted
- Unscrew the nuts
- - Quick locking nut
- 6 + 6 each
- - Retaining clip
- 1x
- Open with screwdriver
- Always replace.
- - Bolt.
- 1x
- - Quick locking nut
- 1x
- - Right underbody protection
Removing
- Remove the guard for the window lifter bracket
- Unscrew hexagonal nuts
The nuts remain attached to the trim due to the fixing tabs.
- - Nut
- 7 + 7 each
- Plastic material
- Integrated in the trim.
- - Guard for the window lifter bracket
- Right.
Removing
- Remove the screws
 Underbody trim
...
 Removing and installing underbody trim
Special tools and workshop equipment required
Torque wrench 2-10 Nm - VAG 1783-
Note
During removal and installation, take note of small amounts of differences
depending on the engine.
...
See also:
Removing and installing the cable for
the outside handle (back door)
Remove the cable for the outside handle (back door)
Install the cable for the outside handle (back door)
CautionRisk of malfunctions.
When removing and installing, make sure the ...
