Seat Leon >> Side window, 5 door model: removal and installation
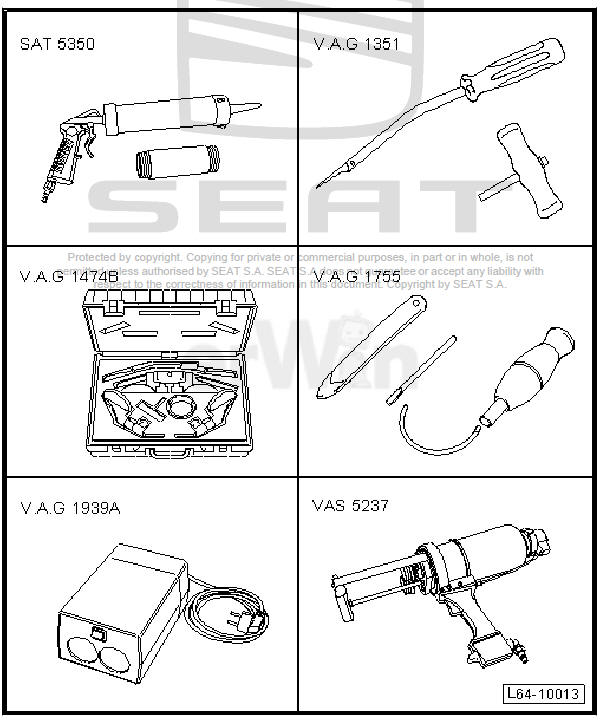
Special tools and workshop equipment required
- Window sealant pistol - SAT 5350-
- Cable holder knob - VAG 1351/1-
- Removal equipment - VAG 1474B-
- Window extraction kit - VAG 1755-
- Cartridge heater - VAG 1939A-
- Dual component window sealant - VAS 5237-
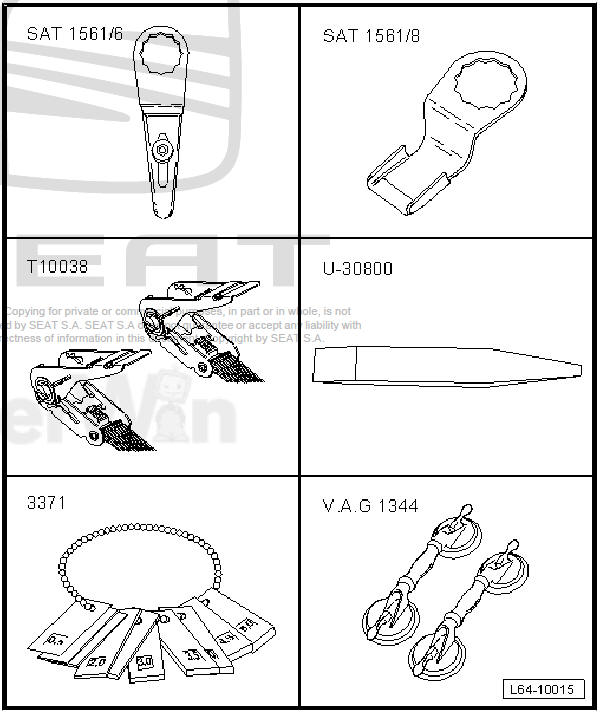
Special tools and workshop equipment required
- Electric cutter - SAT 1561A-
- Blade 072 - SAT 1561/1-
- Knife 076 - SAT 1561/2-
- Knife 087 - SAT 1561/3-
- Knife 143 - SAT 1561/4-
- Knife 154 - SAT 1561/5-

- Blade 169 - SAT 1561/6-
- Scraper 113 - SAT 1561/8-
- Counterhold - T10038-
- Release lever - U 30800-
- Adjusting gauge - 3371-
- Window suction pads - VAG 1344-
Materials
- Single component adhesive 110 ML - DH 009 100 A2- , Single component adhesive 300 ML - DH 009 100- 14) 16) 17)
- Dual-component glue - D 004 660 M2- 15) 16)
- Activator for glass - D 181 802 M1-
- Cleaning solvent - D 009 401 04-
- Applicator - D 009 500 25-
- Glue solvent - D 002 000 A2-
- Primer (Glass/Paint) - D 009 200 02-
- Cutting thread - 357 853 999 B-
- Cutting wire - 357 845 955-
14) To apply this material use the window sealant pistol - SAT 5350- .
15) To apply this material use the window sealant pistol - VAS 5237- .
16) Note drying times.
17) Pre-heat the single-component adhesive according to manufacturer's
instructions
with the cartridge heater - VAG 1939A- .
Undamaged side window, 5-door model: removal
- Remove upper lining column C
| Caution The blades are marked with the manufacturer's part no. This number is engraved on the blade. To avoid damaging the paintwork, protect the surfaces near the work areas with masking tape and with the protective film of the splitter - VAG 1474B- . |
- To remove the undamaged side window with the 5-door model, use the electric knife - SAT 1561A- and the following knives:
- Blade 208 - SAT 1561/11-
- Blade 169 - SAT 1561/6-
| DANGER! Always wear safety goggles and leather gloves. |
- From the vehicle interior, cut down the adhesive/sealant (PUR) in the area between dimensions -a- and -b-.
Note In this process, the retaining blocks -1- should be retained.
Cut down the sealant further using the electric knife - SAT 1561A- . To do this however, now use the knife 169 - SAT 1561/6- and the wedge - T10039/1- :
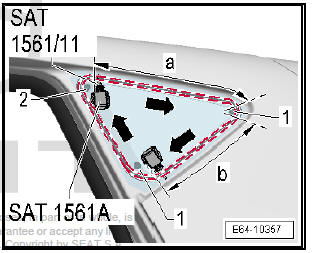
- From the outside of the vehicle and using the wedge - T10039/1- to protect the revolving profile lip, cut down the sealant in the range of dimension -a-.
Note During this process, the attachment block -1- is cut down, the attachment block -2- remains intact.
- Always using the wedge - T10039/1- to protect the revolving profile lip, cut down the sealant in the range of dimension -a-.
Note In this process, the retaining block -2- should be retained.
- If the sealant has partially been cut down, carefully raise the washer in the designated area -arrow- and cut down the remaining sealant in the area of dimension -b-.
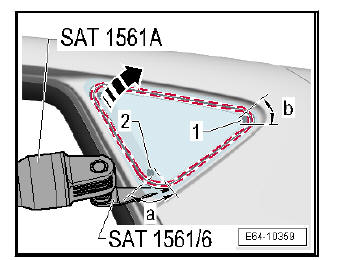
Note In this process, the retaining block -1- should be retained.
- Remove washer and prepare for installation
- Prepare the bodywork flange for glazing
Damaged side window, 5-door model: removal
Special tools and workshop equipment required
- Protective goggles and leather gloves
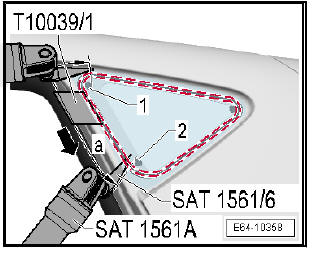
- Remove upper lining column C
| Caution The blades are marked with the manufacturer's part no. This number is engraved on the blade. To avoid damaging the paintwork, protect the surfaces near the work areas with masking tape and with the protective film of the splitter - VAG 1474B- . |
- To remove the damaged side window with the 5-door model, use the electric knife - SAT 1561A- and the following knives:
- Blade 208 - SAT 1561/11-
- Blade 169 - SAT 1561/6-
| DANGER! Always wear safety goggles and leather gloves. |
- Protect the chassis and the interior from the glass remains.
- Remove the pieces of glass as far as the adhesive bead.
- From the vehicle interior, cut down the adhesive/sealant (PUR) in the area of dimension -a-.
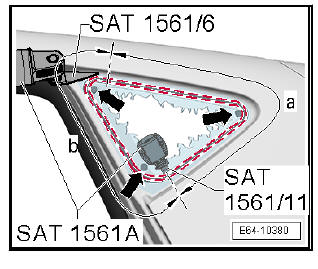
Note With this process, the attachment blocks -arrows- are cut off.
- From the vehicle interior, cut down the sealant in the area of dimension -b- with the electric knife - SAT 1561A- and using the knife 169 - SAT 1561/6- .
Install side window, 5-door model: removal
For damaged windows only
- Preparing window for installation
For new windows only
- Prepare new windscreen
Continued for all windows
- Prepare the bodywork flange for glazing
- Follow the installation instructions
- Observe the curing times
- If at hand, repair any paint damage
- Remove any soiling that has been caused by the adhesive material (PUR)
 Exploded view - side window (4-door models)
- Side window
With ceramic coating
CautionDo not damage when
dealing with the window
- Surrounding profile
- PUR adhesive sealant
Bead cross section:
Width ...
 Side window, 3 door model: removal and installation
Electric cutter - SAT
1561A-
Knife set - SAT 1561/20-
Separator for windows -
VAS 6452- 18)
Release lever - U 30800-
Measuring tool - U 40807-
Window suction pads -
VAG 1344-
S ...
See also:
Rear window: removing and installing
Electric cutter - SAT
1561A-
Knife set - SAT 1561/20-
Separator for windows -
VAS 6452- 6)
Release lever - U 30800-
Measuring tool - U 40807-
Window suction pads -
VAG 1344-
...
