Seat Leon >> Removing and installing windscreen
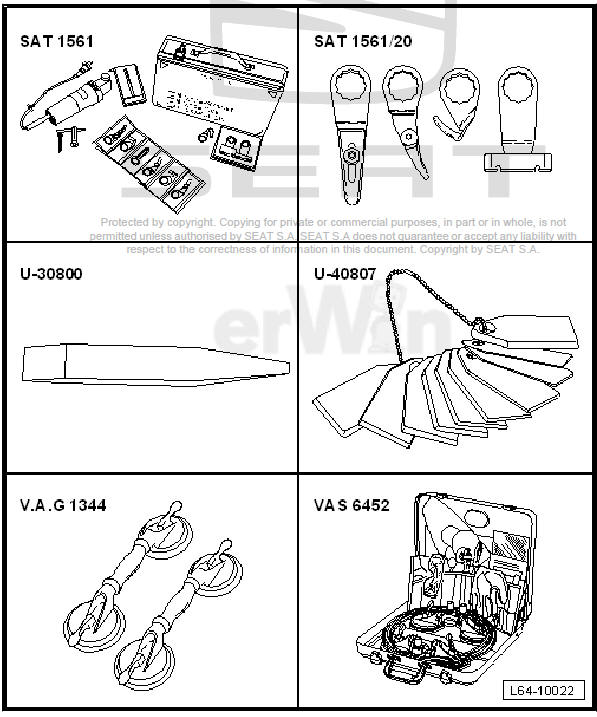
- Electric cutter - SAT 1561A-
- Knife set - SAT 1561/20-
- Separator for windows - VAS 6452- 6)
- Release lever - U 30800-
- Measuring tool - U 40807-
- Window suction pads - VAG 1344-
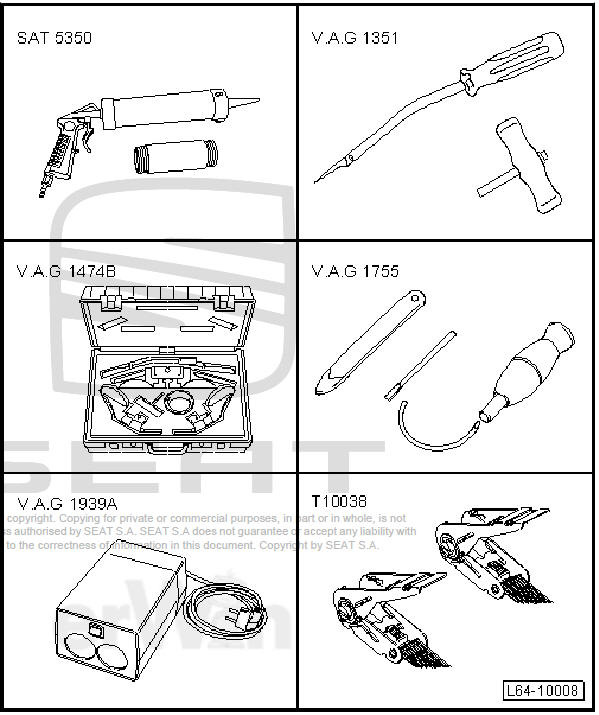
- Window sealant pistol - SAT 5350-
- Cable holder knob - VAG 1351/1-
- Removal equipment - VAG 1474B-
- Window extraction kit - VAG 1755-
- Cartridge heater - VAG 1939A-
- Counterhold - T10038-
Materials
- Cutting wire
- Cutting cord
- 1 component glue 7) 9)
- Dual component glue 8) 8)
- Actuator for washers
- Cleaning solution
- Applicator
- Adhesive remover
- Primer (glass/paint)
6) Note the manufacturer's instructions in the packaging insert slip.
7) To apply this material use the window sealant pistol - SAT 5350- .
8) To apply this material use the window glue pistol - SAT 5360- .
9) Note drying times.
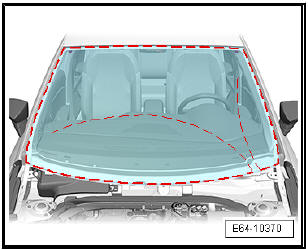
Windscreen glass: removing
| Caution To avoid damaging the paintwork, protect the surfaces near the work areas with masking tape and with the protective film of the splitter - VAG 1474B- . |
- Lift the front bonnet. Use the rod to keep it open.
- Remove windscreen wiper arm .
- Remove the grille below the windscreen.
- Remove the drip rail moulding from strut A.
- Remove interior mirror.
| DANGER! When removing a screen you must wear protective goggles and leather gloves. Note the manufacturer's instructions in the packaging insert slip. |
- Use wire reel - VAS 6452/1- to reel off about 7.50 metres of cutting wire (corresponding to 7 turns) and cut off.
Only for vehicles with sliding / tilt sunroof!
Note
- For vehicles equipped with a sliding/tilting sunroof make sure that the cutting thread -3- is positioned underneath the sealing lip -4- at the top edge of the windscreen -1-. Otherwise, during removal of the windscreen there is the risk of cutting the sealing lip.
- If the sealing lip is cut or damaged -4- the windscreen is to be replaced.
- Using masking tape -2- protect the sliding /tilting sunroof trim panel near the sealing lip -4-.

Note To ease insertion of the cutting cord, spray the sealing lip with soapy water.
- With help of the tool -2- of the window removal set - VAG 1755- position the cutting thread -1- along the top edge of the windscreen below the sealing lip -3-.

All vehicles (continued):
- Protect the surface of the bodywork near the awl exit with masking tape -2-.
| DANGER! Risk of injury.
|
- Pierce the adhesive bead of the adhesive sealing material (PUR) using the awl -1- as shown in the figure from the inside out, at the bottom corner of the windscreen.
- Lace both ends of the cutting wire -3- into the awl -1-. Pull on the awl and guide the ends of the thread in the passenger compartment.

Note Take care that the ends of the thread have sufficient length in order to reach the lower corners of the rear windscreen.
- Position the cutting thread underneath the windscreen at shown in the figure.
| Caution The wire ends through the adhesive bead on the opening must not be twisted. |
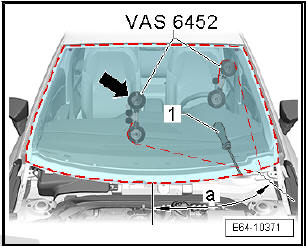
- Guide the longer end of the cutting thread -1- in the integrated roll -2- of the coil guide of the separating device for windows - VAS 6452- .
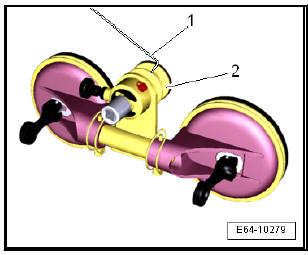
- As shown in the figure, fix the windscreen -arrow- to the inside of the rear window using the suction cups.
- Repeat the process with the other ends of the thread and fix with the suction cups of the other coil guides as shown in the figure.
Note Use the awl -1- during the cutting process of the zone of the control panel.
- By applying the coil guide -arrow- cut the adhesive bead in the area of the dimension -a-.
- Using the roll of the coil guide, release the thread in a controlled manner and fix the coil guide -arrow- in the new positions as displayed in the figure.
- By applying the coil guide -arrow- cut the adhesive bead in the area of the dimension -a-.
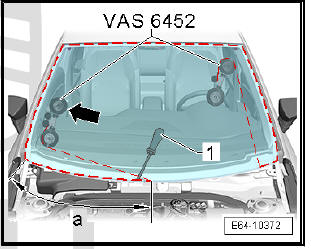
- Reposition the coil guide -arrow - as displayed in the figure.
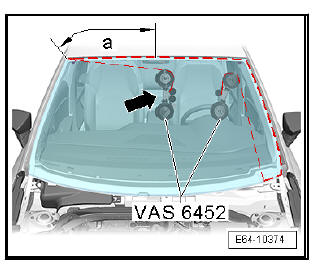
- By applying the coil guide -arrow- cut the adhesive bead in the area of the dimension -a-.

- Reposition the coil guide -arrow - as displayed in the figure.
- By applying the coil guide -arrow- cut the adhesive bead in the area of the dimension -a-.
- By now applying the coil guide -arrow- cut the adhesive bead in the area of the dimension -a-.
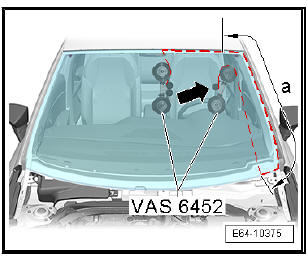
- Reposition the coil guide -arrow - as displayed in the figure.
Note
- In this process the cutting thread ends cross each other.
- With the coil guides positioned this way, cutting the adhesive beads for windscreens can be terminated.
- By applying the coil guide -arrow- cut the adhesive bead in the area of the dimension -a-.
- With the assistance of a second mechanic, lift the windscreen off using the suction lifters - VAG 1344- .

Note
Depending on the production condition of the vehicle remnants of distance block can be found on the bodywork flange -arrow a- or on the windscreen -arrow b-.
- Remove these remnants (-arrows a- and - b-) before working on the glass or the bodywork flange.

Windscreen glass: fitting
Note If the sealing lip is damaged during removal, it is necessary to replace the windscreen.
- Prepare the undamaged glass for glazing
- Preparing the new glass for installation
- Prepare the bodywork flange for glazing
- Installation instructions
- Drying time
- Paintwork damage repairs
- Remove any soiling that has been caused by the adhesive material
 Exploded view - windscreen
- Windscreen
Supplied with retaining
plate for interior rear-view
mirror
Before installation,
check to ensure that retaining
plate is correct
for type of rear view mirror.
...
 Rear window
...
See also:
Sunroof light
Fig. 178 Removing
sunroof light
Fig. 179 Removing
sunroof light
– Carefully remove the lamp, using the flat side of the screwdriver,
as shown in the figure fig. 179.
– Remove the l ...
