Seat Leon >> Removing and installing door
SEAT Leon Service and Repair Manual / General body repairs, exterior / Rear doors, door components / Door / Removing and installing door
Special tools and workshop equipment required
- Torque wrench - V.A.G 1331-
Note The sequences below describe the processes for removal and installation for the left side of the vehicle. The corresponding sequences for the right side are similar with the exception that, where applicable, the scope of the process is written by yourself.
Removing
- Open the front door.
- Disconnect the multi-plug in the B-column.
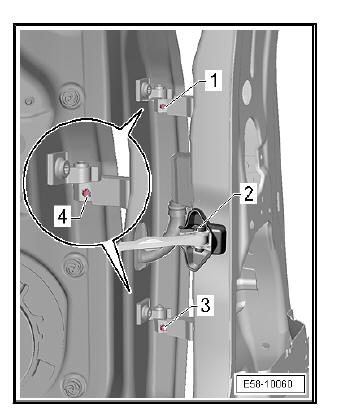
- Unscrew bolt -2- on door retainer.
- Detach the caps -1- and -3- from studs -4-.
- Release the fixing pin -4- of the hinge axis at the top, do not screw out.
- Release the fixing pin -4- of the hinge axis at the bottom, do not screw out.
- Lift the door upwards and remove from hinge shafts carefully.
Note To protect the components removed against damage, cover the resting surface with soft material.
fitting
Fit in reverse order from removal, remembering the following:
Note
- Threaded pins -4- must always be replaced.
- After fitting the door, do not make any adjustments
- Place the door on the hinge shafts carefully.
- Tighten the threaded pins -4-.
- Use the tightening torque of the screws.
 Exploded view - door
- Rear door
- Upper hinge
- Bolt.
2 + 2 each
Always replace.
32+- 5 Nm
- Bolt.
2 + 2 each
Always replace.
32+- 5 Nm
- Bolt.
2 + 2 each
Always replace.
32+- 5 Nm
- Seal ...
 Adjusting door
Special tools and workshop equipment required
Torque wrench - V.A.G 1331-
Adjustment gauges - 3371-
Back door adjustment (hinges on pillar)
Note
The door can be adjusted back and fo ...
See also:
Removing and installing rear footwell
vent
Note
The illustration shows the left side by way of example.
Removal:
Turn off the ignition and all electricity consumers.
Vehicles without access and start authorisation system
Remove ig ...
