Seat Leon >> Removing and installing inner door seal
Seal for front door: remove
Front door seal: Fitting
Special tools and workshop equipment required
- Release lever - U 30800-
- Thrust piece - T20098-
Remove front door seal
Note The sequences below describe the processes for removal and installation for the left side of the vehicle. The corresponding sequences for the right side are similar with the exception that, where applicable, the scope of the process is written by yourself.
- Open the front door.
- Partially remove the lower trim flush with the seal .
| WARNING Take care not to damage the roof lining in the area where the seal joins the roof. |
- Clip out the door seal from the body flange.
Install front door seal
Note
- When being installed in the production, the seals are coated with a sealing mass, placed in the flange and then put in position using the press tool - T20098- .
- On removing the seal, the sealant spreads onto the interior of
the seal and the sides open slightly. When reinstalling, the
tightness nor the correct seating of the seal can be guaranteed.
Therefore each seal which is removed completely should be replaced by a so-called "tap-on" seal.
- Before installation of the seal partially removed, press the sealing edges together.
- Wear clean gloves in order to prevent dirt getting onto the roof trim during the removal.
- Temporarily place the seal on the bodywork flange. When doing so, keep in mind the following:
- The vulcanised connection -arrow- of the seal must be centred between both hinges.
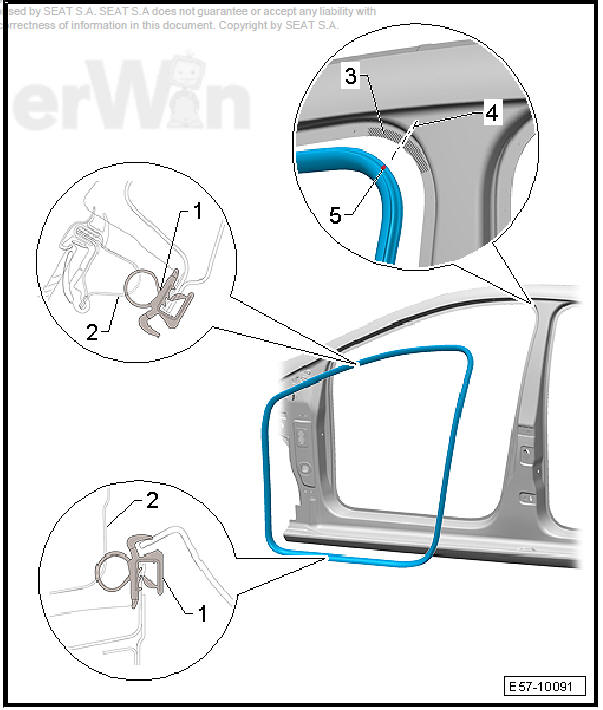
- Start the installation on the upper diameter -3- of the body flange and then continue with the remaining sections.
- If the seal is positioned correctly on the bodywork flange, press in the seal over the entire perimeter using the press tool - T20098- .
 Exploded view - door
- Front door holder
The door trim and the
loudspeaker must be removed
for removal.
- Upper hinge
- Bolt.
2 + 2 each
32+- 5 Nm
Always replace.
- Bolt.
2 + 2 ...
 Removing and installing door seal (outer)
Removing and installing door outer seal, 4-door model
Removing
Pull door seal -1- off door -2- together with the clips -3-.
fitting
Check clips -3- for damage and renew if necessary.
P ...
See also:
Air filter: Clean housing and renew filter
element
Special tools and workshop equipment required
Torque wrench 2-10 Nm - VAG 1783-
Hose clip pliers - VAS 6362-
NOTICE
Always use a genuine air filter cartridge .
Use a silicone-free ...
