Seat Leon >> Removing and installing wing panel
SEAT Leon Service and Repair Manual / General body repairs, exterior / Body - front / Wing panel / Removing and installing wing panel
Special tools and workshop equipment required
- Torque wrench - V.A.G 1331-

- Release lever - 3409-

Removing
| Caution The following does not have to be removed when removing the wing:
|
Note The sequences below describe the processes for removal and installation for the left side of the vehicle. The corresponding sequences for the right side are similar with the exception that, where applicable, the scope of the process is written by yourself.
- Remove front wheel housing liner
- Remove bumper cover (front)
- Remove spacer
- Clip out the filler piece;
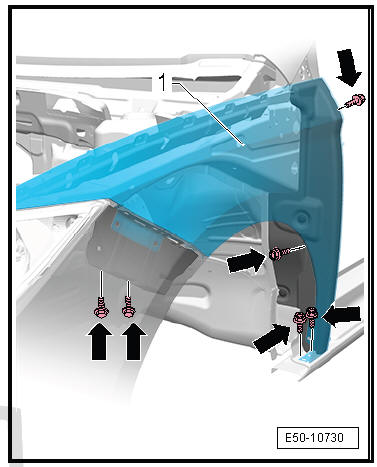
- Remove bolts -arrows-.
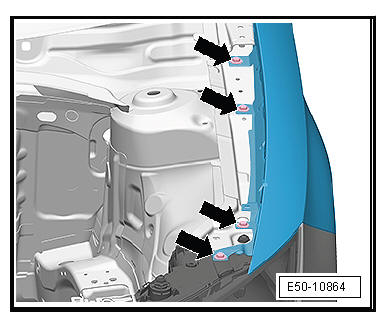
- Remove bolts -arrows-.
- Carefully remove front wing-1-.
fitting
Fit in reverse order from removal, remembering the following:
- Move the protective foam in its installation position.
Caution
|
- Checking panel gaps - Body Repairs;
 Exploded view - wing
- Separator
- Spacer
- Bolt.
1 + 1 each
5+- 1 Nm
- Clips
2 + 2 each
- Front wing
- Spreader block
1 + 1 each
- Bolt.
1 + 1 each
6+- 1 Nm
- ...
 Separation element: removing and installing
Special tools and workshop equipment required
Release lever - 3409-
Removing
Note
The sequences below describe the processes for removal and
installation for the left side of the vehicle. ...
See also:
Anti-theft wheel bolts
Anti-theft wheel bolts
Fig. 159 Anti-theft wheel
bolt
– Insert the adapter onto the wheel bolt and push it on as far as it
will go fig. 159.
– Fit the box spanner as far as it will go over ...
