Seat Leon >> Removing and installing lock carrier brace
Special tools and workshop equipment required
- Torque wrench - V.A.G 1331-
| Caution The following component does not have to be removed when removing the lock carrier brace:
|
Note The sequences below describe the processes for removal and installation for the left side of the vehicle. The corresponding sequences for the right side are similar with the exception that, where applicable, the scope of the process is written by yourself.
Removing
Driver side only
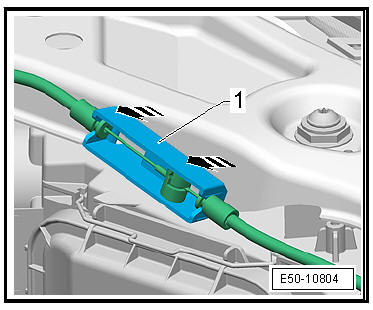
- Clip out the coupling sleeve -1- of the cable for opening the bonnet.
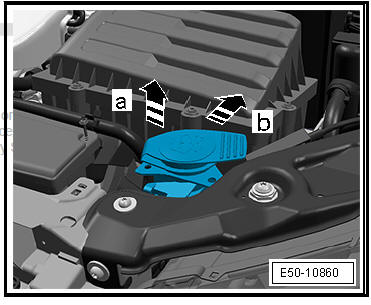
- Remove filler necks from washer fluid reservoir, to do this: slide necks in -direction of arrow a-.
- Clip out the support in the -direction of arrow b-.
Continuation for both sides
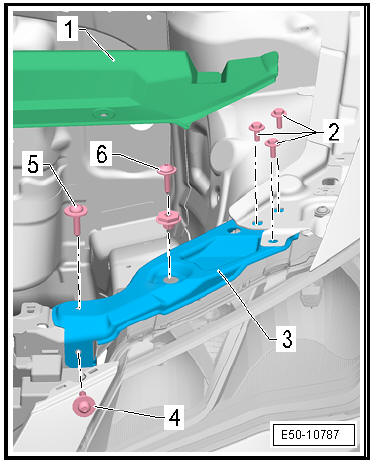
- Remove the rear lock carrier cover -1- .
- Unscrew the bolts -6- with their adjustment sleeve.
- Unscrew the bolts -4- and -5-.
- Remove screws -2-.
- Remove the brace of the lock carrier -3-.
fitting
Fit in reverse order from removal, remembering the following:
- Check the spacings.
- Perform basic setting of headlights, if installed.
Specified torques
- Lock carrier struts

 Removing and installing air duct
Special tools and workshop equipment required
Release lever - 3409-
CautionThe following component does not have to be
removed when
removing the air ducts.
Impact bar
...
 Removing and installing ventilation control
Special tools and workshop equipment required
Torque wrench - VAG 1331-
Removing
Remove bumper cover (front)
Unplug the external temperature sensors -2-.
Unplug the ventilation contro ...
See also:
First-aid kit, warning triangle, fire extinguisher Luggage compartment
Warning triangle
Fig. 104 Housing for the
emergency warning
triangle in the boot
The emergency warning triangle can be fitted in the side lining of the boot.
Note
• The warning triangle is n ...
