Seat Leon >> Location overview - clutch mechanism
SEAT Leon Service and Repair Manual / 5-speed manual gearbox 0AH / Clutch / Clutch mechanism / Location overview - clutch mechanism
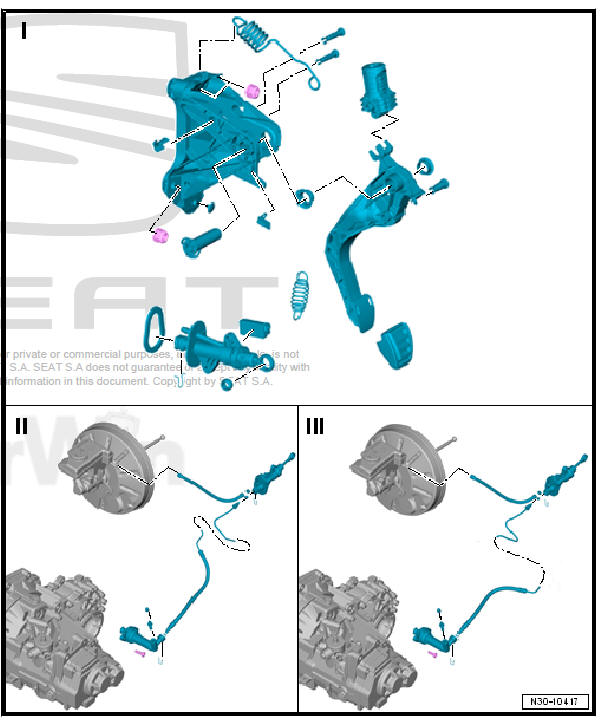
Assembly overview - pedal cluster
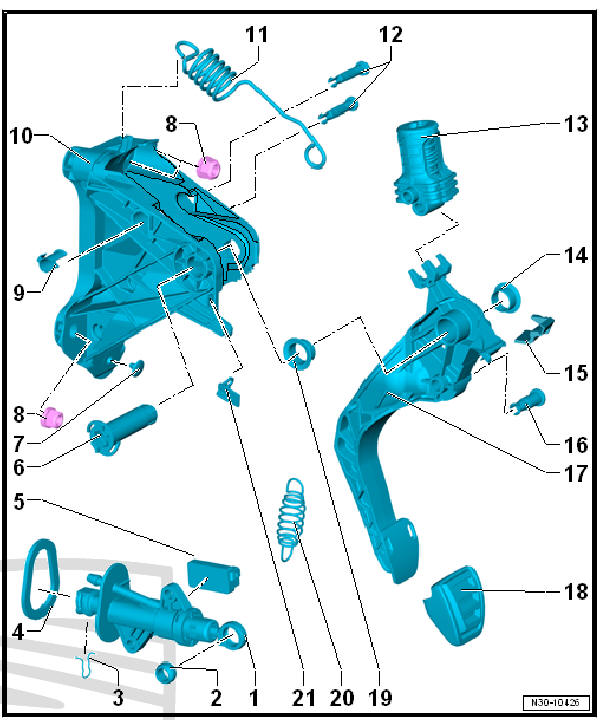
- - Clutch master cylinder
- Removing and installing
- - Mounting bush
- Removing and installing
- Cable must not be greased
- - Clamp
- To remove pipe, pull out clip to stop.
- Can be driven in fully before the line is installed
- - Seal
- Self-adhesive
- Renew after removing the clutch master cylinder
- Glue onto clutch master cylinder
- - Clutch position sender -
G476-
- Can be checked using - Vehicle diagnostic tester in Guided fault finding mode.
- Equivalent
- Removing and installing
- - Bearing shaft
- Must be renewed if removed
- Cable must not be greased
- - Buffer stop
- - Hexagon nut
- For mounting bracket to bulkhead
- 3 Units
- Self-locking
- Must be renewed if removed
- 25 Nm
- - Bearing cap
- 2 Units
- Installed on both sides
- Only fitted in conjunction with over-centre spring.
- Cable must not be greased
- - Mounting bracket
- For clutch pedal
- Removing and installing
- Using drift - VW 207- drive bushes for the studs used to fasten the mounting bracket onto the bulkhead, into the holes in the mounting bracket
- - Recovery spring
- Fitted depending on design status
- Removing and installing
- Do not grease seat on mounting bracket
- - Bearing shaft
- For clutch master cylinder
- Must be renewed if removed
- Cable must not be greased
- - Over-centre spring
- Fitted depending on design status
- Different versions available
- Removing and installing
- Cable must not be greased
- - Mounting bush
- Cable must not be greased
- - Sliding bush
- Fitted depending on design status
- For mounting return spring
- Fit onto clutch pedal
- Grease when mounting return spring.
- For grease allocation, refer to - Electronic parts catalogue (ETKA) .
- - Bearing shaft
- for plunger of the clutch master cylinder
- Must be renewed if removed
- Cable must not be greased
- - Clutch pedal
- Removing and installing
- Cable must not be greased
- - Pedal rubber
- - Mounting bush
- Cable must not be greased
- - Extension spring
- For clutch pedal
- Fitted depending on design status
- Installing and removing - Removing and installing over-centre spring
- Cable must not be greased
- - Damping piece
- Only fitted in conjunction with extension spring.
- Cable must not be greased
Assembly overview - clutch hydraulics
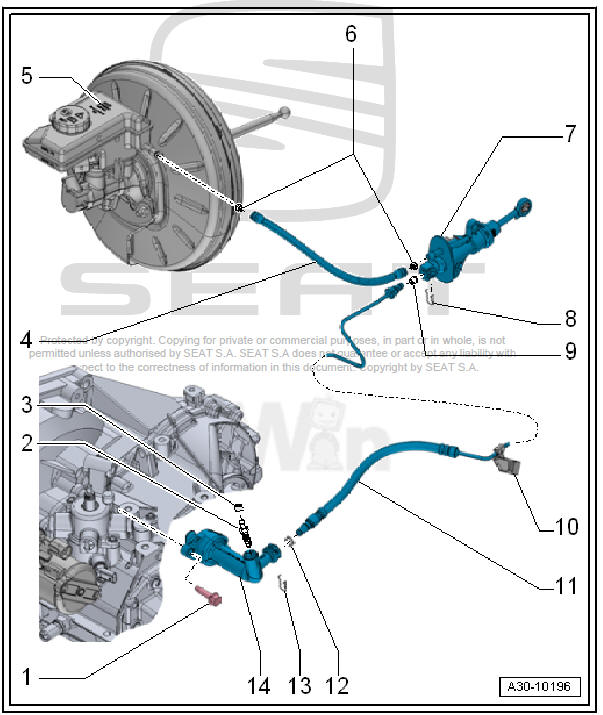
- - Hexagonal bolt
- Tightening torque
- - Bleeder screw
- Bleeding clutch mechanism
- Tightening torque
- - Dustcap
- - Supply hose
- - Brake fluid reservoir
- - Seals
- If damaged, renew together with supply hose
- Must be fitted in supply hose
- - Clutch master cylinder
- Removing and installing
- - Clamp
- To remove pipe, pull out clip to stop.
- Can be driven in fully before the line is installed
- - Seals / O-rings
- Renew if damaged.
- Install on line connection
- Lubricate with brake fluid before installing
- Whether a seal or an O-ring is used depends on the type of connection
- Equivalent
- - Support bracket
- For pipe/hose assembly
- Different supports for LHD and RHD vehicles.
- Equivalent
- - Hose/metal pipe
- Different lengths for LHD and RHD vehicles.
- Equivalent
- Removing and installing
- - Seals / O-rings
- Replace if damaged
- Install on line connection
- Lubricate with brake fluid before installing
- Whether a seal or an O-ring is used depends on the type of connection
- Equivalent
- - Clamp
- To remove pipe, pull out clip to stop.
- Can be driven in fully before the line is installed
- - Clutch cylinder:
- Removing and installing
Assembly overview - clutch release mechanism
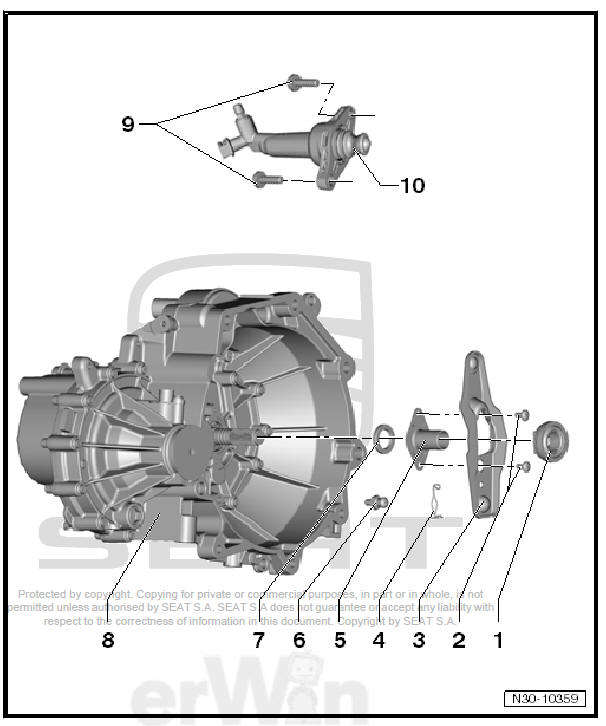
- - Clutch release bearing
- Remove and install together with clutch release lever and guide sleeve
- Do not wash out bearing; wipe only
- Replace collars that make a noise
- - Bolt
- Must be renewed if removed
- 5 Nm + +90º
- - Clutch release lever
- Remove and install together with release bearing and guide sleeve
- Remove any traces of grease
- Grease contact surface of ball-head pin with grease for clutch plate splines
- For grease allocation, refer to - Electronic parts catalogue (ETKA) .
- - Retaining spring
- Secure to clutch lever
- - Guide sleeve
- Remove and install together with release bearing and clutch release lever
- - Ball head studs
- For removal and installation the gearbox must be removed
- Remove any traces of grease
- Grease contact surface of ball-head pin with grease for clutch plate splines
- For grease allocation, refer to - Electronic parts catalogue (ETKA) .
- 20 Nm
- - Input shaft oil seal:
- Must be renewed if removed
- - Gearbox
- - Hexagonal bolt
- 20 Nm
- - Clutch cylinder:
- Removing and installing
 Clutch mechanism
...
 Removing and installing bearing bush
Removing
Push driver's seat as far back as possible.
Move steering wheel up as far as it will go, making use of full
range of steering column adjuster.
Vehicles with knee airbag
Remove ...
See also:
Removing and installing wheel arch
trims
Removing and installing front wheel
arch trims
Special tools and workshop equipment required
Release lever - 3409-
Adhesive strip remover - VAS 6349-
Torque wrench - V.A.G 1331-
...
