Seat Leon >> Checking vacuum system
Notes on checking vacuum system
The following instructions are intended to help you trace the causes of faults quickly and effectively in the event of problems involving the brake servo or in the event of a "hard brake pedal".
This check relates to the following components:
- Brake servo unit
- Seal between brake master cylinder and brake servo
- Retaining valve
- Vacuum hoses with connectors
- Vacuum pump (if included)
When evaluating the measured results, bear in mind that they will be influenced by your geographical location. The higher your location is above sea level, the lower the air pressure will be.
Before checking the vacuum system, it is important to observe the following test requirements:
- Visual inspection of all vacuum hoses for damage (e.g. cracks or marten bite) and to check that they are correctly and firmly attached
- Ensure cleanliness when working on the vacuum system
- Before starting work, clean the engine compartment if necessary
Connect the Brake servo tester - VAS 6721-
Special tools and workshop equipment required
- Brake servo tester - VAS 6721-
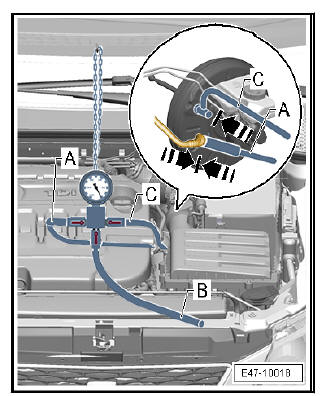
- Detach vacuum hose from brake servo unit.
- First press the brake pedal several times in order to facilitate removal of the vacuum hose.
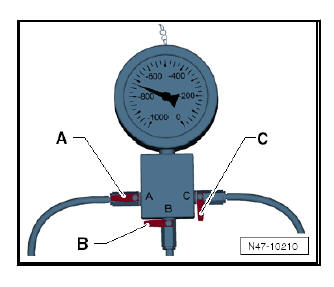
- Use the Brake servo tester - VAS 6721- -, see the following images-.
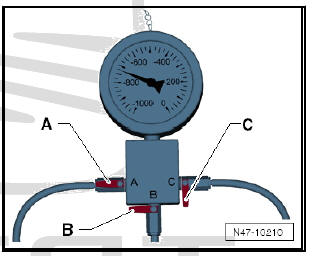
| Item | Component | Definition |
| A | Shut-off valve | In direction of vacuum hose, non-return valve and, if included, vacuum pum |
| B | Shut-off valve |
|
| C | Shut-off valve | In direction of brake servo |
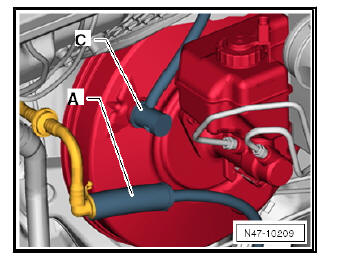
- Connect hose -A- of the brake booster test device - VAS 6721- to the vacuum pressure hose and fit adaptor -C- into the brake booster.
Check vacuum creation
Note
- The average earth atmospheric pressure at sea level is 1,013 mbar and increases the higher you travel (approx. 100 mbar / 1,000 m height). Local and temporal fluctuations also affect vacuum creation.
- Engine idling affects vacuum creation negatively.
- Before starting work, check all vacuum hoses for damage (e.g. cracks or marten bite) and to check that they are correctly and firmly attached
- Connect the Brake servo tester - VAS 6721.
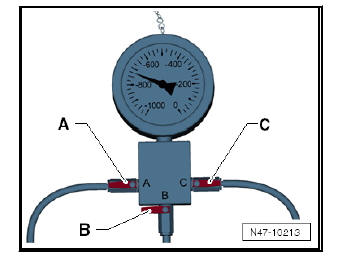
- Open cut-off valve -A-.
- Close cut-off valves -B+C-.
- Start warm engine (>60 ºC), press accelerator briefly once (engine speed more than 2,000 rpm).
- Read-off the measuring value displayed.
Under normal conditions (see notes) the vacuum created should lie between 600 and 950 mbar (dependent upon engine type).
If the measured value is not reached even through the preconditions (see notes) have been met, the vacuum system must first be checked for leaks.
- Create a vacuum with the vacuum pump - VAS 6213- for a comparison.
Open cut-off valve -B- to facilitate removal of hose connections and adapter.
Checking for leaks
Note
- The average earth atmospheric pressure at sea level is 1,013 mbar and increases the higher you travel (approx. 100 mbar / 1,000 m height). Local and temporal fluctuations also affect vacuum creation.
- Engine idling affects vacuum creation negatively.
- Before starting work, check all vacuum hoses for damage (e.g. cracks or marten bite) and to check that they are correctly and firmly attached
- Connect the Brake servo tester - VAS 6721-.
- Open cut-off valve -A-.
- Close cut-off valves -B+C-.
- Start warm engine (>60 ºC), press accelerator briefly once (engine speed more than 2,000 rpm).
- Under normal conditions (see notes) the vacuum created should lie between 600 and 950 mbar (dependent upon engine type).
- Open cut-off valve -C- to evacuate brake servo.
- Switch off engine
- Read and make a note of measured value shown.
- The vacuum may reduce by 400 mbar in a 12 hour period.
Should the vacuum decrease by more it is to be checked whether the leak is in the area of ...
- - Brake servo unit
or, - - Non-return valve, vacuum hoses with plug-in connectors and vacuum pump/intake pipe.
Where bigger leaks are concerned the vacuum rapidly decreases within several seconds.
Checking the vacuum in the area of the brake servo:
- After creating the vacuum, close the shut-off valve -A-, in order to check the vacuum system from the brake servo.
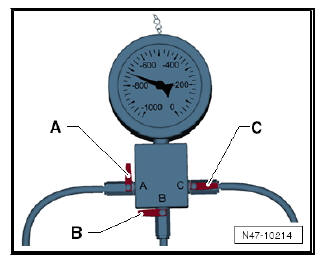
Checking the vacuum in the area of the non-return valve, vacuum hoses with plug-in connectors and vacuum pump/intake pipe:
- After creating the vacuum, close the shut-off valve -C-, in order to check the vacuum system from the brake-servo tester - VAS 6721- up to the intake pipe or vacuum pump.
Open cut-off valve -B- to facilitate removal of hose connections and adapter.
Vacuum creation with the suction pump - VAS 6213-
Special tools and workshop equipment required
- Exhauster pump - VAS 6213-

In place of the engine or the vacuum pump, the vacuum can also be created with the suction pump - VAS 6213- .
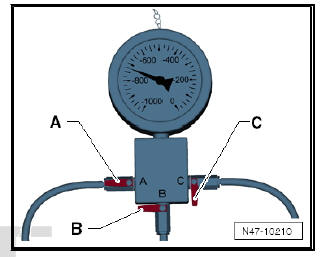
- Connect the manual vacuum pump - VAS 6213- to connection -B- on the of the brake booster test device - VAS 6721- on the vacuum pressure hose for this purpose.
- Open cut-off valve -B-.
- Create a vacuum with the suction pump - VAS 6213- until the brake-servo tester - VAS 6721- indicates between 600 and 950 mbar.
- Then, carry out the corresponding checks.
 Exploded view - vacuum pump
Exploded view - vacuum pump, vehicles
with 1.8-l TSI and 2.0-l TSI engines
Note
The vacuum pump is driven mechanically.
- High-pressure pump
Removing and installing
- Bolt
Tight ...
 Brake lines
...
See also:
Self-aligning bearing and rubber bearing
of the roller rocker arms: Visual inspection
for damage
NOTICE
This test must be performed with the vehicle standing on its
wheels.
Make sure that the dust protective caps -arrow- are not damaged
and are properly fitted.
Check the rear side of th ...
