Seat Leon >> Removing and installing brake calliper
Removing and installing brake calliper, vehicles with manual parking brake
Note
- Use brake filling and bleeding equipment - VAS 5234- to extract brake fluid from brake fluid reservoir.
- Before removing brake caliper or disconnecting brake hose from brake caliper, insert brake pedal actuator - V.A.G 1869/2- to prevent brake fluid reservoir from emptying completely.
Special tools and workshop equipment required
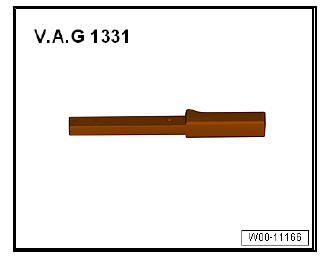
- Torque wrenches - V.A.G 1331-
- Brake pedal depressor - V.A.G 1869/2-
Removing:
Note This procedure applies only to exchanging or the following repair work on the brake caliper.
- Fit the block for the brake pedal - V.A.G 1869/2- .
- Depress brake pedal at least 60 mm using brake pedal depressor - VAG 1869/2- .
- Remove wheels.
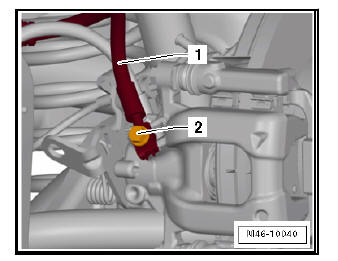
- Attach bleeder hose -1- of bleeder bottle to bleeder valve of brake calliper
- Open bleed valve.
- Close bleed valve and remove bleed bottle.

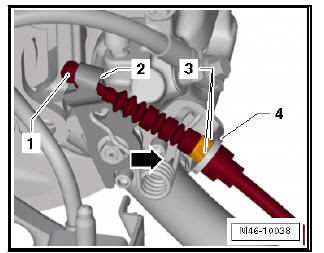
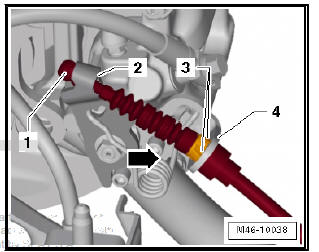
- Unscrew brake hose -1- with banjo bolt -2- from brake caliper.
- Press the lever of the brake calliper -2- in the direction of the -arrow-.
- Hang out the handbrake cable -1- from the lever on the brake calliper -2-.
- Press the tabs -3- together and remove the handbrake cable -1- from the holder -4- on the brake calliper.
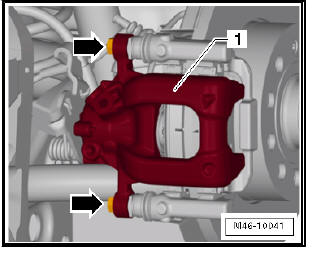
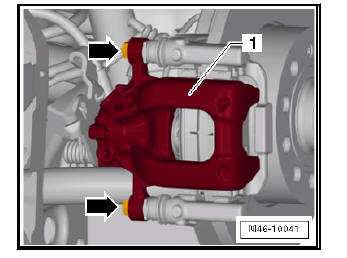
- Unscrew the fixing screws -arrows- of the brake calliper -1-.
The guide pins must be locked for this purpose.
- Pull brake caliper off brake carrier.
Cleanliness:
| WARNING Never clean the brake system with compressed air; harmful dust particles will be released. Only use methylated spirits to clean the brake calliper. |
Installation:
- The piston is removed.
- The brake pads are seated in the retaining springs on the brake carrier.
| Caution Use new bolts. |
- Secure brake caliper -1- to brake carrier with new self-locking bolts -arrows-.
- Screw brake hose -1- with banjo bolt -2- on brake calliper.

- Guide the handbrake cable -1- through the holder -4- of the brake caliper until the tabs -3- engage.
- Press the lever of the brake calliper -2- in the direction of the -arrow-.
- Hang in the handbrake cable -1- to the lever on the brake calliper -2-.
- Remove the block for the brake pedal - VAG 1869/2- .
- Bleeding air from the brake system.
- Adjust handbrake.
- Fit the wheels.
Note After changing pads, check the brake fluid level.
| WARNING After installing the brake pads, depress pedal firmly several times with the vehicle stationary, so that the brake pads are properly seated in their normal operating position. Make sure that the brakes work properly before the vehicle is driven on the road. |
Removing and installing brake calliper, vehicles with electronic parking brake
Special tools and workshop equipment required
- Vehicle diagnosis tester
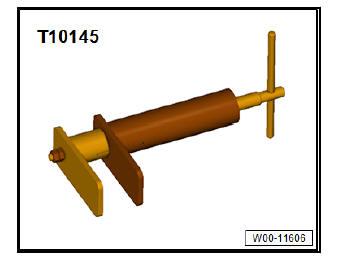
- Thrust piece - T10145-
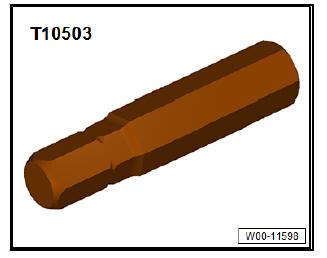
- Bit attachment (7 mm) - T10503-
- Torque wrenches - V.A.G 1331-
- Brake pedal depressor - V.A.G 1869/2-
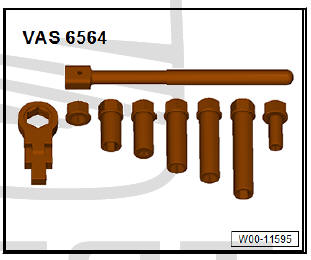
- Bleeder set - VAS 6564-
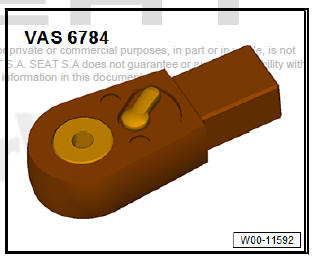
- Ratchet insert - VAS 6784-
Removing
Note This procedure applies only to exchanging as well as the following repair work on the brake caliper:
Note Do not separate connectors of parking brake motors.
- Remove rear wheel on affected side.
The electromechanical parking brake pistons must be moved back by means of - Vehicle diagnostic tester.
Note Before resetting pistons, draw off brake fluid from brake fluid reservoir.
Otherwise, if brake fluid has been replaced it might leak and cause damage.
- Move the pistons back using - Vehicle diagnostic tester.
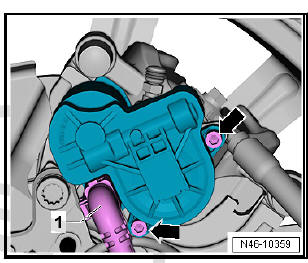
- Unscrew bolts -arrows- for parking brake motor.
- Pull off parking brake motor and place it to one side without disconnecting the connector.
- Attach bleeder hose -1- of bleeder bottle to bleeder valve of brake calliper
- Open bleed valve.
- Apply brake pedal actuator - V.A.G 1869/2- .
- Close bleeder valve and remove bleeder bottle.
- Unscrew brake hose.

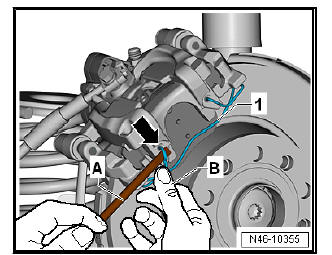
| DANGER! Risk of injury due to tensioned retaining spring. The retaining spring might jump out and cause injury to eyes and skin.
|
- Remove brake caliper -arrow- from the brake pad retaining spring -1- using a screwdriver -A-. Make sure to firmly hold the spring with the other hand.
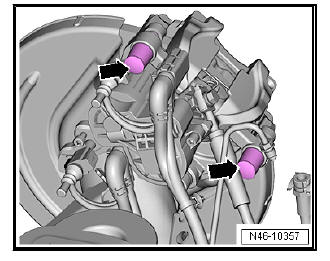
- Remove the protective caps -arrows-.
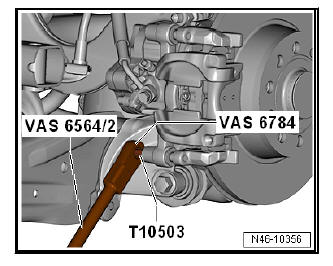
- Unscrew both guide pins from brake caliper using bit attachment (7 mm) - T10503- and ratchet insert - VAS 6784- .
- Pull off brake calliper from brake carrier.
Installing
Carry out installation in the reverse sequence, noting the following:
- The brake pads are seated in the retaining springs on the brake carrier.
- Secure brake caliper to brake carrier with new self-locking bolts.
Note The annular groove and the contact surface of the parking brake motor must be clean.
- Fit new seal.
- Turn spindle back slightly using an E11 Torx socket, until parking brake motor can be properly fitted.
- Carefully fit parking brake motor, while ensuring that seal is correctly seated.
- Turn parking brake motor until bolt hole and thread align.
Note Make sure that parking brake motor is flush with brake caliper.
Never pull parking brake motor onto brake caliper using securing bolts.
- Start new hexagon socket head bolts by hand and tighten them.
- Screw brake hose onto brake caliper.
- Bleeding air from the brake system
After moving the pistons forwards using - Vehicle diagnostic tester, carry out a basic setting of brake system.
- Carry out basic setting of brake system using - Vehicle diagnostic tester.
- Fit wheel.
Specified torques
- Wheel bolts
Note Check brake fluid level.
 Removing and installing brake pads/linings
Removing and installing brake pads, vehicles
with manual parking brake
Note
Use brake filling and bleeding equipment - VAS 5234- to extract
brake fluid from brake fluid reservoir.
Special tools a ...
 Removing and installing brake disc
Special tools and workshop equipment required
Tool insert - T10035-
Removing:
Remove the brake pads.
Remove the bolts -arrows- of the brake carrier -1-.
Remove brake carrier -1-.
...
See also:
Renewing bonded rubber bush for wheel bearing housing
Special tools and workshop
equipment required
attachment tool - 3301-
attachment tool - 3350-
Torque wrenches - V.A.G
1332-
Viscous fan fitting tool -
3367-
Actuating arm - 3390-
at ...
