Seat Leon >> Wheel change
Wheel change, protecting wheel centring seat against corrosion
Applies to alloy and steel wheels
When changing a wheel, wheel centring seat should be waxed using wax spray to prevent corrosion between wheel centring seat and rim - Electronic parts catalogue "ETKA" .
- Undo the wheel.
- Thoroughly clean wheel centring seat on wheel hub and the centring ring of the wheel rim.
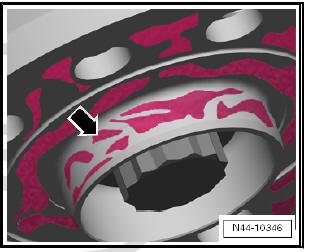
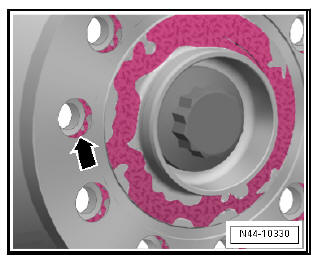
- Apply wax to centring area -arrow- with a brush.
Ensure that only centring ring -arrow- but not contact surface of wheel rim has been waxed. Otherwise, the brakes will be soiled, which would reduce the braking efficiency.
| WARNING Wheel bolts, contact surfaces of wheel hub and wheel rim and wheel hub threads must not be waxed. Do not apply lubricants or anti-corrosive products to the threads of the wheel bolts. |
- Fit and secure wheel.
Wheel change, installation requirements
Warming cold tyres to minimum installation temperature
Note This instruction also applies to ultra-high performance tyres (height/width ratio smaller than/same as 45 % and speed symbol greater than/same as V).
| WARNING The minimum installation temperature of a tyre should be between 15ºC and 30ºC in the core of the tyre. |
- To mount a tyre particularly on the top side and bead without damaging it, the temperature of the inside of the tyre must be at least 15 ºC.
- This temperature is described as core temperature.
- Rubber is a poor conductor of heat. Therefore, a cold tyre must be left in an area with the correct temperature for a sufficiently long period so the inner rubber layers can warm up to at least 15 ºC
- The surface temperature of the tyre during the warming up phase is no indication of the internal temperature of the tyre.
- To enable cold tyres to absorb heat from the ambient air as quickly as possible, they should not be stacked on top of one another but instead stored individually in order to allow the warm air to "circulate" around them effectively.
- The tyres may not be stored in front of a heater or be heated with a hot air gun, since critical temperatures can be reached very quickly on their surface.
- Except for warming with warm water or warm ambient air (max. 50 ºC), there is no process available for warming tyres without damaging the tyre!
- If cold tyres (with temperatures below 0 ℃) are brought into a warm environment (above 0 ℃), a frost layer forms immediately on the tyre surface. This frost layer shows that the tyre intensively absorbs the ambient heat, whereby the humidity condensates.
- Once the layer of frost has thawed, condensate water forms.
The condensation should be dried with a cloth so that the further warming process is not delayed due to a temperature drop caused by evaporation.
Warming times:
- Tyres with a temperature of above 0 ºC must be kept at least at 19 ºC for at least 2 hours.
- Tyres with a temperature of below 0 ºC must be kept at least at 19 ºC for at least 2.5 hours.
Recommendation for heating:
- If possible, tyres should be stored in the workshop 1 day before they are fitted (order preparation).
- Store on an insulated base, pallet or on a similar surface raised from the floor.
- Store the tyres separately, so that the air can circulate the individual tyres.
- Wipe off condensation
- Never heat with a radiator or hot air blower!
Wheel change, installation instructions for wheel change
| WARNING Firm fit of wheel bolts and wheels can only be guaranteed when observing the tests and instructions listed below. |
Note On vehicles with tyre pressure indicator, the tyre pressure indicator has to be recalibrated any time one or more wheels are removed or fitted.
- Check to ensure that contact surfaces -arrows- on brake disc are free of corrosion and dirt.
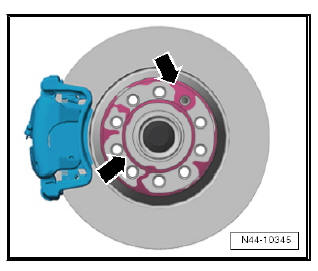
- Check to ensure that contact surface -arrow- on centring seat of brake disc are free of corrosion and dirt.
- Check to ensure that contact surface -arrow- on inner side of wheel (rim) and also centring seat of rim are free of corrosion and dirt.
- The concave seats * in the holes for the wheel bolts and the threads of the wheel bolts must also be free of corrosion and dirt, oil or grease.
* The concave seat is the curved surface of a section of a sphere cut by a plane.
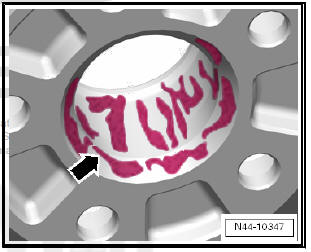
- Check whether the wheel bolts can be easily screwed in by hand. The thread of the wheel nuts should not come into contact with the brake disc opening -arrow-.
If the thread of the wheel bolt touches the opening -arrow-, turn the brake disc as necessary.
If necessary, remove dirt and corrosion:
- Oil or grease from contact surfaces
- Oil or grease from threads in wheel hub
- Oil or grease from threads in wheel bolts
| WARNING Damaged, badly corroded or difficult to remove wheel bolts must be renewed. |
Wheel change, wheel installation
- Preserving wheel centring seat.
- When fitting the wheel, pull in all wheel bolts uniformly by hand.
- Tighten wheel bolts in diagonal sequence to 30 Nm.
- Lower vehicle onto floor. Use torque wrench to firmly tighten wheel bolts diagonally to specified torque.
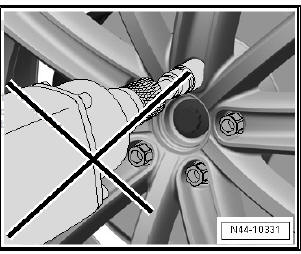
| WARNING Do not use an impact screwdriver to screw in the bolts. |
Wheel change, position of anti-theft wheel bolts for steel wheels
| Caution Adherence to position of anti-theft wheel bolts to tyre valve on steel wheels is vital. |
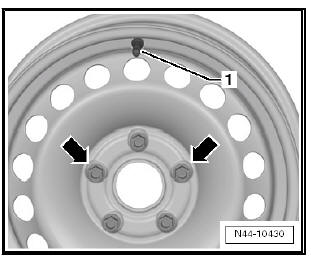
Anti-theft wheel bolts may only be fitted on right or left -arrows- of valve -1- on steel wheels.
Secure installation of hub cap on steel wheel is only possible if anti-theft wheel bolts are installed in this position.
Tightening torque for wheel bolts
Wheel bolt to wheel hub for all vehicles:
Specified torque: 120 Nm.
- Before fitting wheel, protect wheel centring seat against corrosion
- Position of anti-theft wheel bolts for steel wheels.
- Install anti-theft wheel bolts with master set for wheel bolts .
 Removing a tyre from the rim
Tyres which have been filled or sealed using tyre sealant must be
drained before removal.
Caution
Avoid eye and skin contact with tyre sealant.
It can cause injury, irritation to eyes ...
 Pressing tyre off wheel rim
New wheels with a modified contour have been introduced for all
vehicles as of model year 2005.
The tyre fitting unit must be furnished with the tyre fitting head
designed for these wheels.
...
See also:
Adjusting glass panel
Checking height adjustment
Note
Front glass panel must only be adjusted at front edge -1- and rear
glass panel at rear edge -2-.
To achieve the best possible optical appearance, ensure that ...
