Seat Leon >> Checking inner constant velocity joint
The joint is to be dismantled to renew the grease if it is heavily soiled, or to check the running surfaces of the balls for wear and damage.
Note Ball hub and joint body are paired. Mark position in relation to each other with a waterproof felt-tip pen prior to removal.
Removing
- Swing ball hub and ball cage.
- Push out joint body in direction of arrow.
- Press balls out of cage.
- Tip ball hub out of ball cage via ball track -arrows-.
- Check joint body, ball hub, ball cage and balls for small indentations (pitting) and traces of seizing.

Note Excessive backlash in the joint will cause knocking or jolts under load change. In this case the joint must be replaced. Smoothing and traces of wear on the balls are no reason to renew the joint.
Installing
Carry out installation in the reverse sequence, noting the following:
- Insert hub into cage via the two chamfers. The hub can be installed in any position. Press balls into cage.
- Fit the hub with the cage and the balls vertically in the cage element.
When fitting, ensure that the larger distance -a- on the joint housing coincides at all points with the smaller distance -b- on the hub after turning it.
Chamfer on internal circumference of ball hub (splines) must face large diameter of joint body.
- Also take note of chamfer on interior diameter of ball hub. It must be visible after swivelling in.
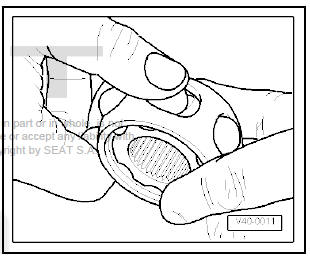
- Swivel the hub into the joint body; at the same time the hub must be swivelled out of the cage -arrows- far enough to allow the balls to fit into the ball races.
- Press hard on the cage -arrow- insert turning the ball hub.
Verification of the constant velocity joint:
The constant velocity joint is correctly assembled if the ball hub can be moved by hand backwards and forwards over its entire range of axial movement.
 Checking outer constant velocity joint
The joint is to be dismantled to renew the grease if it is heavily
soiled, or to check the running surfaces of the balls for wear and
damage.
Removing
Mark the position of the ball hub relative ...

See also:
Removing and installing tailgate seal
Special tools and workshop equipment required
Thrust piece - T20098-
Removing
Open the tailgate.
Pull seal -1- off body flange.
arrow-: vulcanised connection of the seal.
fitting
...
