Seat Leon >> Assembly overview - heater and air conditioning unit
Note
- There are different designs and makes of heater and air conditioning unit. The individual components of the various heaters and air conditioning units are similar but not identical. The combined fitting of different makes of component is therefore not permissible .
- The following illustrations show a "Valeo" heater/air conditioning unit, distinguishing features with respect to other makes
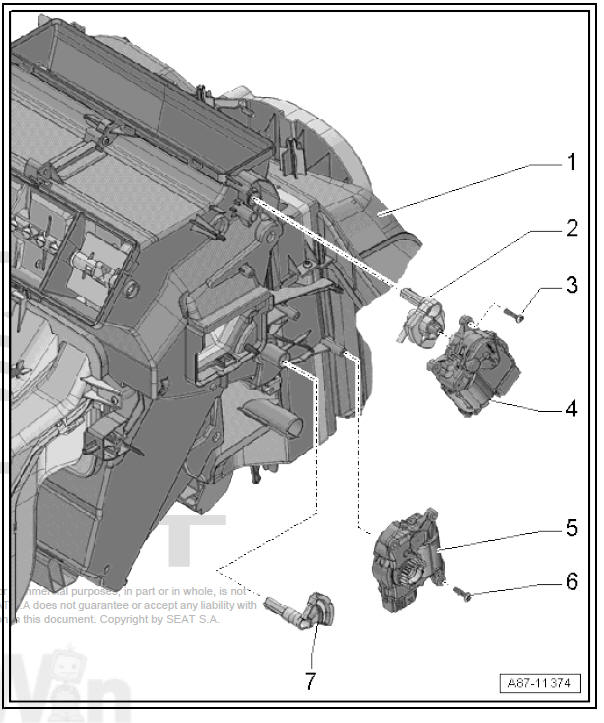
Heater and air conditioning unit, flap control left side: Assembly overview

- - Operating lever
- For actuation of defrost and air distributor flap
- - Air distribution flap servomotor
Heater and manually controlled air conditioner:
Air distribution flap servomotor - V428- with potentiometer for air distribution flap servomotor - G645-
- Removing and fitting
Automatically controlled air conditioner:
- Front air distribution flap servomotor - V426- with potentiometer for front air distribution flap servomotor - G642-
- Removing and fitting
- - Bolt.
- 2 off
- 1 Nm
- - Bolt.
- 3 off
- 1 Nm
- - Bolt.
- 2 off
- 1 Nm
- - Servomotor for temperature flap
Heater and manually controlled air conditioner:
- Temperature flap control motor - V68- with potentiometer for temperature flap control motor - G92-
- Removing and fitting
Automatically controlled air conditioner:
- Left temperature flap control motor - V158- with potentiometer for left temperature flap control motor - G220-
- Removing and fitting
- - Operating lever
- For warm air flap
- - Heater and air conditioning unit
- Many components of the heater and heater/air conditioning unit are identical
- Different versions
- The combined fitting of different makes of component is not permissible
- The following illustrations show the heater from "Valeo"
- Assembly overview
- - Defroster and air distribution flap actuator
- Removing and fitting
Heater and air conditioning unit, flap control right side: Assembly overview
- - Heater and air conditioning
unit
- Assembly overview
- - Operating lever
- For defrost flap
- - Bolt.
- 2 off
- 1 Nm
- - Defroster flap servomotor -
V107-
- With potentiometer for defroster flap servomotor - G135- .
- Only for automatically controlled air conditioner
- Removing and fitting
- - Right temperature flap servomotor
- V159-
- With potentiometer for right temperature flap servomotor - G221-
- Only for automatically controlled air conditioner
- Removing and fitting
- - Bolt.
- 2 off
- 1 Nm
- - Operating lever
- For warm air flap
Heater and air conditioning unit, heat exchanger, auxiliary air heater element: Assembly overview
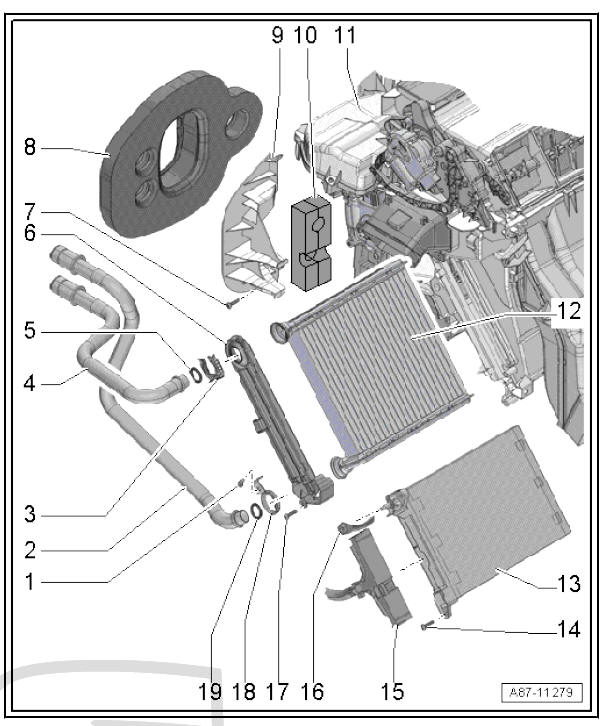
- - Bolt.
- 6 Nm
- - Coolant pipe for heat exchanger
- Removing and fitting
- - Staple
- Can also be replaced by a clamp in the course of service work
- - Coolant pipe for heat exchanger
- Removing and fitting
- - O ring
- Renewing.
- - Cover
- For heat exchanger
- - Bolt.
- 2 Nm
- - Foam spacer
- - Support plate
- For coolant pipes
- - Foam rubber
- For insulation
- Note the fitting position:
- - Heater and air conditioning
unit
- Removing and fitting
- Dismantling and assembling
- - Heat exchanger
- Removing and fitting
- - Heating element for additional heater - Z35-
- Removing and fitting
- - Bolt.
- 2 off
- 2 Nm
- - Electrical wire
- Removing and fitting
- - Negative wire
- Nut, 9 Nm
- - Bolt.
- 3 off
- 2 Nm
- - Screw-type clip
- - O-ring
- Replace

 Assembly overview - add-on parts of
heater and air conditioning unit and of air
intake box
Assembly overview - add-on parts of
heater and air conditioning unit and of air
intake box
Note
There are different designs and makes of heater and air conditioning
unit. The individual components of the various heaters
and air conditioning units are similar but not identical. The
...
See also:
Removing and installing window regulator
E107 in the passenger door
Special tools and workshop equipment required
Lever - U30800-
Note
The switch module may vary, depending on equipment. Installation
and removal of the switch module is identical and
o ...
