Seat Leon >> Removing and installing air conditioner compressor
Special tools and workshop equipment required
- Air conditioner service station
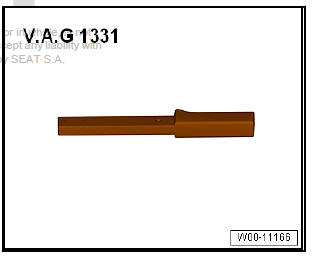
- Torque wrench - V.A.G 1331/- (5 - 50 Nm)
- Engine bung set - VAS 6122-

Note
- Flush the refrigerant circuit with refrigerant in the following cases:
- If dirt or other contamination is in the circuit.
- If during the evacuation of a leak-tight refrigerant circuit the vacuum is not maintained at the gauge (there is moisture in the refrigerant circuit and this generates vapour pressure).
- If the refrigerant circuit has remained open longer than necessary for assembly (e.g. after an accident).
- When pressure and temperature measurements in the refrigerant circuit indicate that there is moisture in the refrigerant circuit.
- There is doubt about the amount of refrigerant oil in the refrigerant circuit.
- The air conditioner compressor has to be exchanged because of internal damage (e.g. noisy or lack of power).
- If only the ancillary bracket is to be removed, the refrigerant lines on the air conditioner compressor need not be loosened: it is sufficient to secure the air conditioner compressor to the body with suitable material, e.g. welding wire.
Removal:
- Turn off the ignition and all electricity consumers.
Vehicles without access and start authorisation system
- Remove ignition key, if fitted.
Vehicles with access and start authorisation system
- Store ignition key outside the vehicle to prevent the ignition from being switched on unintentionally.
Continued for all vehicles
- Extract refrigerant.
- Observe instructions when working on refrigerant circuit.
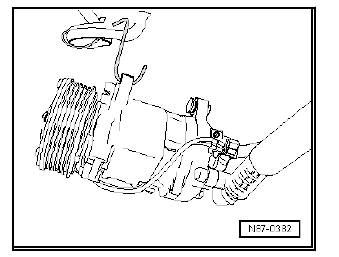
- Detach refrigerant lines from air conditioner compressor.
- Remove poly V-belt.
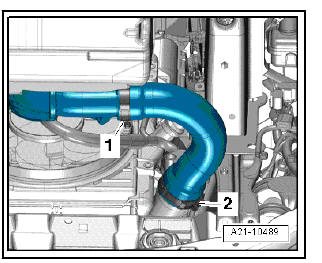
- Vehicles with diesel engine: Open the clamps -1- and -2-and disconnect air intake hose.
- Seal open lines and connections with clean plugs from the Engine sealing plug set - VAS 6122- .
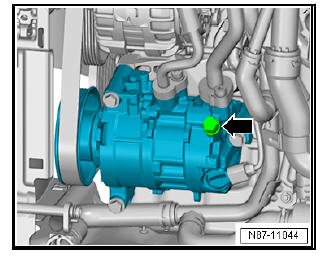
- Unplug the connector -2- at the air conditioner compressor regulating valve - N280- .
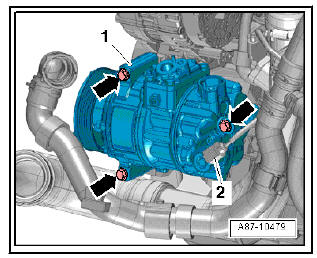
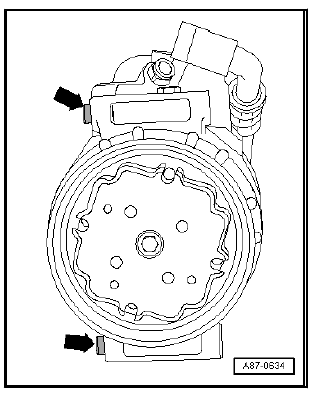
- Screw out the bolts -arrows- and remove the air conditioner compressor -1-.
Installing
Install in reverse order of removal; note the following.
- If a new compressor is fitted, the function "initial start-up of the air conditioning compressor" must be performed in the Guided Fault Finding.
- Thoroughly clean the contact surfaces at the air conditioner compressor and at the holder.
- Insert the dowel sleeves -arrows- in the air conditioner compressor.
| Caution There is a risk of air conditioner compressor damage.
|
- Refill with refrigerant and refrigerant oil.
Note
- The air conditioner compressor is driven permanently by the poly V-belt pulley (not fitted with a magnetic clutch).
- If an air conditioner compressor seizes, the overload protection separates from the air conditioner compressor shaft. In general, the blocking is recognisable at the indentations on the poly V-belt pulley. Abraded rubber in the poly V-belt pulley area is also a significant sign of such blocking.
- The air conditioner compressor has an internal oil circuit to ensure that the air conditioner compressor is not damaged when the refrigerant circuit is empty. This means that about 40 to 50 cc refrigerant oil remain in the air conditioner compressor.
- Only start the engine after the refrigerant circuit has been filled.
- Do not start the engine unless the refrigerant circuit has been properly assembled. If, for example, the refrigerant lines are not connected to the air conditioner compressor when the engine is running, the compressor might heat up (internal heat generation) so much that this can lead to irreparable damage to the compressor.
- Air conditioning system compressor regulating valve - N280- is not activated when the refrigerant circuit is empty and the air conditioner compressor idles with the engine.
- Should it be necessary to start the engine with an empty refrigerant circuit, please observe the following:
- The refrigerant circuit must be fully assembled.
- There must be at least a quarter of the amount of refrigerant oil specified for this refrigerant circuit in the air conditioner compressor.
- The engine speed must not exceed 2000 rpm.
- Run engine only as long as absolutely necessary, max. 10 minutes.
Checking high-pressure safety valve on air conditioner compressor
Checking
- Function: protects refrigerant circuit against excessive pressures.
- Observe instructions when working on refrigerant circuit
| WARNING There is a freezing hazard. The high-pressure safety valve releases refrigerant when the engine is running and the pressure in the refrigerant circuit is too high. Switch off the engine. |
High-pressure safety valve on Denso air conditioner compressor
- The pressure relief valve -arrow- is triggered if oil sticks around the valve for refrigerant.
- In this case, hand over vehicle to a suitable workshop.
Note On air conditioner compressors from other manufacturers the high-pressure safety valve is located at a similar position.
 Detaching and attaching refrigerant
lines at air conditioner compressor
Detaching and attaching refrigerant
lines at air conditioner compressor
Special tools and workshop equipment required
Air conditioner service station
Socket and key - 3320/1-
Engine bung set - VAS 6122-
Removal:
Turn off the ignition and all electricity c ...
 Removing and installing belt pulley
Pulley: Removing and installing, air conditioner
compressor, Denso
Note
The pulley is sensitive to impact and should therefore be treated
with extreme care.
If the pulley overload safeguard ...
See also:
Seat belts protect
Passengers not wearing seat belts risk severe injuries in the
event of an accident.
Fig. 10 Driver protected
by the properly worn seat
belt during a sudden
braking manoeuvre.
Properly worn sea ...
