Seat Leon >> Renew the spoiler mounting
Special tools and workshop equipment required
- Electric cutter - SAT 1561A-
- Cable holder knob - VAG 1351/1-
- Knife 181 - VAS 1561/18-
- Adhesive strip remover - VAS 6349-
Removing
Note The spoiler mounting cannot be removed without damaging it.
- Remove the spoiler
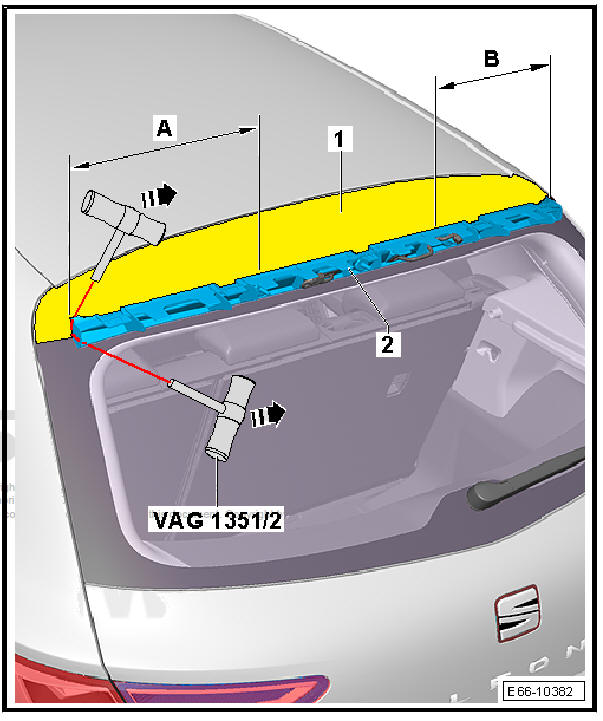
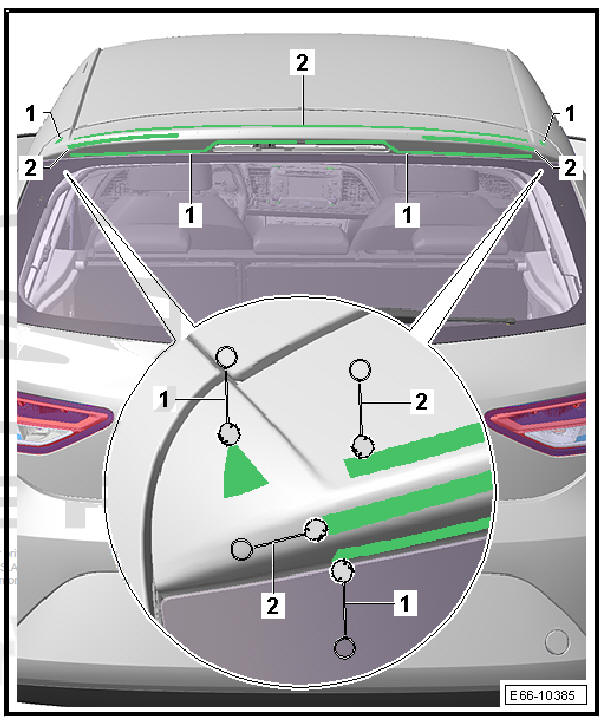
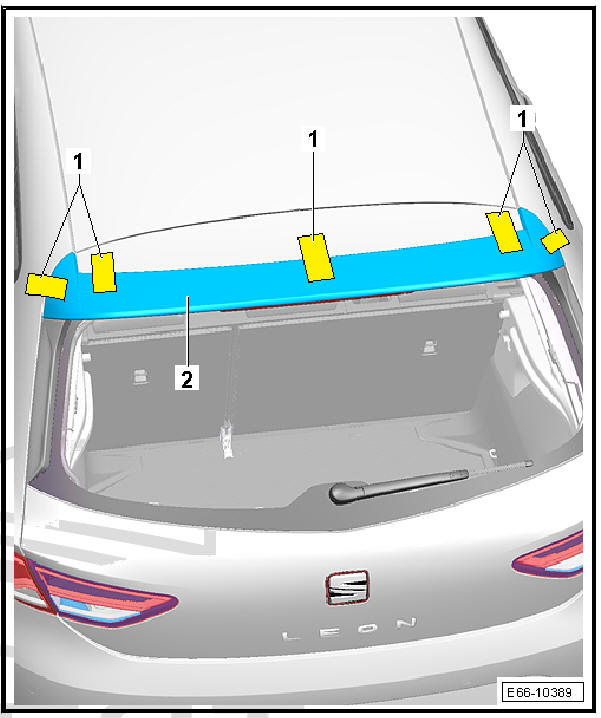
- Protect the upper sector of the rear lid with masking tape-1-.
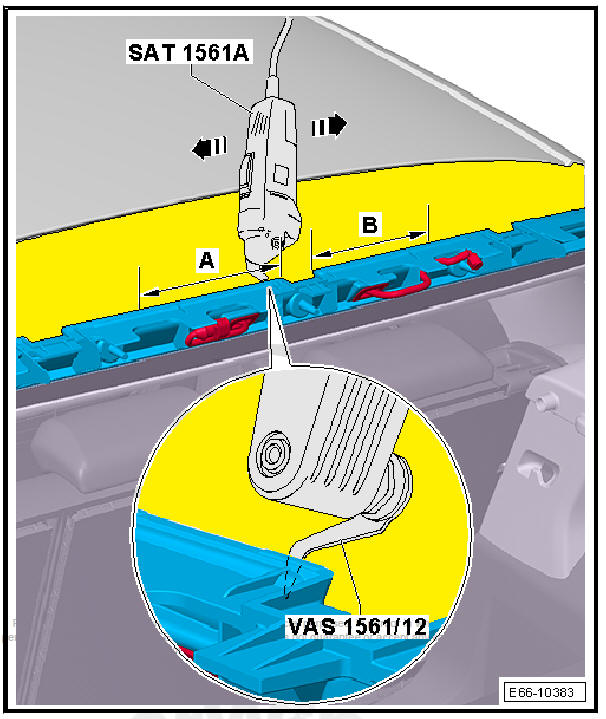
- With the Electric knife - SAT 1561A- and with knife 181 - VAS 1561/18- cut the adhesive sealant PUR -in section A- and -section B- in -the direction of the arrow-. Work carefully to avoid damaging the rear lid.
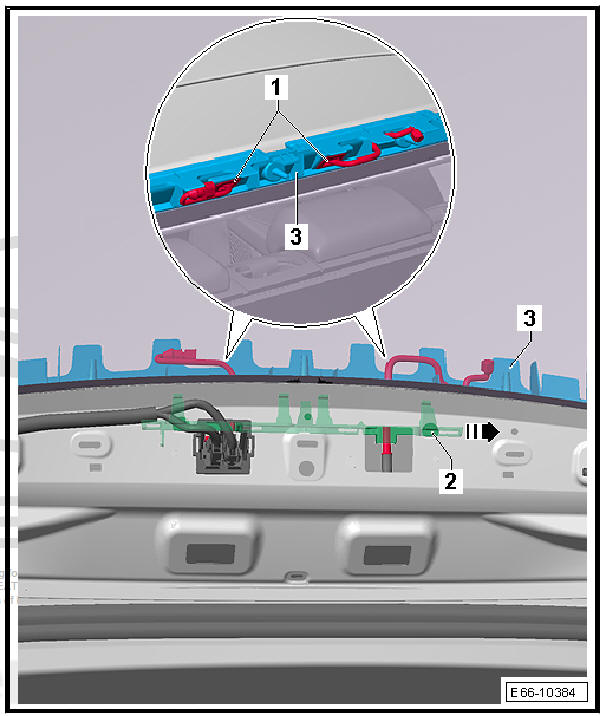
- Insert it on the inner side of the wiring leadthroughs -1-.
- Open the tailgate.
- Remove upper tailgate trim
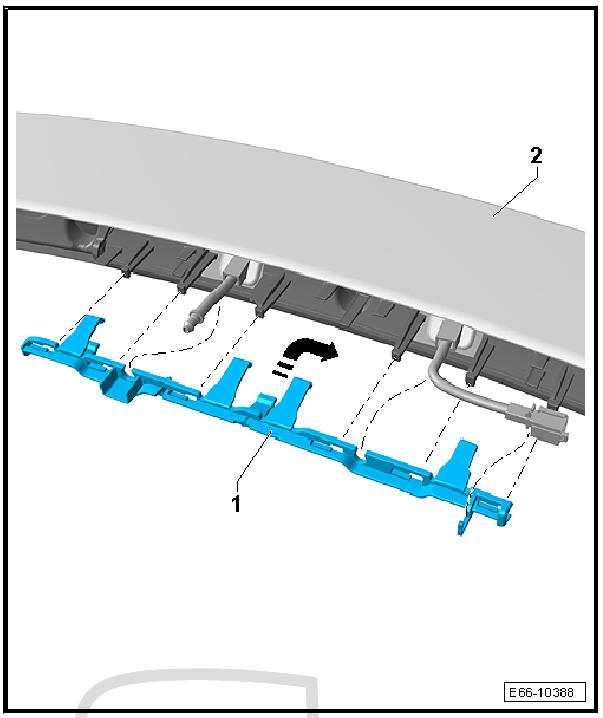
- Free the guide -2- in -the direction of the arrow-.
- Detach bracket -3-.
- Remove the guide -2-.
fitting
Preparation of the rear lid panel for mounting the spoiler
- Remove possible residual adhesive on the rear lid with the tool - VAS 6349- .
- Clean the area of the rear lid where the spoiler is to be affixed with isopropyl alcohol or heptanol.
- Subsequently treat the spoiler mounting zone with silicone cleaner.
- Allow to dry well.
- Shortly before bonding the spoiler, cut the beads of adhesive sealant (PUR) bonded to the rear lid back to a height of just 1 mm.
Note The remaining material is required as a base for the new adhesive sealing material (PUR).
- Apply the glass activator - D 181 802 M1- with the applicator -1- evenly and at a stroke to the previously cut-back old bead of adhesive, as shown in the illustration.
Note Should the rear window be new, apply primer (glass/paint) - D 009 200 02- with the applicator -1- to the rear window as shown in the illustration.
Flashing-off time, approx. 10 minutes.
| WARNING Apply zinc spray - Electronic parts catalogue to the sheet metal parts where the paint has been damaged. |
Prepare the spoiler for installation.
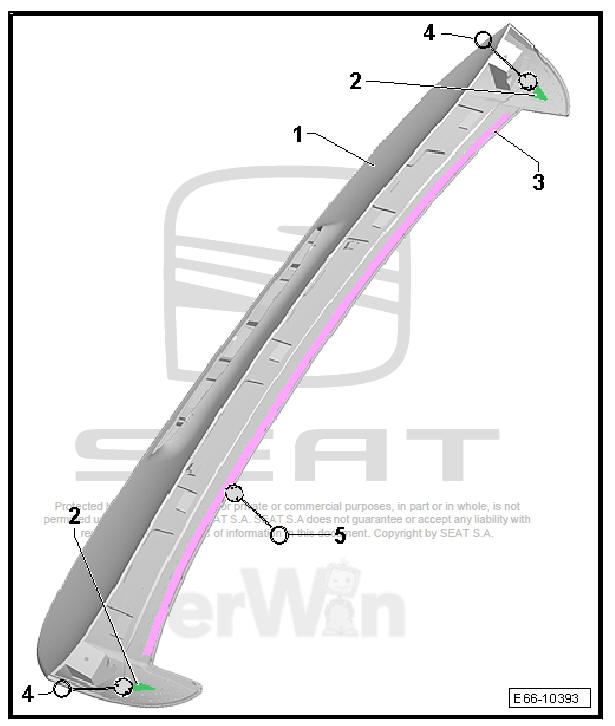
- Remove from the spoiler -1- all residual adhesive -2- and -3-.
- Clean the area of the rear lid where the spoiler is to be affixed with isopropyl alcohol or heptanol.
- Subsequently treat the spoiler mounting zone with silicone cleaner.
- Allow to dry well.
- Apply to zone -2- an even coat of primer (screen/lacquer) - D 009 200 02- with the Applicator - D 009 500 25- .
- Apply to the zone -3- an even coating of Primer - D .
181.650.A1- ; use the applicator - D 009 500 25- .
Flashing-off time, approx. 10 minutes.
- Affix new double sided tape - D .438.515.A3- -2- onto the spoiler surface.
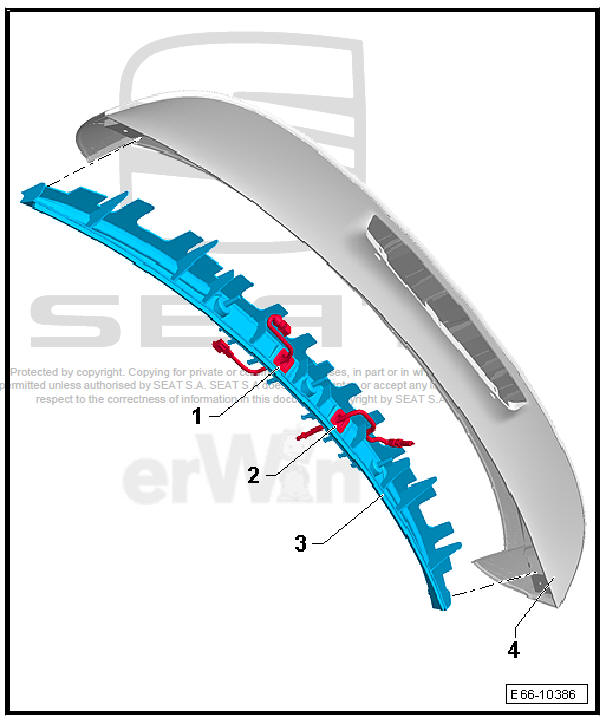
- Mount the interconnection -1- and the rear window wiper jet -2- to the spoiler mounting.
- Secure the new mounting -3- to the spoiler trim -4-; you will hear it latch into place.
- Insert the guide -1- into the spoiler mounting and push it in -the direction of the arrow- into the first position.
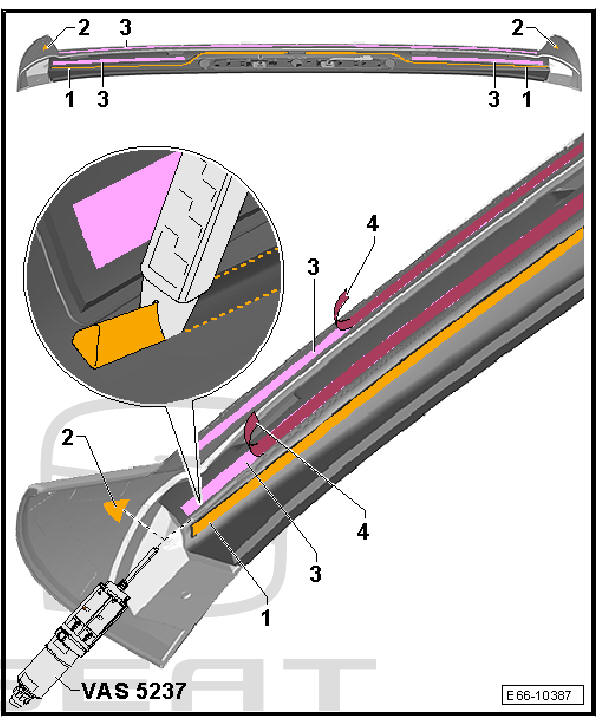
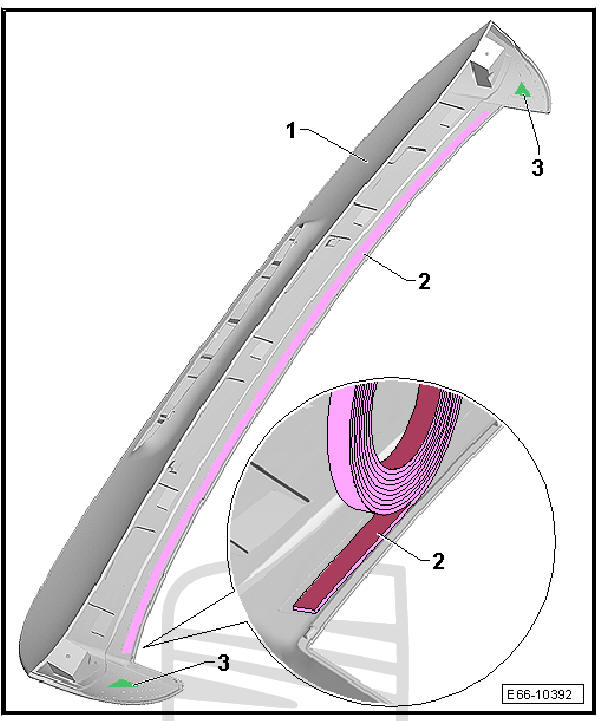
- Use the gun - VAS 5237 - to apply a bead of two component adhesive - D 004 660 M2- to the designated zones -1- and -2-.
- Locate the spoiler on the body and connect the interconnection of the third brake light and water pipe for the rear window wiper.
- Locate the spoiler in its final position; this position is dictated when the third brake light is clipped into the panel.
- Remove the protective films -4- from the adhesive tapes -3-.
- Open the tailgate.
- Mechanically secure the spoiler in the cavity of the third brake light by moving the inner guide.
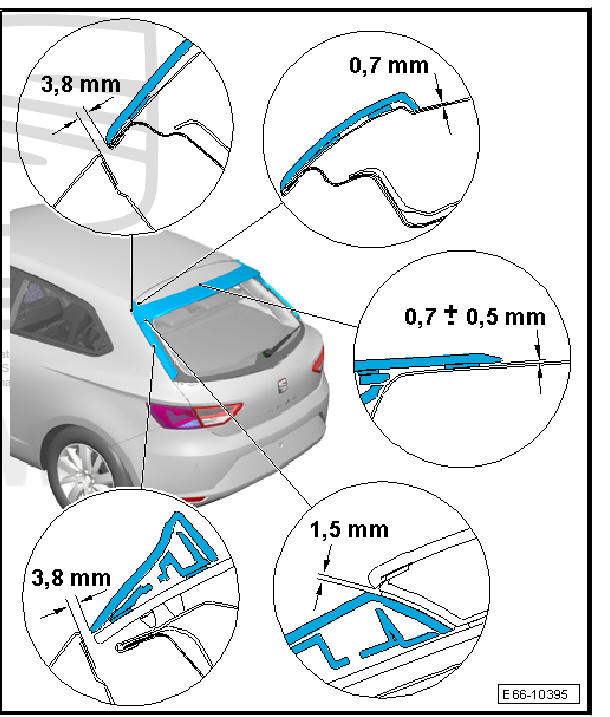
- Flush adjustment at the panel gaps:
Leon five-door
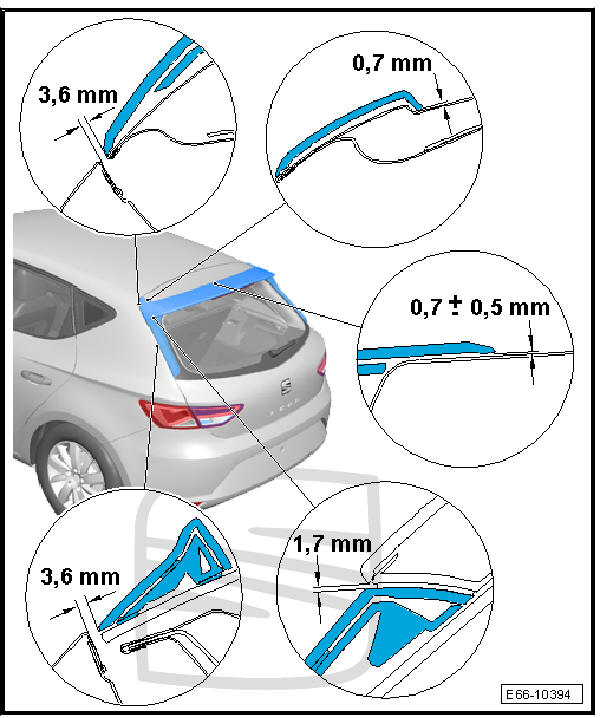
Leon three-door
- Push against the centre section with the pressure tool - T20098- and against the sides of the bonding zones to ensure correct bonding.
- Cut several lengths of adhesive tape and affix them as shown in the illustration.
- Install upper tailgate trim
- Install additional brake light
- Install the protective side strip
 Removing and installing spoiler
Special tools and workshop equipment required
Wedge - T10039/1-
Release lever - U 30800-
Pull handle - VAG 1351/1- (x2)
Dual component window sealant - VAS 5237-
Ad ...

See also:
Warnings on handling the battery
WARNING
Always be aware of the danger of injury and chemical burns as well as the
risk of accident or fire when working on the battery and the electrical
system:
• Wear eye protection. Protect ...
