Seat Leon >> Installation instructions for bonded windows
Features of the adhesive bead and adhesive sealing material (PUR)
- Bead of glue
- Primer
- Plate
- Distance -a- = 7 mm
- Dimension -b- = 11 mm
- Dimension -c- = the area and the process for application of the
adhesive sealant material (PUR) is different depending on the
window concerned. Proceed according to the following instructions:
- Proceed with an undamaged windscreen according to the instructions
- Where other undamaged windows are concerned (excluding the windscreen), apply the paste to the previously cut-back adhesive bead. Follow the instructions accordingly
- With a new window, apply the material on the primer layer.
Follow the instructions accordingly
General requirements for applying the adhesive bead
Note In order to ensure for the homogeneous properties of the dual component mixture, apply a bead -a- with 10 cm to a clean surface and dispose of the first piece of the product.
- The sleeve -2- must rest flush.
- The -Arrow- indicates the direction of travel.
- The diameter of the adhesive bead -1- will depend on the width of the hole in the applicator and the speed of application.
| Caution Risk of water penetrating via the panes bonded to the bodywork
|
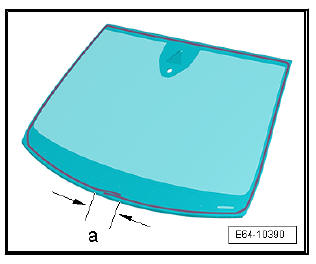
For windscreens only
- -a-= about 50 mm, adhesive bead overlapping zone.
Rear window only
- -a-= about 50 mm, adhesive bead overlapping zone.

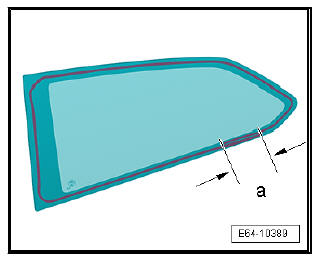
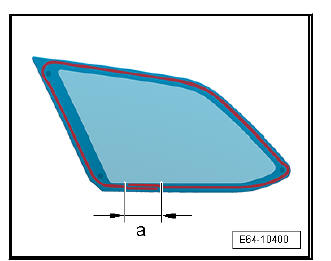
Only for the rear lateral window, 3-door model
- -a-= about 50 mm, adhesive bead overlapping zone.
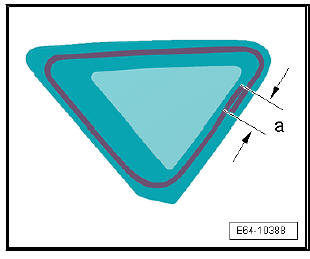
Only for the rear windows of the model ST
- -a-= about 50 mm, adhesive bead overlapping zone.
Only for the rear lateral window, 5-door model
- -a-= about 50 mm, adhesive bead overlapping zone.
Instructions for applying the adhesive sealing material (PUR).
Note
- If the window is not damaged, apply the material on the old adhesive bead previously cut-back. Follow the instructions accordingly
- With a new window, apply the material on the primer layer.
- In the intended area -1- of the window, using the cartridge gun - SAT 5350- or the double cartridge gun - VAS 5237- , apply an adhesive bead of the dual component adhesive - D 004 660 M2- .
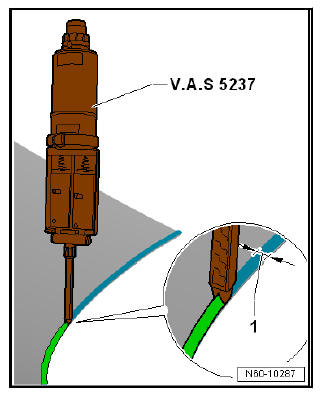
Note Always hold the gun at a right angles to the window.
| WARNING The glass must be fitted before 10 minutes elapse, as the adhesive properties of the adhesive sealing material (PUR) are reduced after that time. Do not apply a very thick bead of glue nor press the glass hard against the bodywork flange, as the excess glue would be seen through the clearance, as there is no sealing lip. |
For windscreens only
- With the two suction holders - VAG 1344- , place the window on the body flange and press on evenly in the middle until the spacers are resting.
- Check the clearances on the windscreen between the roof and upper struts A.
- While hardening, fix the windscreen with adhesive tape.
After the curing time of the adhesive then the installation of the following elements takes place:
- Fit the grille below the windscreen.
- Install windscreen wiper arm.
- Fit the drip rail moulding from strut A.
- Install interior mirror .
Note Paste any stickers needed on the window (e.g. for the airbag).
Continuation only for vehicles with front camera for driver assistance systems
- Calibration of front camera for die assistance systems.
Rear window only
- With the two suction holders - VAG 1344- , place the window on the body flange and press on evenly in the middle until the spacers are resting.
- Check the window glass clearances.
- During the hardening time, fix the windscreen with adhesive tape.
After the curing time of the adhesive then the installation of the following elements takes place:
- If necessary, using a plastic spatula, remove the dried adhesive residues that may come into contact with the components of the heatable rear window (cutting wires, clamps, etc.).
- Fit the connectors for the heated windscreen.
- Install rear window wiper motor .
- Install rear window wiper arm.
- Install tailgate trim .
Only for the rear lateral window, 5-door model
- Using the suction cups - VAG 1344- , first position the fixing blocks centred in their openings or mounts and then place the window on the body flange.
Note The surrounding profile of the window must rest equally on the body.
After the curing time of the adhesive then the installation of the following elements takes place:
- Install upper C-pillar cover.
Only for the rear lateral window, 3-door model
- Using the suction cups - VAG 1344- , first position the fixing blocks centred in their openings or mounts and then place the window on the body flange.
Note The surrounding profile of the window must rest equally on the body.
After the curing time of the adhesive then the installation of the following elements takes place:
- Install upper B-pillar cover.
- Install upper C-pillar cover.
- Remove side trim.
 Minimum curing periods for bonded windows
Drying or setting time
WARNINGSpecial standards must be adhered to when
replacing bonded
windows. One of these standards is, for example, that a freshly
bonded windscreen must comply ...
 Preparing undamaged windows for installation
Preparing undamaged windows (windscreens)
for installation
Note
Depending on the production condition of the vehicle the arrangement
of the beads of adhesive sealant on the sides of
the wind ...
See also:
Side window, 3 door model: removal and installation
Electric cutter - SAT
1561A-
Knife set - SAT 1561/20-
Separator for windows -
VAS 6452- 18)
Release lever - U 30800-
Measuring tool - U 40807-
Window suction pads -
VAG 1344-
S ...
